Insignia NS-SB314 User Manual (English) - Page 11
Mounting your soundbar on a wall optional - no sound
 |
View all Insignia NS-SB314 manuals
Add to My Manuals
Save this manual to your list of manuals |
Page 11 highlights
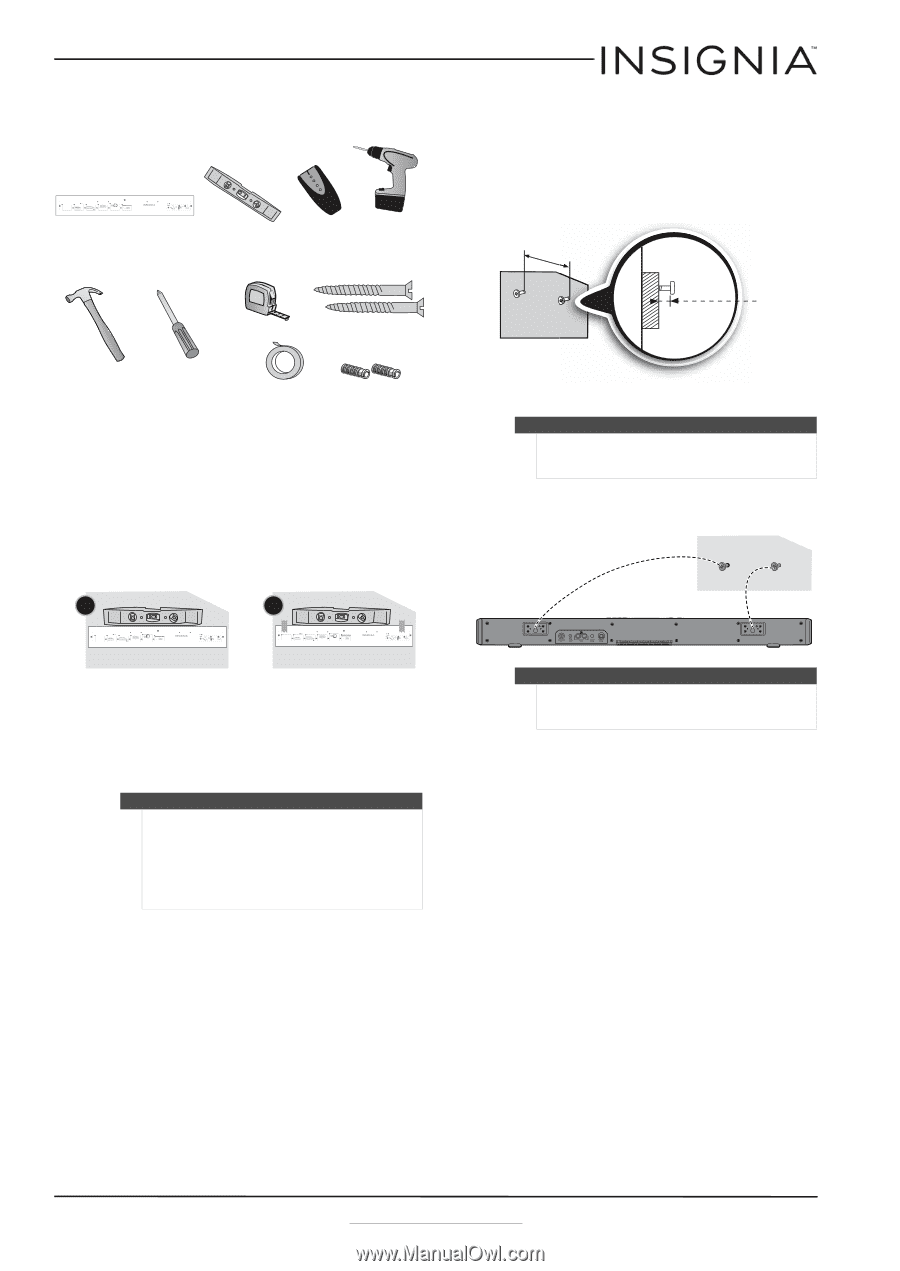
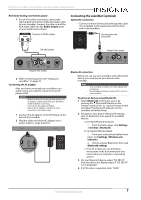
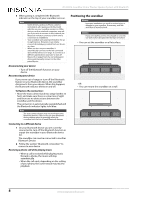
NS-SB314 Soundbar Home Theater Speaker System with Bluetooth Mounting your soundbar on a wall (optional) You will need: Select a location close to your TV and directly in front of the viewing/listening position. For best sound quality, choose a location where sound waves are not blocked by furniture or other obstacles. Drill a hole here Position the wall mount template on the wall where you want to mount your soundbar, level the template, then tape it to the wall. Wall Note: Make sure that the template is level. Drill two holes in the wall where the template indicates, then remove the template. Wall LEVELING EDGE Wall Anchor If you are mounting on drywall or concrete, insert wall anchors (not included) into the holes and use a hammer to make sure that the anchors are flush against the wall. Hold a level to the Leveling Edge of this template LEVELING EDGE 20.43 inches (519 mm) Approx. 1/4 in (6.8 mm) Wall Secure two screws (not included) to the wall or wall anchors (if required). The screws must protrude from the wall by about 1/4". Use a #10 wood screw (or similar), 1 1/2" in length. The screw width must be about 3/16" and the screw head must be approximately 1/4" to 3/8". Soundbar Wall Align the speaker hanging brackets with the screws, then hang the soundbar on the screws. Wall mount template Position holes onto studs behind drywall or use anchors for mounting Warning: Improper installation can result in serious injury or damage to your soundbar. If necessary, seek the assistance of a professional. Drill a hole here Tools Needed Wall anchors (2) Screws (2) - #10 x 1 ½" wood screw (or similar) V1 14-0130 Wall mounting template Level Stud finder (optional for wood stud installation) Drill and drill bit Hammer Tape measure Screwdriver Tape Screws (2) - #10 x 1 ½" wood screw (or similar) Wall anchors (2) 1 Select a location close to your TV and directly in front of the viewing/listening position. For best sound quality, choose a location where sound waves are not blocked by furniture or other obstacles. 2 Position the supplied wall mount template to the wall where you want to mount the soundbar. Make sure the template is level (A), then tape the template to the wall (B). A Select a location close to your TV and directly in front of the viewing/listening position. For best sound quality, choose a location where sound waves are not blocked by furniture or other obstacles. Drill a hole here Position the wall mount template on the wall where you want to mount your soundbar, level the template, then tape it to the wall. Wall Drill two holes in the wall where the template indicates, then remove the template. Wall Note: Make sure that the template is level. LEVELING EDGE Wall Anchor If you are mounting on drywall or concrete, insert wall anchors (not included) into the holes and use a hammer to make sure that the anchors are flush against the wall. Hold a level to the Leveling Edge of this template LEVELING EDGE 20.43 inches (519 mm) Approx. 1/4 in (6.8 mm) Wall Secure two screws (not included) to the wall or wall anchors (if required). The screws must protrude from the wall by about 1/4". Use a #10 wood screw (or similar), 1 1/2" in length. The screw width must be about 3/16" and the screw head must be approximately 1/4" to 3/8". Soundbar Wall Align the speaker hanging brackets with the screws, then hang the soundbar on the screws. Wall mount template Position holes onto studs behind drywall or use anchors for mounting Warning: Improper installation can result in serious injury or damage to your soundbar. If necessary, seek the assistance of a professional. Drill a hole here Tools Needed Wall anchors (2) Screws (2) - #10 x 1 ½" wood screw (or similar) V1 14-0130 B Select a location close to your TV and directly in front of the viewing/listening position. For best sound quality, choose a location where sound waves are not blocked by furniture or other obstacles. Drill a hole here Position the wall mount template on the wall where you want to mount your soundbar, level the template, then tape it to the wall. Wall Drill two holes in the wall where the template indicates, then remove the template. Wall Note: Make sure that the template is level. LEVELING EDGE Wall Anchor If you are mounting on drywall or concrete, insert wall anchors (not included) into the holes and use a hammer to make sure that the anchors are flush against the wall. Hold a level to the Leveling Edge of this template LEVELING EDGE 20.43 inches (519 mm) Approx. 1/4 in (6.8 mm) Wall Secure two screws (not included) to the wall or wall anchors (if required). The screws must protrude from the wall by about 1/4". Use a #10 wood screw (or similar), 1 1/2" in length. The screw width must be about 3/16" and the screw head must be approximately 1/4" to 3/8". Soundbar Wall Align the speaker hanging brackets with the screws, then hang the soundbar on the screws. Wall mount template Position holes onto studs behind drywall or use anchors for mounting Warning: Improper installation can result in serious injury or damage to your soundbar. If necessary, seek the assistance of a professional. Drill a hole here Tools Needed Wall anchors (2) Screws (2) - #10 x 1 ½" wood screw (or similar) V1 14-0130 3 Drill two holes into the wall, where the template indicates, then remove the template. 4 Install wall anchors (not included) into the holes you drilled, using the instructions that came with your anchors. Notes • • If you have drilled into a stud, wall anchors are not required. If you cannot drill into wall studs and must drill into drywall, concrete, or another type of wall, wall anchors are required. See the instructions that came with your wall anchors to determine the drill bit size. 5 Secure two screws (not included) to the wall or wall anchors (if required). The screws must protrude from the wall by about 1/4". Use a #10 wood screw (or similar), 1 1/2" in length. The screw width must be about 3/16" and the screw head must be approximately 1/4" to 3/8". 20.43 inches (519 mm) Wall Approx. 1/4 in (6.8 mm) Caution Make sure that you use wall anchors that are suitable to your wall type if you need to mount the soundbar to drywall, concrete, or similar wall type. 6 Align the speaker hanging brackets with the screws, then hang the soundbar on the screws. Warning Improper installation can result in serious injury or damage to your soundbar. If necessary, seek the assistance of a professional. www.insigniaproducts.com 9
-
 1
1 -
2
-
3
-
4
-
5
-
 6
6 -
 7
7 -
 8
8 -
 9
9 -
 10
10 -
 11
11 -
 12
12 -
 13
13 -
 14
14 -
 15
15 -
 16
16
 |
 |