Intel D945GRW Product Guide - Page 45
Connecting to the Flexible Audio System
 |
UPC - 735858180474
View all Intel D945GRW manuals
Add to My Manuals
Save this manual to your list of manuals |
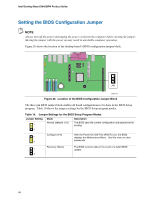
Page 45 highlights
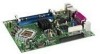
Installing and Replacing Desktop Board Components Connecting to the Flexible Audio System After installing the Realtek audio driver from the Intel Express Installer driver CD-ROM, the multichannel audio feature can be enabled. Figure 23 shows the back panel audio connectors. The default connector assignments are shown in the table. If using two speakers, connect them to (B). The connectors are retaskable using the audio driver interface. Item A B C D E F Description Line in (retaskable as output) Front left/right out Mic in (retaskable as output) Side surround left/right out Rear left/right out Center/Low Frequency Effects (LFE) out Figure 23. Back Panel Audio Connectors 45
-
 1
1 -
2
-
3
-
4
-
5
-
6
-
7
-
8
-
9
-
10
-
11
-
12
-
13
-
14
-
15
-
16
-
17
-
18
-
19
-
20
-
21
-
22
-
23
-
24
-
25
-
26
-
27
-
28
-
29
-
30
-
31
-
32
-
33
-
34
-
35
-
36
-
37
-
38
-
39
-
 40
40 -
 41
41 -
 42
42 -
 43
43 -
 44
44 -
 45
45 -
 46
46 -
 47
47 -
 48
48 -
 49
49 -
 50
50 -
51
-
52
-
53
-
54
-
55
-
56
-
57
-
58
-
59
-
60
-
61
-
62
-
63
-
64
-
65
-
66
-
67
-
68
 |
 |

Installing and Replacing Desktop Board Components
45
Connecting to the Flexible Audio System
After installing the Realtek audio driver from the Intel Express Installer driver CD-ROM, the multi-
channel audio feature can be enabled.
Figure 23 shows the back panel audio connectors.
The
default connector assignments are shown in the table.
If using two speakers, connect them to (B).
The connectors are retaskable using the audio driver interface.
Item
Description
A
Line in (retaskable as output)
B
Front left/right out
C
Mic in (retaskable as output)
D
Side surround left/right out
E
Rear left/right out
F
Center/Low Frequency Effects (LFE) out
Figure 23.
Back Panel Audio Connectors