Intel DH61BF Integration Guide - Page 6
Install, Express, Graphics, Remove
 |
View all Intel DH61BF manuals
Add to My Manuals
Save this manual to your list of manuals |
Page 6 highlights
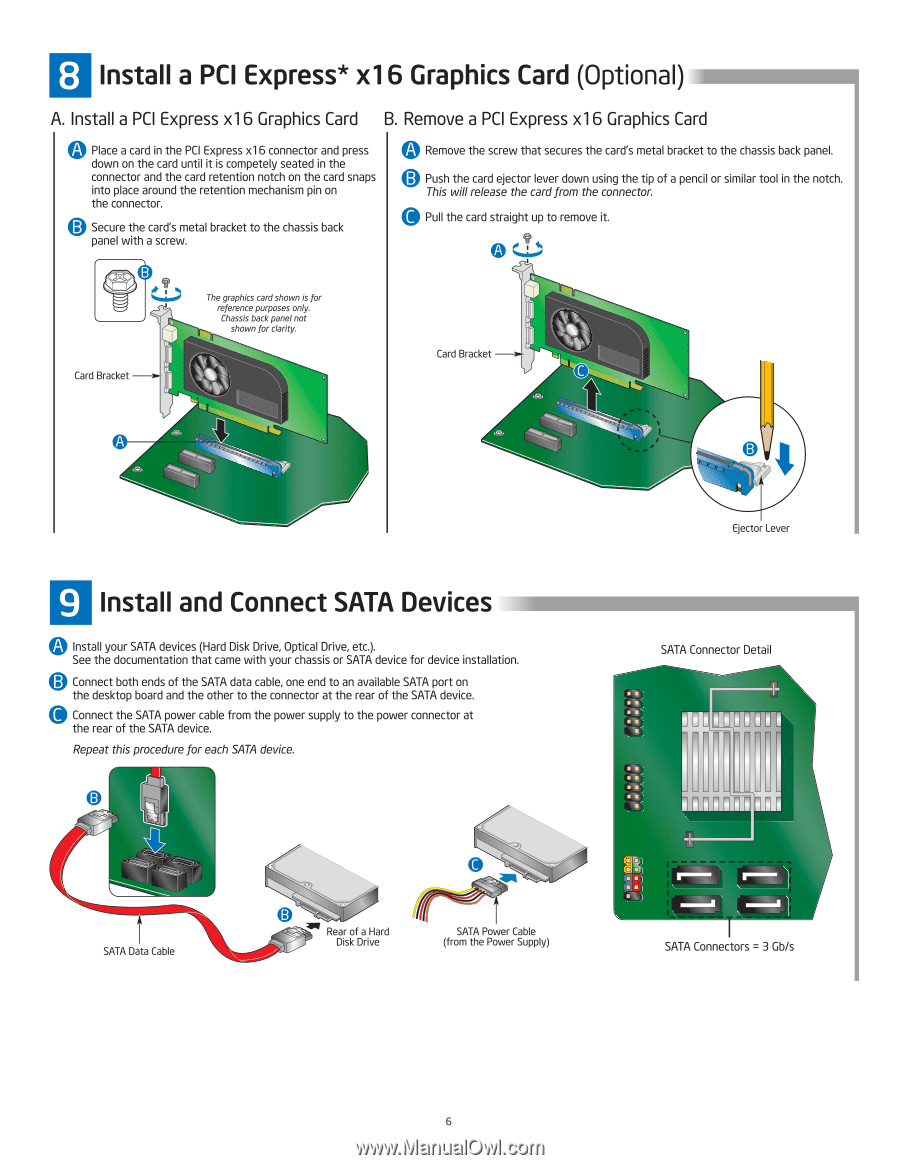
8 Install a PCI Express* x16 Graphics Card (Optional) A. Install a PCI Express x16 Graphics Card B. Remove a PCI Express x16 Graphics Card O Place a card in the PCI Express xl 6 connector and press down on the card until it is competely seated in the connector and the card retention notch on the card snaps into place around the retention mechanism pin on the connector. Secure the card's metal bracket to the chassis back panel with a screw. 0 Remove the screw that secures the card's metal bracket to the chassis back panel. Push the card ejector lever down using the tip of a pencil or similar tool in the notch. This will release the cardfrom the connector. e Pull the card straight up to remove it. 0 e 9 The graphics card shown is for reference purposes only. Chassis back panel not shownfor clarity. Card Bracket Card Bracket 4 9 Install and Connect SATA Devices 0 Install your SATA devices (Hard Disk Drive, Optical Drive, etc.). See the documentation that came with your chassis or SATA device for device installation. Connect both ends of the SATA data cable, one end to an available SATA port on the desktop board and the other to the connector at the rear of the SATA device. @ Connect the SATA power cable from the power supply to the power connector at the rear of the SATA device. Repeat this procedure for each SATA device. 7kortio SATA Data Cable Rear of a Hard Disk Drive SATA Power Cable (from the Power Supply) Ejector Lever SATA Connector Detail • `, • ` I ., I 8B 88 SATA Connectors = 3 Gb/s 6
-
 1
1 -
 2
2 -
 3
3 -
 4
4 -
 5
5 -
 6
6 -
 7
7 -
 8
8 -
 9
9 -
 10
10
 |
 |