Intel SRCS28X User Manual - Page 17
Battery Backup Unit BBU Installation
 |
UPC - 735858171625
View all Intel SRCS28X manuals
Add to My Manuals
Save this manual to your list of manuals |
Page 17 highlights
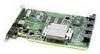
Figure 2. Battery Backup Unit (BBU) Installation B Hardware Installation A C 3. Power down the system. Turn off the computer and physically remove the power cord from the back of the power supply. Remove the cover from the computer chassis. Disconnect the system from any networks. 4. Configure the jumpers on the Intel® Raid Controller SRCS28X. Configure the jumper settings on the Intel® Raid Controller SRCS28X using the jumper definitions and locations provided in Chapter 4, "Intel® Raid Controller SRCS28X Characteristics." 5. Carefully insert the Intel® Raid Controller SRCS28X. Align the Intel® Raid Controller SRCS28X to a PCI-X slot. Press down gently but firmly to properly seat the Intel® Raid Controller SRCS28X in the slot. Figure 3 shows how to insert the Intel® Raid Controller SRCS28X in a slot. Caution: Do not apply pressure to the battery backup unit when installing the board. Intel® Raid Controller SRCS28X User Manual 17
-
 1
1 -
2
-
3
-
4
-
5
-
6
-
7
-
8
-
9
-
10
-
11
-
 12
12 -
 13
13 -
 14
14 -
 15
15 -
 16
16 -
 17
17 -
 18
18 -
 19
19 -
 20
20 -
 21
21 -
 22
22 -
23
-
24
-
25
-
26
 |
 |
