Intel SRCSASPH16I Hardware User Guide - Page 17
Installation
 |
UPC - 735858201339
View all Intel SRCSASPH16I manuals
Add to My Manuals
Save this manual to your list of manuals |
Page 17 highlights
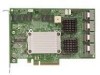
Installation 1. Power off the computer and all drives, enclosures, and system components. Remove the power cord from the computer. 2. Remove the chassis cover and access the PCI Express add-in card slots. See your server chassis documentation for instructions. 3. Align the controller's connector with a x8 or x16 PCI Express* slot on the server board. 4. Press down gently but firmly to ensure that the card is properly seated in the slot, as shown in Figure 1. Secure the bracket to the computer chassis. Bracket Screw PHreerses PHreerses Edge of Main Board AF002644 Figure 1. Inserting the Intel® RAID Controller SRCSASPH16I into a PCI Express* Slot 5. Connect the provided internal cables into the adapter using the 4-port combined end. Make sure the controller and cables are properly attached. Intel® RAID Controller SRCSASPH16I Hardware Guide 8
-
 1
1 -
2
-
3
-
4
-
5
-
6
-
7
-
8
-
9
-
10
-
11
-
 12
12 -
 13
13 -
 14
14 -
 15
15 -
 16
16 -
 17
17 -
 18
18 -
 19
19 -
 20
20 -
 21
21 -
 22
22 -
23
-
24
-
25
-
26
-
27
-
28
 |
 |
