Intel WPC2011BWW Quick Installation Guide - Page 14
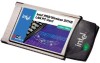
Step 5: Install Intel® PRO/Wireless 2011B LAN, Software
 |
UPC - 735858149402
View all Intel WPC2011BWW manuals
Add to My Manuals
Save this manual to your list of manuals |
Page 14 highlights
Installation Steps vary from one Windows CE device to another, but you are prompted for the same information. For a list of supported Windows CE devices, refer to the Intel support web site. 5. Enter the Network Name (SSID) in the Easy Setup program on the Windows CE device. 6. Click Advanced to set up encryption keys or other parameters. When finished, click OK. 7. When prompted to reset the Windows CE device, click OK. 8. The Windows CE device restarts. If not already done, insert the PC Card. 9. You are prompted to specify information needed to connect to the LAN. If you select the Specify an IP Address option, you are prompted for additional information. Follow the wizard instructions. 10. From the Start menu, select Programs, Intel® PRO Wireless LAN, and then WLANmon. The WLANmon icon is displayed as green in the system tray indicates a connection. To verify a connection, click this icon. Step 5: Install Intel® PRO/Wireless 2011B LAN Software Before You Start Launch the Intel® PRO/Wireless 2011B LAN software from the CD. When you insert the CD in the CD-ROM drive, a screen is displayed. Make sure that you have the CD. Instructions 1. If the CD is in the CD-ROM drive, re-insert the CD into the CD-ROM. Otherwise, insert the CD in the CD-ROM. 2. Click Install Software V3.0 in the Intel® PRO/Wireless 2011B LAN Software window. 3. Follow the instructions on the wizard screens. 4. If you are not running Windows 95, start Intel® PROSet II by double-clicking on the Control Panel icon or the icon displayed in the system tray. 10 Intel® PRO/Wireless 2011B LAN Adapter Quick Installation Guide
-
 1
1 -
2
-
3
-
4
-
5
-
6
-
7
-
8
-
 9
9 -
 10
10 -
 11
11 -
 12
12 -
 13
13 -
 14
14 -
 15
15 -
 16
16
 |
 |
