Intermec PB3 PB2 Mobile Printer User's Guide - Page 17
Battery Safety Information, When the Status LED turns green, the battery is charged and ready
 |
View all Intermec PB3 manuals
Add to My Manuals
Save this manual to your list of manuals |
Page 17 highlights
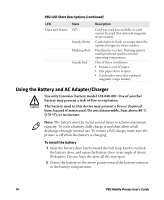
2 Connect the adapter to AC power. The Status LEDs turn green, indicating that the charger is ready to use. Status LEDs 3 With the contacts on the bottom and the arrow pointing toward the LEDs, place a battery into one of the bays. 4 Slide the battery towards the LEDs. The battery snaps into place. If the battery is not charged, the Status LED for that bay turns red. When the Status LED turns green, the battery is charged and ready to use. Battery Safety Information Follow these tips for maintaining the PB2 battery: • Be sure to fully charge the battery before long printing sessions, such as printing receipts with many bar codes and graphics. PB2 Mobile Printer User's Guide 17
-
 1
1 -
2
-
3
-
4
-
5
-
6
-
7
-
8
-
9
-
10
-
11
-
 12
12 -
 13
13 -
 14
14 -
 15
15 -
 16
16 -
 17
17 -
 18
18 -
 19
19 -
 20
20 -
 21
21 -
 22
22 -
23
-
24
-
25
-
26
-
27
-
28
-
29
-
30
-
31
-
32
-
33
-
34
-
35
-
36
-
37
-
38
 |
 |

PB2 Mobile Printer User’s Guide
17
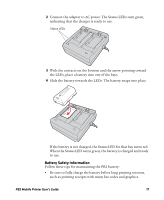
2
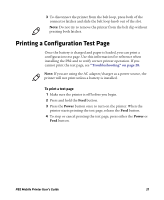
Connect the adapter to AC power. The Status LEDs turn green,
indicating that the charger is ready to use.
3
With the contacts on the bottom and the arrow pointing toward
the LEDs, place a battery into one of the bays.
4
Slide the battery towards the LEDs. The battery snaps into place.
If the battery is not charged, the Status LED for that bay turns red.
When the Status LED turns green, the battery is charged and ready
to use.
Battery Safety Information
Follow these tips for maintaining the PB2 battery:
•
Be sure to fully charge the battery before long printing sessions,
such as printing receipts with many bar codes and graphics.
Status LEDs