JET Tools 708599 User Manual - Page 14
Workstop Assembly, Abrasive Belt
 |
View all JET Tools 708599 manuals
Add to My Manuals
Save this manual to your list of manuals |
Page 14 highlights
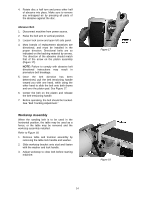
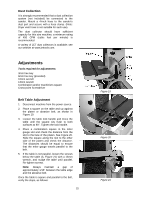
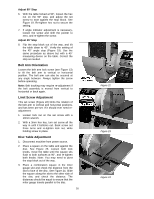
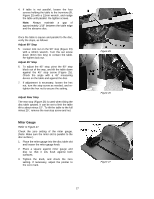
4. Rotate disc a half turn and press other half of abrasive into place. Make sure to remove any entrapped air by pressing all parts of the abrasive against the disc. Abrasive Belt 1. Disconnect machine from power source. 2. Raise the belt arm to vertical position. 3. Loosen lock screw and open left side panel. 4. Most brands of replacement abrasives are directional, and must be installed in the proper direction. Directional belts are so indicated on the backing material by arrows. The direction of the abrasive should match that of the arrow on the platen assembly (Figure 17). NOTE: Failure to comply with abrasive belt directional instructions may result in premature belt breakage. 5. Once the belt direction has been determined, pull the belt tensioning handle toward you with one hand, while using the other hand to slide the belt onto both drums and over the platen pad. See Figure 17. 6. Center the belt on the platen and release the belt tensioning handle. 7. Before operating, the belt should be tracked. See "Belt Tracking Adjustment." Workstop Assembly When the sanding belt is to be used in the horizontal position, the table may be used as a fence; or the table may be removed and the workstop assembly installed. Refer to Figure 18. 1. Remove table and trunnion assembly by removing the table lock handle and washer. 2. Slide workstop bracket onto stud and fasten with the washer and lock handle. 3. Adjust workstop to clear belt before starting machine. Figure 17 Figure 18 14
-
 1
1 -
2
-
3
-
4
-
5
-
6
-
7
-
8
-
 9
9 -
 10
10 -
 11
11 -
 12
12 -
 13
13 -
 14
14 -
 15
15 -
 16
16 -
 17
17 -
 18
18 -
 19
19 -
20
-
21
-
22
-
23
-
24
-
25
-
26
-
27
-
28
 |
 |
