JET Tools 708599 User Manual - Page 15
Dust Collection, Adjustments, Belt Table Adjustment
 |
View all JET Tools 708599 manuals
Add to My Manuals
Save this manual to your list of manuals |
Page 15 highlights
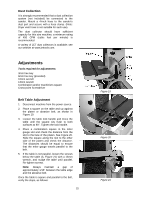
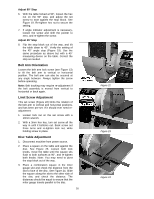
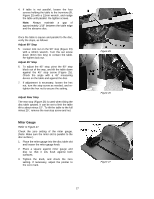
Dust Collection It is strongly recommended that a dust collection system (not included) be connected to the sander. Mount a 4-inch hose to the sander's dust port and secure with a hose clamp. (Note: Dryer vent hose is not suitable for such use). The dust collector should have sufficient capacity for this size machine; a minimum rating of 450 CFM (cubic feet per minute) is recommended. A variety of JET dust collectors is available; see our website at www.jettools.com. Adjustments Tools required for adjustments: 3mm hex key 6mm hex key (provided) 10mm wrench 13mm wrench Combination and/or machinist's square Cross-point Screwdriver Belt Table Adjustment 1. Disconnect machine from the power source. 2. Place a square on the table and up against the platen or abrasive belt, as shown in Figure 19. 3. Loosen the table lock handle and move the table until the square sits flush to both surfaces at 90°. Tighten the lock handle. 4. Place a combination square in the miter gauge slot and check the distance from the slot to the face of the platen. See Figure 20. Slide the square along the slot to the other side of the platen and check the distance. The distances should be equal to ensure that the miter gauge travels parallel to the belt. 5. If the table is not parallel, loosen the screws below the table (A, Figure 21) with a 13mm wrench, and nudge the table until parallel. Re-tighten screws. Note: Always maintain a gap of approximately 1/16" between the table edge and the abrasive belt. Once the table is square and parallel to the belt, verify the stops, as follows: 15 Figure 19 Figure 20 Figure 21
-
 1
1 -
2
-
3
-
4
-
5
-
6
-
7
-
8
-
9
-
 10
10 -
 11
11 -
 12
12 -
 13
13 -
 14
14 -
 15
15 -
 16
16 -
 17
17 -
 18
18 -
 19
19 -
 20
20 -
21
-
22
-
23
-
24
-
25
-
26
-
27
-
28
 |
 |
