JET Tools J-41002 User Manual - Page 15
Abrasive Disc Replacement, Aluminum Disc Removal, accessible through the opening behind
 |
View all JET Tools J-41002 manuals
Add to My Manuals
Save this manual to your list of manuals |
Page 15 highlights
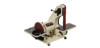
Abrasive Disc Replacement 1. Unplug the sander from the power source. 2. Remove the dust cover and the disc table. To remove the disc table, remove the handles then tilt the disc table upward while pulling it away from the disc. 3. Peel off the old abrasive disc. 4. Thoroughly clean the aluminum disc surface using naptha or a similar non-flammable solvent that will dry film-free. 5. Pull the protective backing half-way off the new abrasive disc. 6. Carefully position the new abrasive disc so it is centered accurately on the aluminum disc. 7. When accurately centered, remove the rest of the protective backing and press the abrasive disc firmly against the aluminum disc so complete adhesive contact is made. 8. Re-install dust cover and table. 9. Reconnect sander to power source. Aluminum Disc Removal The aluminum disc can be easily removed if needed; for example, to facilitate cleaning the aluminum disc when replacing abrasive discs. 1. Unplug sander from the power source. 2. Remove the disc table and the dust chute. 3. Rotate the disc until the set screw is accessible through the opening behind the disc guard. See Figure 15. You may need to loosen the socket head cap screws (see Figure 4) on the guard and shift it forward in order to clear the set screw. 4. Loosen the set screw with a 3mm hex wrench, and pull the aluminum disc off the motor shaft. 5. When re-mounting the aluminum disc, make sure the key is properly seated in the keyway on the motor shaft. Tighten the set screw firmly when the disc has been mounted. Figure 15 15
-
 1
1 -
2
-
3
-
4
-
5
-
6
-
7
-
8
-
9
-
 10
10 -
 11
11 -
 12
12 -
 13
13 -
 14
14 -
 15
15 -
 16
16 -
 17
17 -
 18
18 -
 19
19 -
 20
20 -
21
-
22
-
23
-
24
 |
 |
