JET Tools J-41002 User Manual - Page 17
guide. See See
 |
View all JET Tools J-41002 manuals
Add to My Manuals
Save this manual to your list of manuals |
Page 17 highlights
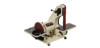
2. Tighten the miter gauge securely so the miter reference angle will not shift while you are sanding. 3. Place the workpiece against the miter reference surface and slide it along the miter reference surface and into the sanding disc. The following are just some of the many operations that can be performed with your JET Sander. • Sharpening a wood chisel on the sanding belt using a block of wood. Use the block of wood to support the chisel and provide clearance for the chisel handle. See Figure 18. Sand a bevel in the block of wood in order to position the block as close as possible to the sanding belt and clamp the block to the table. • A cold chisel can also be sharpened on the belt table with the table tilted. • Sanding aluminum on the disc unit with the table tilted and using the miter gauge as a guide. See Figure 19. • Sanding outside curves on the belt unit with the platen removed. See Figure 20. • Polishing using a felt belt (not provided) in place of the sanding belt. Note: Most polishing operations are performed with the platen removed. • Sanding in tight areas with the sanding belt. See Figure 21. Figure 18 Figure 19 Figure 20 Figure 21 17
-
 1
1 -
2
-
3
-
4
-
5
-
6
-
7
-
8
-
9
-
10
-
11
-
 12
12 -
 13
13 -
 14
14 -
 15
15 -
 16
16 -
 17
17 -
 18
18 -
 19
19 -
 20
20 -
 21
21 -
 22
22 -
23
-
24
 |
 |
