JVC AV-P720U 15 pg instruction manual on the AV-P720U Visual Presenter (250KB, - Page 7
Storing The Equipment
 |
View all JVC AV-P720U manuals
Add to My Manuals
Save this manual to your list of manuals |
Page 7 highlights
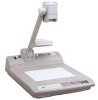
ENGLISH STORING THE EQUIPMENT 1. Turn the power switch OFF, and then remove the power cord and the video cable from the terminals. Note: • Hold the plug sections of the power cord and the video cable when unplugging them from the terminals. 2. Rotate the camera head towards the direction of 1 until you hear a click. 3. Press the lock release button 3 while moving the camera arm to the direction of 2. Then push down the camera arm towards the direction of 4. Release the lock release button and continue to push down the camera arm until you hear a click. Check and confirm that the camera arm is securely locked by trying to move it up and down slightly. 4 1 2 3 Note: • Do not let go of the camera arm if it is not locked. Also hold the arm securely when pushing down the camera arm. Otherwise, the camera arm section will drop down of its own weight and this could result in breakdown and/or injury. • If the camera arm is locked, do not apply extra force on the camera arm. This may result in breakdown. • When storing, do not leave the equipment leaning against, for instance, a wall. The equipment may fall down causing breakdown and/or injury. 5 • When carrying around the equipment, make sure to hold it by the base section 5. Holding it by the cam- era arm or the lighting device will put too much strain on these parts. As a result the main unit may drop to the floor and cause breakdown or injury. 3 4 5 7
-
 1
1 -
 2
2 -
 3
3 -
 4
4 -
 5
5 -
 6
6 -
 7
7 -
 8
8 -
 9
9 -
 10
10 -
 11
11 -
 12
12 -
13
-
14
-
15
 |
 |
