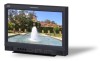
JVC DT-E17L4G Operation manual for DT-E17L4/DT-E21L4G Monitor (32 pages) - Page 17
Set-Up Menu, Sync Function, No Operation Action, Function Setting
 |
View all JVC DT-E17L4G manuals
Add to My Manuals
Save this manual to your list of manuals |
Page 17 highlights
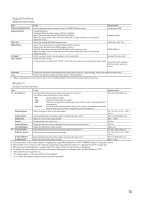
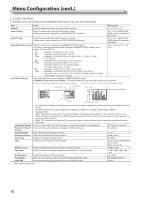
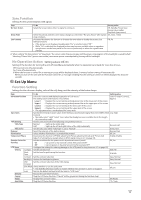
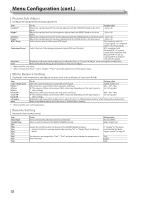
Sync Function Settings for the synchronization with signals. Item No Sync Action Delay Time Low Latency To do Setting value Select the screen status when no signal is coming in. Off, Standby, Power Save (power save mode), Gray Back (gray screen) Select the period until the screen status changes as selected in "No Sync Action" after signals 30s, 5min, 15min stop coming in. Activates/deactivates the function to shorten the time taken to display the picture (low Off, On latency function). • If the picture is not displayed steadily while "On" is selected, select "Off." • While "On" is selected, the displayed picture may become unstable when an operation using buttons on the front panel or the menu is performed, or when the signal format changes. ● When setting "No Sync Action" to "Gray Back," the screen color changes to gray and the power consumption of the backlight is saved by half. Selecting "Power Save" (power save mode) saves more power consumption by turning off the backlight. No Operation Action Setting values: Off, On Setting of the function for turning the unit off (standby) automatically when no operations are made for more than 4 hours. Off: Does not turn off automatically On: Turns off automatically ● When the function is turned On, a warning message will be displayed about 3 minutes before turning off automatically. When you turn on the unit with the function turned On, a message notifying that the setting is turned on will be displayed for about 30 seconds. Set-Up Menu Function Setting Settings for the sub menu display, color of the tally lamp, and the intensity of the button lamps. Item To do Setting value sub menu Position Select the contents and displaying position of "sub menu." The setting values and features are as follows. Lower1, Upper1, Lower2, Upper2 Lower1 : Displays the current setting and adjustment bar at the lower part of the screen. Upper1 : Displays the current setting and adjustment bar at the upper part of the screen. Lower2 : Displays the current setting at the lower part of the screen. Upper2 : Displays the current setting at the upper part of the screen. • The adjustment bar is not displayed for some items. Sync Term Specify the terminal resistant value of the RGB input synchronized signal from the COMPO./RGB Low, High terminal. • Normally, select "High". Select "Low" when the display becomes unstable due to the length of a connection cable. Tally Setting Set the color and mode of the tally lamp using external control. Tally Type Normal Half : Light up the entire tally. : Light up the left and right halves of the tally individually. Normal, Half Tally Color Set the tally color when "Tally Type" is set to "Normal". Green, Red Dimmer Select the intensity of the button lamps. Normal, Dark Illumination Select whether illumination is activated/deactivated. Off, On Component Phase Deactivates the function of PHASE adjustment (Picture adjustment knob and "Picture Sub Adjust" in Set-Up Menu) except when an NTSC signal comes in (☞ on page 18). Enable, Disable Remote Active On Standby LCD Saver Set the conditions for the power switch by external control (serial). On : Can power on by external control after powered OFF. Off : Cannot power on by external control after powered OFF. Configure the setting for reducing damage to the LCD panel for long-time use. (☞ on page 20) Off, On Setting 1st Start Set the standby time. 00h-24h Work Time Set the time for performing the function. 01h-06h Contrast Set the contrast reduction. Save, Normal Backlight Reduce the backlight brightness. Save, Normal OSD Set the contrast reduction of the OSD display. Contrast Save, Normal Side Mask Select whether to use the side panel. * The Side Mask function works no matter whether the LCD Saver is active or stopped. Off, On reset Restore the default settings for all the items in "LCD Saver". Execute Execute the LCD Saver function. Cancel Stop the LCD Saver function. ("Cancel" will be grayed out during the function stop.) Status Display the LCD Saver status. Off, Ready Start After Stop the LCD Saver function. **h **min 17
-
 1
1 -
2
-
3
-
4
-
5
-
6
-
7
-
8
-
9
-
10
-
11
-
 12
12 -
 13
13 -
 14
14 -
 15
15 -
 16
16 -
 17
17 -
 18
18 -
 19
19 -
 20
20 -
 21
21 -
 22
22 -
23
-
24
-
25
-
26
-
27
-
28
-
29
-
30
-
31
-
32
 |
 |
