JVC DT-E17L4GU Operation manual for DT-E17L4/DT-E21L4G Monitor (32 pages) - Page 15
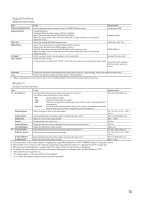
Signal Setting, Marker, Component/RGB Select
 |
View all JVC DT-E17L4GU manuals
Add to My Manuals
Save this manual to your list of manuals |
Page 15 highlights
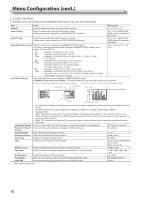
Signal Setting Settings for input signals. Item Component/RGB Select Sampling Mode Wide XGA SXGA/SXGA+ I/P Mode*1 Color System To do Setting value Selects the signal type you want to use for COMPO./RGB terminals. Component, RGB Analog RGB input Standard: When the input signal is VGA60 or XGA60 Wide: When the input signal is WVGA60 or WXGA60 When the input signal is other than the above, the setting value does not affect the displayed image. Standard, Wide Select the analog WIDE XGA signal format. 1280*768, 1360*768 Select the format when the analog SXGA60 signal comes in. SXGA: Select this when the SXGA60 signal comes in. SXGA+A: Select this when the SXGA+60/SXGA+60* signal comes in. When the input signal is other than the above, the setting value does not affect the displayed image. SXGA, SXGA+A Selects a proper mode corresponding to the input picture. Normal, Cinema, Field Select the color system. • If the picture is unstable with "AUTO," select the color system according to the input signal. Auto, NTSC, PAL, SECAM, NTSC 4.43, PAL M, PAL N, PAL60 sub menu reset Display the sub menu which enables you to adjust the items in "Signal Setting" while viewing the actual picture. Restore the default settings for all the items in "Signal Setting". *1 When "Low Latency" on the menu is set to "On", forcefully perform I/P conversion using "Field" processing. Marker*1 Settings for marker functions. Item To do Setting value 1/2 Area Marker Activate/deactivate the area marker and select the style of it. The setting values and features are as follows. Off, Line, Half, Half+Line Off Line Half Half+Line : Deactivate the marker. : Displays the area with an outline. : The area outside the specified aspect ratio of the screen is displayed at 50% transparency. : The area of the specified aspect ratio of the screen is indicated by an outline, and the area outside of that is displayed at 50% transparency. Marker Aspect Select the aspect ratio of the area marker. 4:3, 14:9, 13:9, 2.35:1, 1.85:1, 1.66:1 Safety Marker Activate/deactivate the safety marker and select the style of it.*2 Off, Line, Half, Half+Line Safety Area Adjust the area of the safety marker. 80% - 100% Frame*3 Displays/Hides the video area. Off, On Center Marker*3 Displays/hides the marker indicating the center position of the picture. Off, On Line Brightness 2/2 R-Area Marker R-Marker Aspect R-Safety Marker R-Safety Area Adjust the brightness of the marker. Activate/deactivate the area marker and select the style of it.*2 Select the aspect ratio of the area marker. Activate/deactivate the safety marker and select the style of it.*2 Adjust the area of the safety marker. High, Low Off, Line, Half, Half+Line 4:3, 14:9, 13:9, 2.35:1, 1.85:1, 1.66:1 Off, Line, Half, Half+Line 80% - 100% ● The area marker or the safety marker is displayed by using AREA MARKER or SAFETY MARKER button, or external control. ● Select either non-"R-" items or "R-" items to activate by using external control. (☞ "External Control" on page 22) ● When a picture is displayed in 4:3 aspect ratio, the safety marker for the 4:3 area is displayed. ● To display the safety marker for the area of a picture displayed in 16:9 aspect ratio, set Area Marker to "Off". *1 Memorized for each signal format. *2 The setting values are the same as that of "Area Marker". *3 In 1:1 mode, this display is grayed out and cannot be operated. 15
-
 1
1 -
2
-
3
-
4
-
5
-
6
-
7
-
8
-
9
-
 10
10 -
 11
11 -
 12
12 -
 13
13 -
 14
14 -
 15
15 -
 16
16 -
 17
17 -
 18
18 -
 19
19 -
 20
20 -
21
-
22
-
23
-
24
-
25
-
26
-
27
-
28
-
29
-
30
-
31
-
32
 |
 |
