JVC DT-X71H DT-X71C/H/F Operation manual - Page 6
DT-X71F, Front view - dt x71f
 |
View all JVC DT-X71H manuals
Add to My Manuals
Save this manual to your list of manuals |
Page 6 highlights
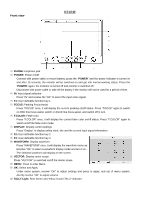
Front view DT-X71F ⑴ PHONE: Earphone jack ⑵ POWER: Power on/off Connect with power cable or mount battery, press the "POWER" and the power indicator is turned on and after 10 seconds, the monitor will be switched on and get into normal working status. Press the "POWER" again, the indicator is turned off and monitor is switched off. Disconnect with power cable or take off the battery if the monitor will not be used for a period of time. ⑶ IN: Input signal selection Press "IN" and revolve the "OK" to select the input video signal. ⑷ F1: User definable function key 1 ⑸ FOCUS: Peaking Focus Assist Press "FOCUS" once, it will display the current peaking on/off status. Press "FOCUS" again to switch on RED line focus assist, switch on BLUE line focus assist, and switch off in turn. ⑹ F.COLOR: False color Press "F.COLOR" once, it will display the current false color on/off status. Press "F.COLOR" again to switch on/off the false color mode. ⑺ DISPLAY: Display current settings Press "Display" to display safety mark, title and the current input signal information ⑻ F2: User definable function key 2 ⑼ F3: User definable function key 3 ⑽ WAVEFORM: Display waveform Press "WAVEFORM" once, it will display the waveform menu as: Revolve "OK" to select a waveform display mode and turn it on. The selected waveform will display on the screen. ⑾ VECTOR: Display vector scope Press "VECTOR" to switched on/off the Vector scope ⑿ MENU: Press to enter Menu ⒀ OK: Select and Apply Under menu system, revolve "OK" to adjust settings and press to apply; and out of menu system, directly revolve "OK" to adjust volume. ⒁ TALLY Light: Red, Green and Yellow 3-color TALLY indicator
-
 1
1 -
 2
2 -
 3
3 -
 4
4 -
 5
5 -
 6
6 -
 7
7 -
 8
8 -
 9
9 -
 10
10 -
 11
11 -
 12
12 -
13
-
14
-
15
-
16
 |
 |
