JVC FS-SD1000 User Manual - Page 11
Connecting the Powered Subwoofer SP-PW1000, Attaching the Spacers, Connecting External Equipment
 |
View all JVC FS-SD1000 manuals
Add to My Manuals
Save this manual to your list of manuals |
Page 11 highlights
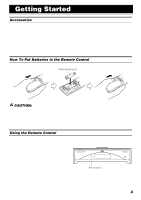
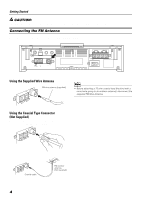
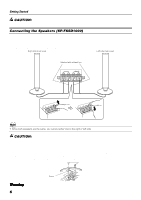
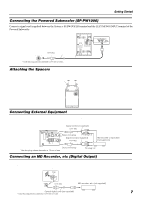
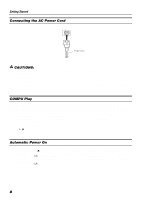
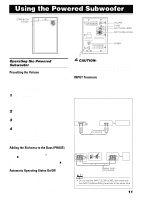
Getting Started Connecting the Powered Subwoofer (SP-PW1000) &RQQHFWýDýVLJQDOýFRUGýõVXSSOLHGôýEHWZHHQýWKHý6\VWHP'Vý68%:22)(5ýWHUPLQDOýDQGýWKHý/()7î0212ý,1387ýWHUPLQDOýRIýWKH 3RZHUHGý6XEZRRIHUï Powered Subwoofer SUB WOOFER 11mm Max. * Signal cord * Use the plug whose diameter is 11mm or less. Attaching the Spacers Attach the supplied spacers to the bottom of the powered subwoofer (SP-PW1000) to protect the cabinet, prevent slipping, and absorb the cabinet vibration. Peel off the backing from a spacer and attach it. Spacer Connecting External Equipment Connect signal cords (not supplied) between the System's MD/AUX-OUT/IN terminals and the output/input terminals of the external MD recorder, tape deck, etc. You can then listen to the external source through the System or record the System's CD player or tuner to the external unit. Signal cord (not supplied) 11mm Max. * SUB WOOFER CD DIGITAL OUT OUT IN ANTENNA MD / AUX AM EXT AM LOOP FM(75 ) COAXIAL Stereo mini-plug Pin-plug x 2 Signal cord (not supplied) 11mm Max. * MD recorder or tape deck (not supplied) Stereo mini-plug * Use the plug whose diameter is 11mm or less. Pin-plug x 2 Connecting an MD Recorder, etc (Digital Output) Unplug the cap and connect an optical digital cord (not supplied) between the System's CD DIGITAL OUT terminal and the input terminal of the MD recorder, etc. You can record the digital output signal from the System's CD Player to the MD recorder, etc. Cap CD DIGITAL OUT 11mm Max. * MD recorder, etc. (not supplied) Optical digital cord (not supplied) 7 * Use the plug whose diameter is 11mm or less.
-
 1
1 -
2
-
3
-
4
-
5
-
 6
6 -
 7
7 -
 8
8 -
 9
9 -
 10
10 -
 11
11 -
 12
12 -
 13
13 -
 14
14 -
 15
15 -
 16
16 -
17
-
18
-
19
-
20
-
21
-
22
-
23
-
24
-
25
-
26
-
27
-
28
-
29
-
30
 |
 |
