JVC GY-HM700U 132 page operation manual for the GY-HM700 solid state camcorder - Page 58
Protecting Important Scenes (OK Mark Function), Special Recording, Pre REC, Shooting
 |
View all JVC GY-HM700U manuals
Add to My Manuals
Save this manual to your list of manuals |
Page 58 highlights
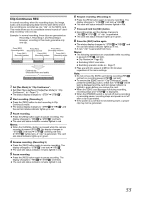
Shooting Protecting Important Scenes (OK Mark Function) Special Recording You can append OK marks to the clips for important scenes. Clips appended with OK marks cannot be deleted, thus protecting the important clips. In addition, you can display only the clips with OK marks in the thumbnail display during Media mode. Appending OK Marks During Recording 1 Assign the AOK MarkB function to the [RET] button on the lens from the menu. ● Select [Main Menu]B[Camera Function]B[Switch Set]B[LENS RET]BAOK MarkB. (A Page 74) ● Append or delete the [OK] mark with every press of the [RET] button. ● When an OK mark is appended, AOKB appears at the top left of the status screen on the viewfinder/LCD monitor. (A Page 96) (A Page 103) 1280x720 30/24 fps 60p HQ OK AOKB Mark 00:00:00:00 MAX 123% MIN 45% A 100min B 100min REC 282min F5.6 S.DTL B -3 ND1/16 A AE+1 9dB 1/10000 STATUS 1 Screen Memo: ● Clips appended with [OK Mark] cannot be deleted from the camera recorder using [Delete Clip]. (However, they will be deleted when the SDHC card is formatted.) ● When the camera recorder is in Media mode (SD Card mode), you can delete the [OK] marks appended during recording, or append/delete [OK] marks after shooting. (A Page 64 [Appending and Deleting OK Marks]) Note: ● When the write-protect switch on the SDHC card is set ( is displayed), [OK] marks cannot be appended/ deleted. Besides the normal recording mode, three special recording methods are available in this camera recorder. They are Pre REC, Clip Continuous REC, and Variable Frame REC. Select the mode from [Rec Mode] in the [Record Set] menu. * Set using [Main Menu]B[Record Set]B[Rec Mode]. (A Page 71) Pre REC This mode allows you to start video and audio recording about 3 seconds before the actual recording. You can start recording about 3 seconds before the actual recording when the camera recorder is in recording standby mode (STBYP). Using Pre REC allows you to record a complete event without missing the initial scenes even if you start the recording late. Finished clip (Recorded video and audio) Records approx. 3 seconds before Press [REC] (Recording starts) Press [REC] (Recording stops) 1 Set [Rec Mode] to APre RecB. (A Page 71) ● Set [Main Menu]B[Record Set]B[Rec Mode] to APre RecB. ● The status display changes to ASTBYBBASTBYPB. 2 Press the [REC] button to start recording in Pre REC mode. ● The status display changes to ASTBYPBBARECPB and the card slot status indicator lights up in red. ● Press the [REC] button again to pause recording. The display changes to ARECPBBASTBYPB and the card slot status indicator lights up in green. Note: ● When the interval between start and stop recording is short, ASTBYPB may not be displayed immediately after recording is complete. ARECPBBASTBYPB (STBY blinks in red)BASTBYPB is displayed. ● When the SDHC card becomes full during recording, recording stops and ASTOPPB is displayed. ● Video and audio before the above mentioned time may not be recorded after recording starts in the following cases. ● Immediately after power on ● Immediately after switching from Media mode to Camera mode ● Immediately after setting [Rec Mode] ● Immediately after the end of Clip Review ● Immediately after changing file format ● Immediately after changing video format 54
-
 1
1 -
2
-
3
-
4
-
5
-
6
-
7
-
8
-
9
-
10
-
11
-
12
-
13
-
14
-
15
-
16
-
17
-
18
-
19
-
20
-
21
-
22
-
23
-
24
-
25
-
26
-
27
-
28
-
29
-
30
-
31
-
32
-
33
-
34
-
35
-
36
-
37
-
38
-
39
-
40
-
41
-
42
-
43
-
44
-
45
-
46
-
47
-
48
-
49
-
50
-
51
-
52
-
 53
53 -
 54
54 -
 55
55 -
 56
56 -
 57
57 -
 58
58 -
 59
59 -
 60
60 -
 61
61 -
 62
62 -
 63
63 -
64
-
65
-
66
-
67
-
68
-
69
-
70
-
71
-
72
-
73
-
74
-
75
-
76
-
77
-
78
-
79
-
80
-
81
-
82
-
83
-
84
-
85
-
86
-
87
-
88
-
89
-
90
-
91
-
92
-
93
-
94
-
95
-
96
-
97
-
98
-
99
-
100
-
101
-
102
-
103
-
104
-
105
-
106
-
107
-
108
-
109
-
110
-
111
-
112
-
113
-
114
-
115
-
116
-
117
-
118
-
119
-
120
-
121
-
122
-
123
-
124
-
125
-
126
-
127
-
128
-
129
-
130
-
131
-
132
 |
 |
