JVC GZ-EX310 User Guide - Page 193
OUTDOOR MONITORING connection from the Internet
 |
View all JVC GZ-EX310 manuals
Add to My Manuals
Save this manual to your list of manuals |
Page 193 highlights
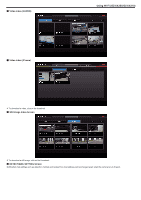
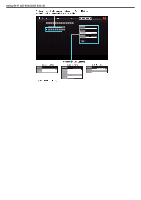
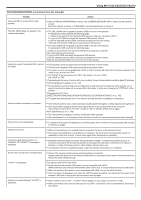
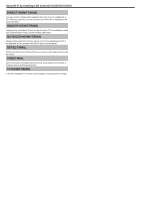
Using Wi-Fi (GZ-EX355/GZ-EX310) OUTDOOR MONITORING (connection from the Internet) Trouble Unsure of URL to access from a web browser. Action 0 After OUTDOOR MONITORING is started, tap "CAMERA NETWORK INFO." shown on the camera's screen. Enter the address as shown in "URL(WAN):" into the web browser to access it. The URL (WAN) does not appear in the network information. 0 The URL (WAN) will not appear if dynamic DNS is not set on the camera. To set dynamic DNS, perform the following steps. 1. Obtain an account with JVC dynamic DNS service using your computer. (URL?) 2. Log in to JVC DNS and obtain the dynamic DNS service. (How?) 3. Set the obtained dynamic DNS username and password on the camera. *Only the JVC dynamic DNS service can be set on this camera. 0 The URL (WAN) will not appear if dynamic DNS is not set on the camera. To set dynamic DNS, perform the following steps. 1. Obtain an account with JVC dynamic DNS service using your computer. https://dd3.jvckenwood.com/user/ 2. Log in to JVC DNS and obtain the dynamic DNS service. 3. Set the obtained dynamic DNS username and password on the camera. *Only the JVC dynamic DNS service can be set on this camera. Unable to access the entered URL. (cannot be found) 0 This function cannot be used in an environment with two or more routers. 0 Check that the dynamic DNS username and password are correct. 0 The router in use is not compatible with UPnP, or UPnP is turned off. Check the instruction manual of the router in use, and turn on UPnP. 0 The "UPnP" of the camera is set to "OFF". (By default, it is set to "ON".) Set "UPnP" to "ON". 0 Depending on the terms of service with your provider, it may not be possible to obtain a global IP address. "Confirming global IP address" (A p. 140) 0 Check whether a terminal that uses port 80 (such as web servers) has been set in the network, or if a specific terminal has been set to use port 80 on the router. In such case, change the "HTTP Port" of the camera. "Changing the HTTP Port (DIRECT MONITORING/INDOOR MONITORING/OUTDOOR MONITORING)" (A p. 155) 0 Try again after powering off and on the camera and the terminal (smartphone or computer). Video or audio is interrupted or delayed 0 If the network speed is slow, videos and audio sound may be interrupted, or delay may become significant. 0 (For web browser) Lagging may become significant due to the performance of the computer. If the stream format is set to "Full HD", change to "SD" or "Motion-JPEG" and try again. "Wi-Fi Specifications" (A p. 196) 0 (For web browser) If lagging is severe, reload the screen regularly. 0 (For smartphone) Try to change the place and time to locate an environment with good signal strength. The unit turns off automatically. 0 To prevent the situation of forgetting to turn off the power, this unit will turn off automatically after 10 days of continuous usage. Unable to set focus. 0 When not monitoring from a smartphone (or computer), the focus of the camera is fixed. 0 Even when monitoring from a smartphone (or computer), the focus of the camera will be fixed if not operated for more than 3 hours. (Focus works again when the camera is operated.) Connection gets disconnected, or a "UNABLE TO CONNECT" message is displayed 0 Establish connection again at a place with good signal strength. Transmission speed may drop, or connection may fail if the devices are placed too far away from each other, when there are objects in between, or when microwave ovens or other wireless devices are in use. 0 If connection cannot be established again, restart the terminal (smartphone or computer). Screen does not refresh or remains black 0 Check if the camera and the access point are properly connected. Images cannot be detected on the terminal (smartphone or computer) if the camera is disconnected from the access point halfway through. "LUPnP" is displayed. This appears when UPnP has failed. 0 Check whether the wireless LAN router in use is compatible with UPnP. (Refer to the instruction manual of the wireless LAN router in use, or consult the manufacturer of the router.) 0 When the wireless LAN router in use is compatible with UPnP, turn on the UPnP function. 0 If the icon does not disappear even when the UPnP function is enabled, turn off and on the power of the wireless LAN router in use as well as the camera, then try again. Unable to connect although "LUPnP" is displayed. 0 When "UPnP" is set to "OFF", "LUPnP" will not appear. In such cases, set "UPnP" to "ON". 0 When port 80 has been used by other devices via UPnP, connection cannot be established. Reconnect the camera. 193
-
 1
1 -
2
-
3
-
4
-
5
-
6
-
7
-
8
-
9
-
10
-
11
-
12
-
13
-
14
-
15
-
16
-
17
-
18
-
19
-
20
-
21
-
22
-
23
-
24
-
25
-
26
-
27
-
28
-
29
-
30
-
31
-
32
-
33
-
34
-
35
-
36
-
37
-
38
-
39
-
40
-
41
-
42
-
43
-
44
-
45
-
46
-
47
-
48
-
49
-
50
-
51
-
52
-
53
-
54
-
55
-
56
-
57
-
58
-
59
-
60
-
61
-
62
-
63
-
64
-
65
-
66
-
67
-
68
-
69
-
70
-
71
-
72
-
73
-
74
-
75
-
76
-
77
-
78
-
79
-
80
-
81
-
82
-
83
-
84
-
85
-
86
-
87
-
88
-
89
-
90
-
91
-
92
-
93
-
94
-
95
-
96
-
97
-
98
-
99
-
100
-
101
-
102
-
103
-
104
-
105
-
106
-
107
-
108
-
109
-
110
-
111
-
112
-
113
-
114
-
115
-
116
-
117
-
118
-
119
-
120
-
121
-
122
-
123
-
124
-
125
-
126
-
127
-
128
-
129
-
130
-
131
-
132
-
133
-
134
-
135
-
136
-
137
-
138
-
139
-
140
-
141
-
142
-
143
-
144
-
145
-
146
-
147
-
148
-
149
-
150
-
151
-
152
-
153
-
154
-
155
-
156
-
157
-
158
-
159
-
160
-
161
-
162
-
163
-
164
-
165
-
166
-
167
-
168
-
169
-
170
-
171
-
172
-
173
-
174
-
175
-
176
-
177
-
178
-
179
-
180
-
181
-
182
-
183
-
184
-
185
-
186
-
187
-
 188
188 -
 189
189 -
 190
190 -
 191
191 -
 192
192 -
 193
193 -
 194
194 -
 195
195 -
 196
196 -
 197
197 -
 198
198 -
199
-
200
-
201
-
202
-
203
-
204
-
205
-
206
-
207
-
208
-
209
-
210
-
211
-
212
-
213
-
214
-
215
-
216
-
217
-
218
-
219
-
220
-
221
-
222
-
223
-
224
-
225
-
226
-
227
-
228
-
229
-
230
-
231
-
232
-
233
-
234
-
235
-
236
-
237
-
238
-
239
-
240
-
241
-
242
-
243
-
244
-
245
-
246
-
247
-
248
-
249
-
250
-
251
-
252
-
253
-
254
-
255
-
256
-
257
-
258
-
259
-
260
-
261
 |
 |