JVC GZ-HM200AUS Guide Book - Page 67
FURTHER INFORMATION, Troubleshooting
 |
UPC - 046838038853
View all JVC GZ-HM200AUS manuals
Add to My Manuals
Save this manual to your list of manuals |
Page 67 highlights
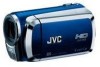
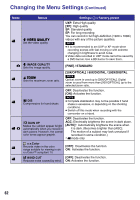
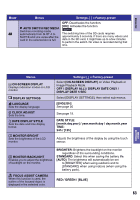
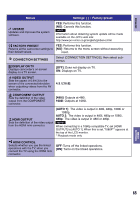
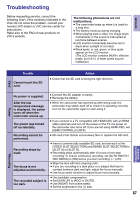
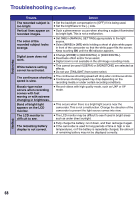
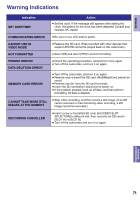
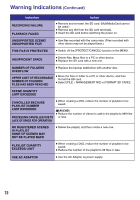
ENGLISH FURTHER INFORMATION Troubleshooting Before requesting service, consult the following chart. If the solutions indicated in the chart do not solve the problem, consult your nearest JVC dealer or JVC service center for instructions. Refer also to the FAQ of new products on JVC's website. The following phenomena are not malfunctions. • The camcorder heats up when it is used for a long time. • The battery heats up during charging. • When playing back a video, the image stops momentarily or the sound is interrupted at junctions between scenes. • LCD monitor momentarily become red or black when sunlight is recorded. • Black spots, or red, green, or blue spots appear on the LCD monitor. (The LCD monitor contains 99.99% effective pixels, but 0.01% of fewer pixels may be ineffective.) Card Power Trouble Cannot insert the SD card. Action • Check that the SD card is facing the right direction. No power is supplied. After the low temperature message is displayed, the power turns off when the camcorder warms up. The power was turned off accidentally. Recording cannot be performed. Recording stops by itself. The focus is not adjusted automatically. The recorded subject is too dark. • Connect the AC adapter correctly. • Recharge the battery. • When the camcorder has warmed up after being cold, the camcorder may switch itself off to check it is operating correctly. Turn on the camcorder again to start using it. • If you connect to a TV compatible with HDMI-CEC with an HDMI cable (optional) and turn off the power on the TV, the power on the camcorder also turns off. If you are not using HDMI-CEC, set [HDMI CONTROL] to [OFF]. • SD card is full. Delete unnecessary files or replace the SD card. • Insert a commercially available SD card, and set each of the [VIDEO SLOT SELECTION] and [IMAGE SLOT SELECTION] to [SLOT A] or [SLOT B]. • Recording stops automatically after 12 hours of non-stop recording. To ensure continuous recording, set [AUTO SWITCH REC MEDIA] to [ON] before you start recording. (Z p.63) • Wipe the lens with lens cleaning cloth. • If you are recording in a dark place or a subject that has no contrast between dark and light, adjust the focus manually. • Use focus assist function to adjust focus more precisely. • Use backlight compensation. • Set [GAIN UP] to [AGC] or [AUTO]. • Use [NIGHT] from scene select. • Set the brightness to the [+] side. 67 FURTHER INFORMATION Recording
-
 1
1 -
2
-
3
-
4
-
5
-
6
-
7
-
8
-
9
-
10
-
11
-
12
-
13
-
14
-
15
-
16
-
17
-
18
-
19
-
20
-
21
-
22
-
23
-
24
-
25
-
26
-
27
-
28
-
29
-
30
-
31
-
32
-
33
-
34
-
35
-
36
-
37
-
38
-
39
-
40
-
41
-
42
-
43
-
44
-
45
-
46
-
47
-
48
-
49
-
50
-
51
-
52
-
53
-
54
-
55
-
56
-
57
-
58
-
59
-
60
-
61
-
 62
62 -
 63
63 -
 64
64 -
 65
65 -
 66
66 -
 67
67 -
 68
68 -
 69
69 -
 70
70 -
 71
71 -
 72
72 -
73
-
74
-
75
-
76
-
77
-
78
 |
 |
