JVC GZMS100 Instructions - Page 27
File Upload on a Windows PC, File Upload to YouTube - one touch not working
 |
UPC - 046838035296
View all JVC GZMS100 manuals
Add to My Manuals
Save this manual to your list of manuals |
Page 27 highlights
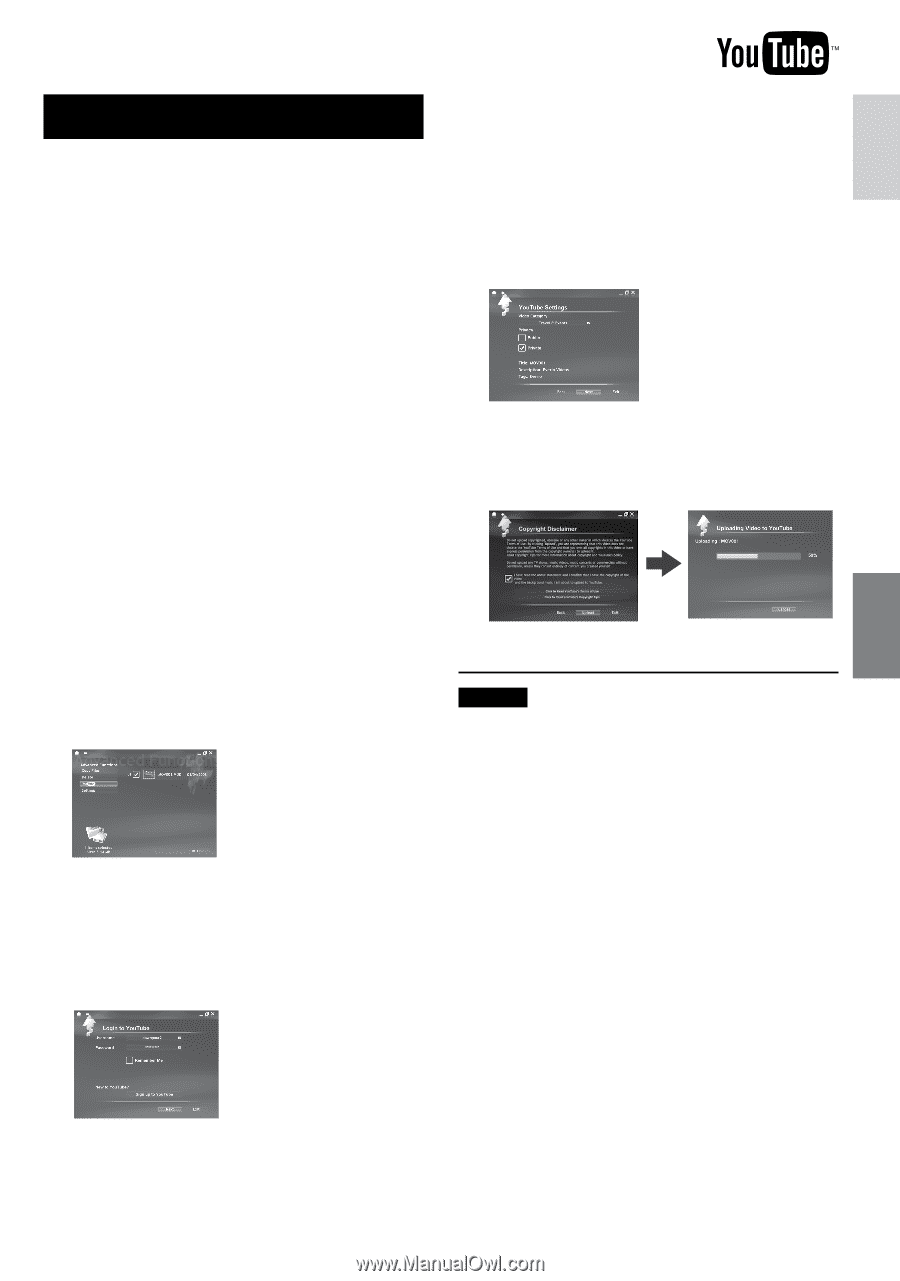
ENGLISH File Upload on a Windows ® PC File Upload to YouTubeTM This method uses software on the provided CD-ROM to perform quick video clip upload to YouTubeTM with a simple one touch operation. This product's YouTubeTM upload functionality is included under license from YouTube LLC. The presence of YouTubeTM upload functionality in this product is not an endorsement or recommendation of the product by YouTube LLC. Preparation: • Install the software from the included CD- ROM. (Z pg. 23) • Connect the camcorder to the PC with the USB cable. (Z pg. 25) 1 Open the LCD monitor to turn on the camcorder. 2 On the camcorder, press the UPLOAD button. Although a dialog box appears on the PC, you do not need to use it. PowerCinema starts automatically. 3 On the PC, click on the check box of the desired file. The s mark appears on the left of the selected file. To select other files, repeat this step. 4 Click [YouTubeTM]. 5 Login your username and password. Click [Next]. To create a YouTube™ account, click [Sign up to YouTubeTM]. 6 Select video category and broadcast option. Click [Next]. The Video Title is automatically filled in during uploading process with the File name, and the Description and Tags with Everio Video references. Date information is also input. If you want to modify this information, sign on to your account on the YouTubeTM website: http://www.youtube.com/ 7 Click on the check box and then click [Upload]. Uploading starts. Click [Cancel] to cancel procedure. 8 Click [Finish]. NOTES • It is recommended to use the AC Adapter as the power supply instead of the battery pack. • The operation is possible only with video clips that have been configured for this video sharing website. So, before you start shooting, set upload pre-record mode to "UPLOAD REC ON". (Z pg. 16) • You can upload up to 10 movies under the same video category and broadcast option at one time. • It takes approx. 5 minutes to upload every 1 minute recording of a video clip (for uplink speed of 1Mbps). • There is no guarantee that the operation will work in all environments or when there are changes in YouTubeTM site in the future. • For more information on YouTubeTM, visit YouTubeTM website: http://www.youtube.com/ • If you cannot upload the file to YouTubeTM Refer to "Latest Information", "Updater", "Troubleshooting", etc. in the help of PowerCinema NE for Everio. 27
-
 1
1 -
2
-
3
-
4
-
5
-
6
-
7
-
8
-
9
-
10
-
11
-
12
-
13
-
14
-
15
-
16
-
17
-
18
-
19
-
20
-
21
-
 22
22 -
 23
23 -
 24
24 -
 25
25 -
 26
26 -
 27
27 -
 28
28 -
 29
29 -
 30
30 -
 31
31 -
 32
32 -
33
-
34
-
35
-
36
-
37
-
38
-
39
-
40
-
41
-
42
-
43
-
44
-
45
-
46
-
47
-
48
-
49
-
50
-
51
-
52
-
53
-
54
-
55
-
56
-
57
-
58
-
59
-
60
-
61
-
62
-
63
-
64
-
65
-
66
-
67
-
68
-
69
-
70
-
71
-
72
-
73
-
74
-
75
-
76
-
77
-
78
-
79
-
80
 |
 |