JVC SR-V10U SR-V10U Instruction manual (1MB, PDF) - Page 45
Select video input terminal
 |
View all JVC SR-V10U manuals
Add to My Manuals
Save this manual to your list of manuals |
Page 45 highlights
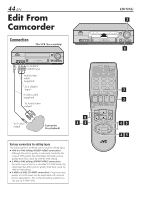
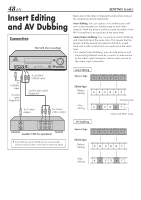
You can use a camcorder as the playback VCR and your VCR as the recording VCR 1 Make connections Connect an audio/video cable between the camcorder's audio/video output connectors and your VCR's audio/video input connectors. ● When using a camcorder with a monaural output, connect the audio output connector on the camcorder to the left audio input connector on this VCR. 2 Load a cassette Insert the cassette to be recorded on into this VCR (for recording). 3 Select input mode on this VCR Select "L-1" - when connecting the camcorder to the audio/video input connectors on the rear panel. Select "F-1" - when connecting the camcorder to the audio/video input connectors on the front panel. On the front panel: Push the JOG dial, then turn it to the left or right. On the Remote: Press the Number key "0 (AUX)" and/or CH +/-. 4 Select video input terminal Follow the procedure described on pages 37 and 40. When using S VIDEO terminal, set "FRONT AUX INPUT" (or "REAR AUX INPUT" if you use the connectors on the rear) to "S-VIDEO". When using VIDEO terminal, set "FRONT AUX INPUT" (or "REAR AUX INPUT") to "VIDEO". 5 Select edit mode Follow the procedure described on pages 37 and 38. EN 45 6 Return to normal screen Press MENU. 7 Start playback Set the camcorder to its play mode. NOTE: If the camcorder is equipped with a superimpose/OSD disable feature then set it to "OFF" before starting playback. 8 Start recording On the front panel: Press REC ( ¶ ). On the Remote: Press REC ( ¶ ) and PLAY ( 3 ) at the same time. NOTE: Be sure to select "AUTO" for "PICTURE CONTROL" (or "NORM" when "VIDEO CALIBRATION" is set to "OFF") after you finish dubbing the tapes (੬ pg. 37 and 38).
-
 1
1 -
2
-
3
-
4
-
5
-
6
-
7
-
8
-
9
-
10
-
11
-
12
-
13
-
14
-
15
-
16
-
17
-
18
-
19
-
20
-
21
-
22
-
23
-
24
-
25
-
26
-
27
-
28
-
29
-
30
-
31
-
32
-
33
-
34
-
35
-
36
-
37
-
38
-
39
-
 40
40 -
 41
41 -
 42
42 -
 43
43 -
 44
44 -
 45
45 -
 46
46 -
 47
47 -
 48
48 -
 49
49 -
 50
50 -
51
-
52
-
53
-
54
-
55
-
56
-
57
-
58
-
59
-
60
-
61
-
62
-
63
-
64
 |
 |
