JVC TH-C7 Instructions - Page 23
Playback
 |
View all JVC TH-C7 manuals
Add to My Manuals
Save this manual to your list of manuals |
Page 23 highlights
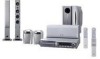
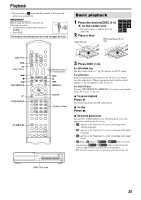
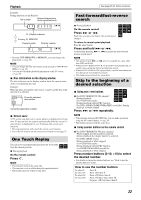
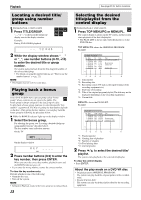
Playback • The icon such as DVD VIDEO shows the disc formats or file types the operation is available for. IMPORTANT Before using the remote control for the following operation; 1 Set the remote control mode selector to AUDIO. 2 Press DVD. The buttons described below are used on pages 20 to 23. (play button) DISC 1 DISC 2 DISC 3 DISC 4 DISC 5 DVD AUDIO Remote control mode selector TOP MENU/PG TOP MENU/PG ENTER MENU/PL MENU/PL TITLE/GROUP Number buttons FL DISPLAY Basic playback 1 DVD DVD DVD Press the desired DISC (1-5) VIDEO AUDIO VR 0 on the center unit. • The system turns on and the disc tray comes out. 2 Place a disc. Label side up When placing an 8 cm disc DISC 1 DISC 2 DISC 1 DISC 2 3 Press DISC (1-5). For MP3/WMA files The file control display (A pg. 28) appears on the TV screen. For JPEG files Each file (still pictures) is shown on the TV screen for about 3 seconds (slide-show). When stopping playback, the file control display (A pg. 28) appears on the TV screen. For DVD VR disc Pressing TOP MENU/PG or MENU/PL shows the control display on the TV screen. (A pg. 23) 7 To pause playback Press 8. To return to playback, press 3 (play button). 7 To stop Press 7. 7 On-screen guide icons During DVD VIDEO playback, the following guide icons may appear for a while on the TV screen; • : appears at the beginning of a scene containing multisubtitle languages. • : appears at the beginning of a scene containing multi-audio languages. • : appears at the beginning of a scene containing multi-angle views. • (Play), (Pause), / (Fast forward/ fast-reverse), / (Slow-motion forward/ reverse): appears when you perform each operation. • : the disc cannot accept an operation you have tried to do. DISC 1 DISC 2 DISC 3 DISC 4 DISC 5 20
-
 1
1 -
2
-
3
-
4
-
5
-
6
-
7
-
8
-
9
-
10
-
11
-
12
-
13
-
14
-
15
-
16
-
17
-
 18
18 -
 19
19 -
 20
20 -
 21
21 -
 22
22 -
 23
23 -
 24
24 -
 25
25 -
 26
26 -
 27
27 -
 28
28 -
29
-
30
-
31
-
32
-
33
-
34
-
35
-
36
-
37
-
38
-
39
-
40
-
41
-
42
-
43
-
44
-
45
-
46
-
47
-
48
-
49
-
50
-
51
 |
 |
