Jensen JHD1510 Operation Manual - Page 11

Switching to Sirius Satellite Radio

Page 11 highlights

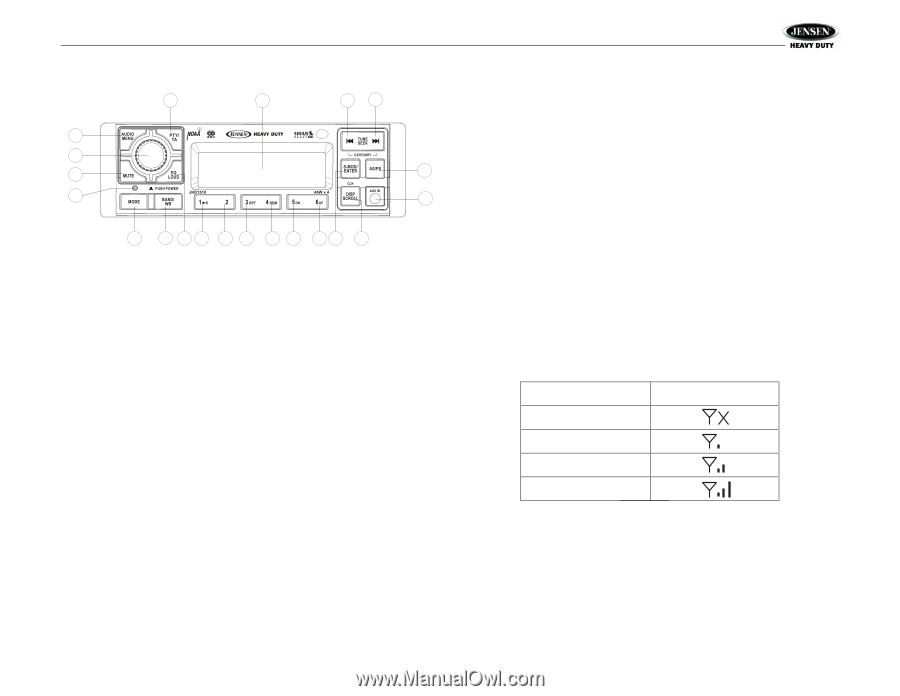
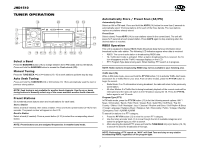
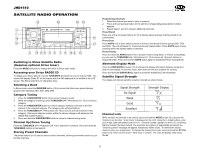
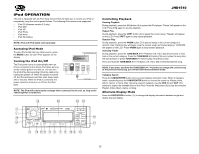
JHD1510 SATELLITE RADIO OPERATION 13 20 18 19 3 1 16 14 21 17 4 15 11 8 6 5 7 9 10 2 12 Switching to Sirius Satellite Radio (Requires optional Sirius tuner) Press the MODE button (4) to change the mode to Sirius radio mode. Accessing your Sirius RADIO ID To display your Sirius radio ID, use the TUNE/SEEK || buttons (18, 19) to choose a category. 3. Press the S-MOD/ENTER button to confirm category selection and tune to the first channel in the selected category. The category icon will stop flashing. 4. Press the TUNE/SEEK |>| buttons (18, 19) to choose desired channels in that category. (The lowest channel number within the chosen category will always be the default first channel tuned.) 5. Press and hold the S-MOD/ENTER button to return to channel tuning mode. Channel Up/Down Tuning Press the TUNE/SEEK |>| buttons (18, 19) to search for a channel. Press and hold the TUNE/SEEK buttons to fast search. Storing Preset Channels The preset buttons (5-10) can be used to store 6 channels, allowing convenient access to your favorite channels. Programming Channels 1. Select the channel you want to store in memory. 2. Press and hold a preset button (5-10) until the corresponding preset button number appears. 3. Repeat steps 1 and 2 to program additional channels. Preset Recall Press one of the six preset buttons (5-10) to directly select a preset channel stored in the current band. Preset Scan Press AS/PS (14) to scan stations stored in all three user-preset channel groups (SR1, SR2 and SR3). The unit will pause for 10 seconds at each preset station. Press AS/PS again to stop scanning when the desired station is reached. Preset Tuning Press and hold the AS/PS button (14) to access Preset Tuning Mode. In Preset Tuning Mode, you can use the TUNE/SEEK |>| buttons (18, 19) to access all 18 preset stations in sequential order. Press and hold the AS/PS button again to deactivate Preset Tuning Mode. Alternate Display Mode Press the DISP/SCROLL button (12) to change the display information between single and dual line text display. In dual line mode, both artist and title are available for viewing. Press and hold the DISP/SCROLL button to scroll the Artist/Song Title information. Satellite Signal Strength The display will indicate satellite reception strength as shown below. Signal Strength Strength Display No Signal Weak Good Excellent Channel Lock While tuned to the channel to be locked, press and hold the MODE button (4) to access the Channel Lock function. "Enter Code" is displayed on the LCD. Using the 1-6 digit buttons, enter your 4-digit code (the default code is 1111). "Channel Locked" appears on the LCD, confirming that the channel has been locked. The next time the channel is sequentially accessed, the "Channel Locked" message will appear, followed by "Enter Code". To retrieve the locked channel, enter your 4-digit code. To change the channel lock code, press and hold the PTY/TA button (13). Enter Current Code > New Code > Confirm. The LCD will display "New Code Stored". 9

  • 1
  • 2
  • 3
  • 4
  • 5
  • 6
  • 7
  • 8
  • 9
  • 10
  • 11
  • 12
  • 13
  • 14
  • 15
  • 16
  • 17
  • 18

JHD1510
9
SATELLITE RADIO OPERATION
Switching to Sirius Satellite Radio
(Requires optional Sirius tuner)
Press the
MODE
button (4) to change the mode to Sirius radio mode.
Accessing your Sirius RADIO ID
To display your Sirius radio ID, use the
TUNE/SEEK |<<
button to tune to channel “000”. The
screen will display “Sirius ID” on the top bar with the SID displayed in the middle of the LCD
screen. The Sirius radio ID is 12 characters long.
Selecting a Band
In Sirius mode, press the
BAND/WB
button (15) to access the Sirius user-preset channel
groups in the following order: SR1, SR2, SR3.
Category Tuning
1.
Press the
S-MOD/ENTER
button (2) to access Category mode.
2.
While the category is flashing, press
TUNE/SEEK |<< / >>|
buttons (18, 19) to choose a
category.
3.
Press the
S-MOD/ENTER
button to confirm category selection and tune to the first
channel in the selected category. The category icon will stop flashing.
4.
Press the
TUNE/SEEK
|<< / >>|
buttons (18, 19) to choose desired channels in that
category. (The lowest channel number within the chosen category will always be the
default first channel tuned.)
5.
Press and hold
the
S-MOD/ENTER
button to return to channel tuning mode.
Channel Up/Down Tuning
Press the
TUNE/SEEK
|<< / >>|
buttons (18, 19) to search for a channel.
Press and hold
the
TUNE/SEEK
buttons to fast search.
Storing Preset Channels
The preset buttons (5-10) can be used to store 6 channels, allowing convenient access to your
favorite channels.
Programming Channels
1.
Select the channel you want to store in memory.
2.
Press and hold
a preset button (5-10) until the corresponding preset button number
appears.
3.
Repeat steps 1 and 2 to program additional channels.
Preset Recall
Press one of the six preset buttons (5-10) to directly select a preset channel stored in the
current band.
Preset Scan
Press
AS/PS
(14) to scan stations stored in all three user-preset channel groups (SR1, SR2
and SR3). The unit will pause for 10 seconds at each preset station. Press
AS/PS
again to stop
scanning when the desired station is reached.
Preset Tuning
Press and hold
the
AS/PS
button (14) to access Preset Tuning Mode. In Preset Tuning Mode,
you can use the
TUNE/SEEK |<< / >>|
buttons (18, 19) to access all 18 preset stations in
sequential order.
Press and hold
the
AS/PS
button again to deactivate Preset Tuning Mode.
Alternate Display Mode
Press the
DISP/SCROLL
button (12) to change the display information between single and
dual line text display. In dual line mode, both artist and title are available for viewing.
Press and hold
the
DISP/SCROLL
button to scroll the Artist/Song Title information.
Satellite Signal Strength
The display will indicate satellite reception strength as shown below.
Channel Lock
While tuned to the channel to be locked,
press and hold
the
MODE
button (4) to access the
Channel Lock function. “Enter Code” is displayed on the LCD. Using the 1-6 digit buttons, enter
your 4-digit code (the default code is 1111). “Channel Locked” appears on the LCD, confirming
that the channel has been locked. The next time the channel is sequentially accessed, the
“Channel Locked” message will appear, followed by “Enter Code”. To retrieve the locked
channel, enter your 4-digit code. To change the channel lock code,
press and hold
the
PTY/TA
button (13). Enter Current Code > New Code > Confirm. The LCD will display “New Code
Stored”.
3
2
4
5
11
6
12
7
13
8
14
9
15
10
16
17
1
18
20
19
21
Signal Strength
Strength Display
No Signal
Weak
Good
Excellent