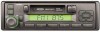
Jensen JHD2000 Owners Manual - Page 3
Operating Instructions - speakers
 |
UPC - 681787012587
View all Jensen JHD2000 manuals
Add to My Manuals
Save this manual to your list of manuals |
Page 3 highlights
OPERATING INSTRUCTIONS appears on the display panel. Within 5 seconds of choosing, turn the control counter clockwise to decrease the bass response or clockwise to increase it as desired. The level will be shown on the display panel from a minimum of BAS: -7 to a maximum of BAS: +7 (0 indicates flat response). The display will automatically return to the normal indication 5 seconds after the last adjustment or when another function is activated. .TREBLE CONTROL Selet the Treble mode by pressing the AUD button so the TRE: indication appears on the display panel. Within 5 seconds of choosing the Treble mode, rotate the VOL control counterclockwise to decrease the treble response or clockwise to increase it as desired. The level will be shown on the display panel from a minimum of TRE: -7 to a maximum of TRE: +7 (0 indicates flat response). The display will automatically return to the normal indication 5 seconds after the last adjustment or when another function is activated. . LEFT/RIGHT BALANCE CONTROL To adjust the left-right speaker balance,first select the Balance mode by pressing the AUD button so the BAL: indication appears on the display panel. Within 5 seconds of choosing the Balance mode, rotate the VOL control counter clockwise to adjust the stereo balance to the left channel speakers or clockwise to adjust it to the right channel speakers. The balance position will be shown on the display panel from BAL:L9 (full left) to BAL:R9(full right). When the volume level between the left and right speakers is equal, 0 will be shown on the display panel. The display will automatically return to the normal indication 5 seconds after the last adjustment or when another function is activated. . FRONT/REAR F ADER CONTROL To adjust the front-rear speaker balance, first select the Fader mode by pressing the AUD button so the F AD: indication appears on the display panel. Within 5 seconds of choosing the Fader mode, rotate the VOL control clockwise to adjust the front-rear speaker balance to the front speakers or counterclockwise to adjust it to the rear speakers. The fader position will be shown on the display panel from FAD:R9(full rear) to FAD:F9(full front). When the level between the front and rear speakers is equal, 0 will be shown on the display panel.The display will automatically return to the normal indication 5 seconds after the last adjustment or when another function is activated. .LOUDNESS CONTROL Pressing the AUD button for 2s will turn the Loudness ON/OFF. - 3 - OPERATING INSTRUCTIONS MANUAL UP/DOWN TUNING (TUNE TRK+/TUNE TRK-) Momentarily pressing and releasing either TUNE/TRK button will activate the manual tuning function, whereby FM stations may be selected in 200KHz increments, up or down and AM station may be in 10KHz increments. Pressing this button for 2s will activate the automatic seek. The radio will seek to the next station in the + or - direction and stop and remain at that frequency. During the upward or downward seek operation, LOC (local) appears on the display panel, and then disappears when a strong stereo station is encountered (ST appears on the display). 10 .MONO/STEREO OPERATION During FM radio operation, when the signal is broadcast in stereo, the stereo mode is indicated by the ST indication on the display panel. If the FM signal is broadcast in monaural instead of stereo, the stereo indication will disappear. The stereo indication will also disappear when the signal strength is greatly diminished, or when a station on either AM band is selected. 11 .PRE=SET SCAN(PS)/AUTO-STORE TUNING(AS) Press this button momentarily to scan the stations pre-set in each AM band and each FM band. The unit will stop at each pre-set station for approximately 5s before continuing to the next pre-set station (the pre-set station number on the display panel will flash during pre-set scan operation). Press the button again momentarily to stop pre-set scan operation and remain on the selected frequency. If no buttons are pressed during the scan, the unit will continue to scan the band In use. Pressing and holding the button for longer than 2s will activate the AUTO-STOR(AS)tuning feature which will automatically scan and enter up to 6 local area stations Into the pre-set memories on the band in use. If you have already set the pre-set memories to your favorite stations, activating the auto-store tuning feature will erase those stations and enter the new local ones. This feature is most useful when traveling in a new area where you are not familiar with the local stations. 12 .STATION PRE-SET MEMORIES To set any of the 6 preset memories in each band, use the following procedure: 1. turn the radio on and select the desired band. 2. Select the first station to be pre-set using the TUNE+/-(manual mode )or automatic seek tuning. 3. Press the preset button to be set and continue to hold it in for approximately 2s. - 4 -
-
 1
1 -
 2
2 -
 3
3 -
 4
4 -
 5
5 -
 6
6 -
 7
7
 |
 |