Jensen VM9412 Operation Manual - Page 17
Parking Brake, Monitor Movement Mechanism - wiring
 |
UPC - 043258303714
View all Jensen VM9412 manuals
Add to My Manuals
Save this manual to your list of manuals |
Page 17 highlights
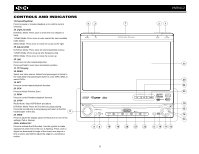
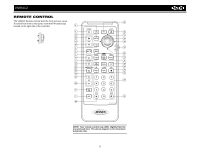
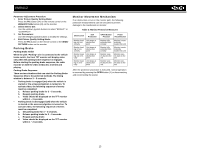
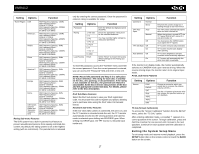
VM9412 Parameter Adjustment Procedure 1. Enter Picture Quality Setting Mode: Press the PIC button (24) on the remote control or the WIDE/PICTURE button (23) on the monitor. 2. Select Item to Set: Use the up/down joystick buttons to select "BRIGHT" or "CONTRAST". 3. Set Parameters: Use the left/right joystick buttons to modify the settings. 4. Exit Picture Quality Setting Mode: Press the PIC button on the remote control or the WIDE/ PICTURE button on the monitor Parking Brake Parking Brake Inhibit When the pink "Parking" wire is connected to the vehicle brake switch, the front TFT monitor will display video only when the parking brake sequence is engaged. Before starting the parking brake sequence, the radio must be on with the video media disc inserted and playing. Parking Brake Sequence There are two situations that can start the Parking Brake Sequence (this is the preferred method). The timing window is between 3 ~ 5 seconds. • Parking brake is engaged (on) when the vehicle is started or the accessory/ignition is turned on. To activate video, the following sequence of events must be completed: a. Release parking brake for 3 ~ 5 seconds. b. Reapply parking brake. c. Video should be displayed on the TFT monitor within 1 ~ 2 seconds. • Parking break is disengaged (off) when the vehicle is started or the accessory/ignition is turned on. To activate video, the following sequence of events must be completed: a. Set parking brake for 3 ~ 5 seconds. b. Release parking brake for 3 ~ 5 seconds. c. Reapply parking brake. d. Video should be displayed on the TFT monitor within 1 ~ 2 seconds. Monitor Movement Mechanism If an obstruction occurs in the monitor path, the following protective measurements can be executed to prevent damage to the mechanism or monitor: Table 3: Monitor Protective Measures Obstruction Self Protection Monitor load- Unit stops at ing out hori- obstruction zontally point Monitor load- Unit stops at ing in hori- obstruction zontally point Monitor load- Unit stops at ing out verti- obstruction cally point Monitor load- Unit stops at ing in verti- obstruction cally point OPEN Button Power Pressed Reconnected Monitor fully extended horizontally Monitor fully extended horizontally Monitor swivels back to the unit Monitor swivels back to the unit Monitor is automatically loaded into unit Monitor is automatically loaded into unit Monitor swivels back to the unit Monitor swivels back to the unit After the protective procedure is executed, normal operation is resumed by pressing the OPEN button (1) or disconnecting and reconnecting the power. 13
-
 1
1 -
2
-
3
-
4
-
5
-
6
-
7
-
8
-
9
-
10
-
11
-
 12
12 -
 13
13 -
 14
14 -
 15
15 -
 16
16 -
 17
17 -
 18
18 -
 19
19 -
 20
20 -
 21
21 -
 22
22 -
23
-
24
-
25
-
26
-
27
-
28
-
29
-
30
-
31
-
32
-
33
-
34
-
35
-
36
-
37
-
38
 |
 |
