Karcher B 110 R Bp Pack 170AhDoseSSDR75 Operating instructions 1 - Page 21
Installation
 |
View all Karcher B 110 R Bp Pack 170AhDoseSSDR75 manuals
Add to My Manuals
Save this manual to your list of manuals |
Page 21 highlights
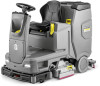
1 * Filling system 2 Fresh water tank cap with fresh water fil- ter 3 Coarse dirt filter 4 Waste water tank cap 5 Control panel 6 Squeegee blade adjustment wheel (D cleaning head only) 7 Brush replacement pedal (D cleaning head only) 8 Steering wheel 9 Squeegee blade 10 Brush replacement handle (R cleaning head only) 11 Sidelight 12 Coarse dirt container (only with R clean- ing head) 13 Detergent canister 14 Type plate 15 Detergent suction hose 16 Battery 17 * Internal charger 18 Battery connector (with external charg- er) Charger mains cable (with internal charger) 19 Storage area for "Homebase Box" cleaning set 20 * Warning light 21 Seat 22 Waste water tank latch 23 Seat adjustment lever 24 Fresh water tank filling hole 25 Hose holder 26 Daytime running light 27 Accelerator pedal 28 * Side scrubbing deck 29 * Water connection for dirty water tank rinsing system 30 Waste water tank lid support 31 Float 32 Fluff filter 33 Storage for suction bar 34 Waste water tank drain hose with dosing unit 35 Waste water tank 36 * Mop holder 37 Suction hose 38 Suction bar clamping lever 39 Waste water tank cap 40 Suction bar 41 Cleaning head 42 Fresh water filling level indicator 43 Fresh water tank * optional Colour coding ● Control elements for the cleaning pro- cess are yellow. ● Control elements for maintenance and servicing are light grey. Control panel 1 * Side scrubbing deck switch 2 Horn 3 Travel direction switch 4 Program switch 5 Intelligent Key 6 Display 7 Info button 8 Safety switch Program switch 1 OFF Device is switched off. 2 TRANSPORT MODE Drive to the operating location. 3 ECO MODE Clean the floor wet (with a reduced amount of water and a reduced brush speed) and vacuum up waste water (with reduced suction power). 4 NORMAL MODE Clean the floor wet and vacuum up waste water. 5 HEAVY MODE Clean the floor wet (with increased brush contact pressure) and vacuum up waste water. 6 SCRUB MODE Precleaning without vacuuming Clean the floor wet and let the detergent act. 7 SUCTION MODE Vacuum up the dirty waste. 8 POLISH MODE Polish the floor at a high brush speed without applying liquid. Suction bar holder ● When driving through narrow spaces, the suction bar can be removed and hung in one of the openings on the lid of the waste water tank. ● The suction bar can be hung in the recess on the waste water tank for storage. Symbols on the device Fresh water tank drain opening Waste water tank drain opening Fresh water tank filling level (50%) Lashing point * Mop holder Filling system water connection Waste water tank flushing system water connection Brush replacement * optional Installation Unloading 1. Remove the packaging film. 2. Remove the strap. 1 Strap 2 Board 3 Block 4 Beam 3. Unscrew the block, squared timber and boards. The components to be unscrewed are marked in grey in the figure. 4. Place a ramp in front of the pallet with the unscrewed boards and squared timber and fasten with chipboard screws. English 5. Install the batteries if the device was delivered without batteries (see chapter "Before inital startup/ batteries"). 6. Drive the device forward and off the pallet (see chapter "Operation / Driving"). 21
-
 1
1 -
2
-
3
-
4
-
5
-
6
-
7
-
8
-
9
-
10
-
11
-
12
-
13
-
14
-
15
-
 16
16 -
 17
17 -
 18
18 -
 19
19 -
 20
20 -
 21
21 -
 22
22 -
 23
23 -
 24
24 -
 25
25 -
 26
26 -
27
-
28
-
29
-
30
-
31
-
32
-
33
-
34
-
35
-
36
-
37
-
38
-
39
-
40
-
41
-
42
-
43
-
44
-
45
-
46
-
47
-
48
-
49
-
50
-
51
-
52
-
53
-
54
-
55
-
56
-
57
-
58
-
59
-
60
-
61
-
62
-
63
-
64
-
65
-
66
-
67
-
68
-
69
-
70
-
71
-
72
-
73
-
74
-
75
-
76
-
77
-
78
-
79
-
80
-
81
-
82
-
83
-
84
-
85
-
86
-
87
-
88
-
89
-
90
-
91
-
92
-
93
-
94
-
95
-
96
-
97
-
98
-
99
-
100
-
101
-
102
-
103
-
104
-
105
-
106
-
107
-
108
-
109
-
110
-
111
-
112
-
113
-
114
-
115
-
116
-
117
-
118
-
119
-
120
-
121
-
122
-
123
-
124
-
125
-
126
-
127
-
128
-
129
-
130
-
131
-
132
-
133
-
134
-
135
-
136
-
137
-
138
-
139
-
140
-
141
-
142
-
143
-
144
-
145
-
146
-
147
-
148
-
149
-
150
-
151
-
152
-
153
-
154
-
155
-
156
-
157
-
158
-
159
-
160
-
161
-
162
-
163
-
164
-
165
-
166
-
167
-
168
-
169
-
170
-
171
-
172
-
173
-
174
-
175
-
176
-
177
-
178
-
179
-
180
-
181
-
182
-
183
-
184
-
185
-
186
-
187
-
188
-
189
-
190
-
191
-
192
-
193
-
194
-
195
-
196
-
197
-
198
-
199
-
200
-
201
-
202
-
203
-
204
-
205
-
206
-
207
-
208
-
209
-
210
-
211
-
212
-
213
-
214
-
215
-
216
-
217
-
218
-
219
-
220
-
221
-
222
-
223
-
224
-
225
-
226
-
227
-
228
-
229
-
230
-
231
-
232
-
233
-
234
-
235
-
236
-
237
-
238
-
239
-
240
-
241
-
242
-
243
-
244
-
245
-
246
-
247
-
248
-
249
-
250
-
251
-
252
-
253
-
254
-
255
-
256
-
257
-
258
-
259
-
260
-
261
-
262
-
263
-
264
-
265
-
266
-
267
-
268
-
269
-
270
-
271
-
272
-
273
-
274
-
275
-
276
-
277
-
278
-
279
-
280
-
281
-
282
-
283
-
284
-
285
-
286
-
287
-
288
-
289
-
290
-
291
-
292
-
293
-
294
-
295
-
296
-
297
-
298
-
299
-
300
-
301
-
302
-
303
-
304
-
305
-
306
-
307
-
308
-
309
-
310
-
311
-
312
-
313
-
314
-
315
-
316
-
317
-
318
-
319
-
320
-
321
-
322
-
323
-
324
-
325
-
326
-
327
-
328
-
329
-
330
-
331
-
332
-
333
-
334
-
335
-
336
-
337
-
338
-
339
-
340
-
341
-
342
-
343
-
344
-
345
-
346
-
347
-
348
-
349
-
350
-
351
-
352
-
353
-
354
-
355
-
356
-
357
-
358
-
359
-
360
-
361
-
362
-
363
-
364
-
365
-
366
-
367
-
368
-
369
-
370
-
371
-
372
-
373
-
374
-
375
-
376
-
377
-
378
-
379
-
380
-
381
-
382
-
383
-
384
-
385
-
386
-
387
-
388
-
389
-
390
-
391
-
392
-
393
-
394
-
395
-
396
-
397
-
398
-
399
-
400
-
401
-
402
-
403
-
404
-
405
-
406
-
407
-
408
-
409
-
410
-
411
-
412
-
413
-
414
-
415
-
416
-
417
-
418
-
419
-
420
-
421
-
422
-
423
-
424
-
425
-
426
-
427
-
428
-
429
-
430
-
431
-
432
-
433
-
434
-
435
-
436
-
437
-
438
-
439
-
440
-
441
-
442
-
443
-
444
-
445
-
446
-
447
-
448
-
449
-
450
-
451
-
452
 |
 |
