Karcher NT 27/1 Operating instructions 1 - Page 12
Device elements, Start up, Operation
 |
View all Karcher NT 27/1 manuals
Add to My Manuals
Save this manual to your list of manuals |
Page 12 highlights
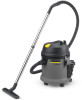
Device elements 1 Nameplate 2 Power cord 3 Holder for suction pipes 4 Holder for crevice nozzle 5 Suction hose 6 Suction head lock 7 Steering roller 8 Dirt receptacle 9 Suction support 10 Floor nozzle (Adv only) 11 Floor nozzle (not Adv) 12 Suction tube 13 Main switch 14 Suction head 15 Carrying handle 16 Cable hook 17 Bender 18 Cartridge filter 19 Fastening nut 20 Float Start up Dry vacuum cleaning ATTENTION Risk of damage! For dry vacuuming, the cartridge filter must always be installed. - To vacuum fine dust, you can also use an additional paper filter bag. Inserting the paper filter bag Illustration Illustration Release and remove the suction head. Insert the paper filter bag. Insert and lock the suction head. Wet vacuum cleaning Inserting the rubber lips Illustration Remove the brush strips. Install the rubber lips. Note: The structured side of the rubber lips must point outwards. Remove the paper filter bag - To suck wet dirt, first remove the paper filter bag. Installing an additional filter Release and remove the suction head. Turn the suction basket by 180° and keep it aside. Loosen the mounting nuts Remove the cartridge filter. Illustration Insert the fastening nut and tighten it. Install the additional filter. Insert and lock the suction head. Clip connection Illustration The suction hose is equipped with a clip system. All C-35/C-DN-35 accessories can be connected. Operation Turning on the Appliance Plug in the mains plug. Switch on the appliance at the main switch. Emptying the dirt container - The vacuum channel is equipped with a float. - When the dirt water reaches the highest permissible level in the container, the suction power is interrupted. Switch off the appliance at the main switch. Empty the dirt container. 12 EN - 2
-
 1
1 -
2
-
3
-
4
-
5
-
6
-
 7
7 -
 8
8 -
 9
9 -
 10
10 -
 11
11 -
 12
12 -
 13
13 -
 14
14 -
 15
15 -
 16
16 -
 17
17 -
18
-
19
-
20
-
21
-
22
-
23
-
24
-
25
-
26
-
27
-
28
-
29
-
30
-
31
-
32
-
33
-
34
-
35
-
36
-
37
-
38
-
39
-
40
-
41
-
42
-
43
-
44
-
45
-
46
-
47
-
48
-
49
-
50
-
51
-
52
-
53
-
54
-
55
-
56
-
57
-
58
-
59
-
60
-
61
-
62
-
63
-
64
-
65
-
66
-
67
-
68
-
69
-
70
-
71
-
72
-
73
-
74
-
75
-
76
-
77
-
78
-
79
-
80
-
81
-
82
-
83
-
84
-
85
-
86
-
87
-
88
-
89
-
90
-
91
-
92
-
93
-
94
-
95
-
96
-
97
-
98
-
99
-
100
-
101
-
102
-
103
-
104
-
105
-
106
-
107
-
108
-
109
-
110
-
111
-
112
-
113
-
114
-
115
-
116
-
117
-
118
-
119
-
120
-
121
-
122
-
123
-
124
-
125
-
126
-
127
-
128
-
129
-
130
-
131
-
132
-
133
-
134
-
135
-
136
-
137
-
138
-
139
-
140
-
141
-
142
-
143
-
144
-
145
-
146
-
147
-
148
 |
 |
