Kenmore 6817 Installation Instructions - Page 1
Kenmore 6817 - 20.6 cu. Ft. Top Freezer Refrigerator Manual
 |
View all Kenmore 6817 manuals
Add to My Manuals
Save this manual to your list of manuals |
Page 1 highlights
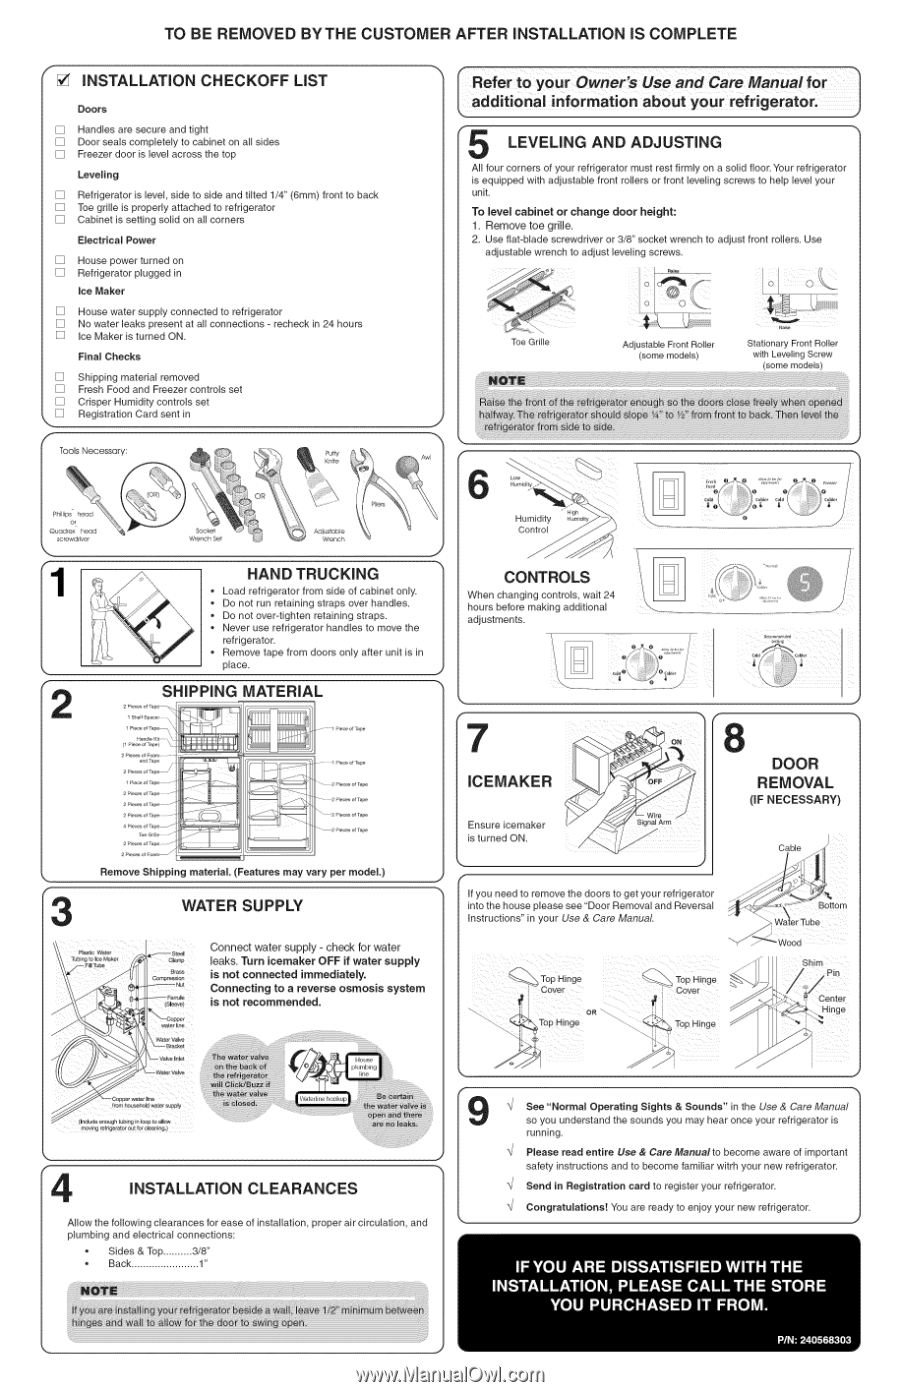
TO BE REMOVED BYTHE CUSTOMER AFTER iNSTALLATiON IS COMPLETE f [] iNSTALLATION CHECKOFF LIST DOORS [] Handles are secure and tight [] Door seals completely to cabinet on all sides [] Freezer door is level across the top Leveling [] Refrigerator is level, side to side and tilted 1/4" (6mm) front to back [] Toe grille is properly attached to refrigerator [] Cabinet is setting solid on all corners Electrical Power [] House power turned on [] Refrigerator plugged in ice Maker [] House water supply connected to refrigerator [] No water leaks present at all connections - recheck in 24 hours [] Ice Maker is turned ON. Final Checks [] Shipping material removed [] Fresh Food and Freezer controls set [] Crisper Humidity controls set [] Registration Card sent in f Tools Necessary: f -, LEVELING AND ADJUSTING All four corners of your refrigerator must rest firmly on a solid floor. Your refrigerator is equipped with adjustable front rollers or front leveling screws to help level your unit. To level cabinet or change door height: 1. Remove toe grille. 2. Use flat-blade screwdriver or 3/8" socket wrench to adjust front rollers. Use adjustable wrench to adjust leveling screws. Toe Grille Adjustable Front Roller (some models) Stationary Front Roller with Leveling Screw (some models) 6 Phillips" head Quodrex hood screwdriver 1 % 2f Socket Wrench Set Adjustable Wrench J HAND TRUCKING ,, Load refrigerator from side of cabinet only. ,, Do not run retaining straps over handles. ,, Do not over-tighten retaining straps. ,, Never use refrigerator handles to move the refrigerator. ,, Remove tape from doors only after unit is in place. SHIPPING MATERIAL 1....... fT_l \ 2 Pieces of Foam ......... . !OD - 1 Piece ol Tape 1 Piece of _hpe 1 Piece of Ta#e 2 Pieces of Tape - - 2 Piece8 of Tape .-f" 2 Pieces of T_pe ......... 4 Pieces of TapeJ Toe Grille r--" J 2 Pieces of Foam_ "_ 2 I:_ieees of I_pe ...... 2 Pieces of Tape "\" 2 _:'_eees of I_pe "-_2 I P_eees ef Tape Remove Shipping material. (Features may vary per model.) 3 WATER SUPPLY Plastic Water Connect water supply - check for water leaks. Turn icemaker OFF if water supply is not connected immediately. Connecting to a reverse osmosis system is not recommended. Humidity o ""H_h'd'ty_-_)_ CONTROLS When changing controls, wait 24 hours before making additional adjustments. / 7 ICEMAKER Ensure icemaker is turned ON. [/"/_,//_ Signal Arm f if you need to remove the doors to get your refrigerator into the house please see "Door Removal and Reversal instructions" in your Use & Care Manual. OR_ iii ,J DOOR REMOVAL (iF NECESSARY) Cable Bottom ube Shim Center gliii!iiijli 4 INSTALLATION CLEARANCES Allow the following clearances for ease of installation, proper air circulation, and plumbing and electrical connections: ,, Sides & Top .......... 3/8" * Back 1" See "Normal Operating Sights & Sounds" in the Use & Care Manual so you understand the sounds you may hear once your refrigerator is running. Please read entire Use & Care Manual to become aware of important safety instructions and to become familiar witrh your new refrigerator. Send in Registration card to register your refrigerator. Congratulations! You are ready to enjoy your new refrigerator.
-
 1
1 -
 2
2
 |
 |