Kenmore 6972 Installation Instructions - Page 8
SeeDetermine
 |
View all Kenmore 6972 manuals
Add to My Manuals
Save this manual to your list of manuals |
Page 8 highlights
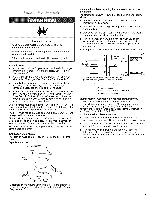
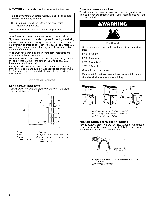
1. Instaell xhaushtoodU. secaulkincgompountodseael xterior wallopeninagroundexhaushtood. 2. ConnecvtentoexhaushtoodV. enmt usftitinsideexhaust hoodS. ecurveentoexhaushtoodwith4"(10.2cm)clamp. 5. Placeacartoncornepr ostundeer achofthe2 dryebr ack cornersS.tandthedryeur p.Slidethedryeor nthecorner postsuntiilt isclosetoitsfinalocationL.eavenougrhoom toconnectht eexhausvtent. 6. Onceconnectioisnmadeanddryeirsinfinalocation, removceornepr ostsandcardboard. 3. RunventodryelrocationU.sethestraightepsat thpossible. For mobile home use See"DeterminVeenLt engthA."void90°turnsU. seclamptso seaal lljointsD. onotuseductapes, crewosrothefrastening Gas dryers must be securely fastened to the floor. devicetshatextendintotheinterioorfthevent o secure vent. Mobile home installations require a Mobile Home Installation Kit. See "Tools and Parts" section for ordering information. Check the levelness of the dryer. Check levelness first side to side, then front to back. 1. Toprotecttheflooru, sea largeflatpieceofcardboafrrdom thedryecr artonP. lacecardboarudndetrheentirebackedge ofthedryerS. eeillustration. 2. Firmlygraspthebodyofthedrye(rnothetoporconsole panelG). entlylaythedryeor nthecardboard. 3. Examine the leveling legs. Find the diamond marking. If the dryer is not level, prop up the dryer using a wood block. Use a wrench to adjust the legs up or down and check again for levelness. NOTE: It might be necessary to level the dryer again after it is moved into its final position. 4. Screw the legs into the leg holes by hand. Use a wrench to finish turning the legs until the diamond marking is no longer visible.
-
 1
1 -
2
-
 3
3 -
 4
4 -
 5
5 -
 6
6 -
 7
7 -
 8
8 -
 9
9 -
 10
10 -
 11
11 -
 12
12 -
 13
13 -
14
-
15
-
16
-
17
-
18
-
19
-
20
 |
 |
