Kenmore 7418 Use and Care Guide - Page 2

Conten, Product, Record, DRYER, SAFETY

Page 2 highlights

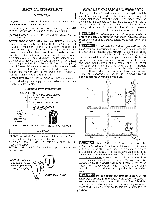
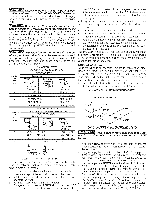
Conten ts SUBJECT PAGE Pre-lnstallation Requirements 2 Electrical Requirements 3 Product Record For Sears warranty information or to contact a Sears Service Center, call 1-800-4-my-HOME (1-800-469-4663) Exhaust System Requirements 3-4 Gas Supply Requirements 4 Rough-In Dimensions 5 Unpacking 5 Reversing Door Swing 5 Location of Your Dryer 6 Electrical Installation 7 Grounding Requirements 7 Electrical Connections--3-wire 8 Electrical Connections--4-wire 8 Installation 9 Lint Blade Retaining Pin Location 9 Metercase instructions 9-12 If you need SERVICE or PARTS for your Kenmore coin-operated washer: be ready to give the model number, serial number and date of purchase. Record below. Modelnumber Serialnumber Purchase date Record Coin Box RPaerptlsacliesmtse..n..t....P...a..r.t.s 13-1142 Key Number Warranty 15 Key number is on key and/or coin box. Back Cover 16 ...).]...DRYER SAFETY Before beginning installation, carefully read these instructions. This will simpfify the installation and ensure the dryer is installed correctly and safely. Leave these instructions near the Dryer after installation for future reference. NOTE: The electrical service to the Dryer must conform with local codes and ordinances and the latest edition of the National Electrical Code, ANSI/NFPA 70. NOTE: The gas service to the Dryer must conform with local codes and ordinances and the latest edition of the National Fuel Gas Code ANSI Z223.1. Your safety and the safety of others is very important. We have provided many important safety messages in the Installation Instructions / Use & Care Guide and on your appliance. Always read and obey all safety messages. _This is the safety alert symbol. This symbol alerts you to hazards that can kill or hurt you or others. All safety messages will be preceded by the safety alert symbol and the word "DANGER" or "WARNING" These words mean: You can be killed or seriously injured if you don't immediately follow instructions. You can be killed or seriously injured if you don't follow instructions. All safety messages will identify the hazard, tell you how to reduce the chance of injury, and tell you what can happen if the instructions are not followed. For your safety the information in this manual must be followed to minimize the risk of fire or explosion or to prevent property damage, personal injury or loss of life. - Do not store or use gasoline or other flammable vapors and liquid in the vicinity of this or any other appliance. - WHAT TO DO IF YOU SMELL GAS • Do not try to light any appliance. • Do not touch any electrical switch; do not use any phone in your building. • Clear the room, building or area of all occupants. Immediately call your gas supplier from a neighbor's phone. Follow the gas supplier's instructions. If you cannot reach your gas supplier, call the fire department. Installations must be performed by a qualified or licensed contractor, plumber, or gasfitter qualified or licensed by the state, province, or region where this appliance is being installed. PRE-INSTALLATION REQUIREMENTS Tools and Materials Required for Installation: 1. Phillips head screwdriver. 2. Channel-lock adjustable pliers. 3. Carpenter's level. 4. Flat or straight blade screwdriver. 6. Rigid or flexible metal 4 inch (10.2 cm) duct. 7. Vent hood. 8. Pipe thread sealer (Gas). 9. Plastic knife. S. Duct tape.

  • 1
  • 2
  • 3
  • 4
  • 5
  • 6
  • 7
  • 8
  • 9
  • 10
  • 11
  • 12
  • 13
  • 14
  • 15
  • 16

Conten
ts
Product
Record
SUBJECT
PAGE
Pre-lnstallation
Requirements
.................................
2
For Sears warranty
information
or to contact
a Sears Service
Electrical
Requirements
..........................................
3
Center,
call
1-800-4-my-HOME
(1-800-469-4663)
Exhaust
System
Requirements
............................
3-4
If
you
need
SERVICE
or
PARTS
for
your
Kenmore
Gas Supply Requirements
.......................................
4
Rough-In Dimensions
..............................................
5
coin-operated
washer:
be ready to
give the
model
Unpacking
................................................................
5
number,
serial number
and
date
of
purchase.
Record
Reversing Door Swing
.............................................
5
below.
Location
of Your Dryer
.............................................
6
Electrical
Installation
...............................................
7
Modelnumber
Grounding
Requirements
........................................
7
Electrical
Connections--3-wire
..............................
8
Serialnumber
Electrical
Connections--4-wire
..............................
8
Installation
................................................................
9
Purchase
date
Lint Blade Retaining
Pin Location
...........................
9
Metercase
instructions
......................................
9-12
Record
Coin
Box
Replacement
Parts
.................................................
12
Key
Number
Parts lists
.........................................................
13-14
Warranty
...............................................................
15
Key number
is on key and/or
coin box.
Back Cover
...........................................................
16
..................................................................................................................................................................................................................................................................................................................................................................................................................................................................................
)]
DRYER
SAFETY
Before beginning
installation,
carefully
read
these instructions.
This will
simpfify
the installation
and
ensure
the dryer
is installed
correctly
and safely. Leave these instructions
near the Dryer after
installation
for future
reference.
NOTE: The electrical
service
to the Dryer
must
conform
with
local
codes and
ordinances
and the
latest
edition
of
the
National
Electrical
Code, ANSI/NFPA 70.
NOTE: The gas service
to
the Dryer
must
conform
with
local
codes
and
ordinances
and
the
latest
edition
of
the
National
Fuel Gas Code ANSI Z223.1.
Your safety and the safety of others is very important.
We have provided many important
safety messages in the Installation
Instructions
/
Use & Care Guide and on your appliance. Always read and obey all safety messages.
_This
is the safety alert symbol. This symbol alerts you to hazards that can kill or hurt you or others.
All safety messages will
be preceded by the safety alert symbol and the word
"DANGER" or "WARNING"
These words mean:
You
can be
killed
or
seriously
injured
if you
don't
immediately
follow
instructions.
You
can be killed
or
seriously
injured
if you
don't
follow
instructions.
All safety messages will identify the hazard, tell you how to reduce the chance of injury, and tell you what can happen if the
instructions are not followed.
For your safety the information in this manual must be followed to minimize the risk of fire or explosion or to prevent
property damage, personal injury or loss of life.
- Do not store or use gasoline or other flammable vapors and liquid in the vicinity of this or any other appliance.
-
WHAT TO DO
IF
YOU SMELL GAS
Do not try to light any appliance.
Do not touch any electrical switch; do not use any phone in your building.
Clear the room, building or area of all occupants.
Immediately call your gas supplier from a neighbor's phone. Follow the gas supplier's instructions.
If you cannot reach your gas supplier, call the fire department.
Installations must be performed
by a qualified
or licensed contractor, plumber, or gasfitter qualified
or licensed by the state,
province, or region where this appliance is being installed.
PRE-INSTALLATION
REQUIREMENTS
Tools
and
Materials
Required
for
Installation:
1. Phillips head screwdriver.
2.
Channel-lock
adjustable pliers.
3.
Carpenter's
level.
4. Flat or straight blade screwdriver.
S. Duct tape.
6. Rigid or flexible metal 4 inch (10.2 cm) duct.
7. Vent hood.
8. Pipe thread sealer (Gas).
9.
Plastic knife.