Kenmore 7965 Installation Instructions - Page 11
Reversible Super Wide Side-Swing Door
 |
UPC - 883049149400
View all Kenmore 7965 manuals
Add to My Manuals
Save this manual to your list of manuals |
Page 11 highlights
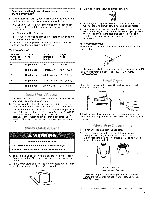
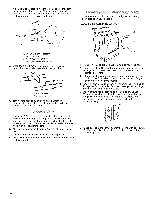
Reversible Super Wide Side-Swing Door C 10. Remove door strike plug (B). Insert the door strike you removed in Step 8 into hole and secure with screw. Insert door strike plug into original door strike hole and secure with screw. 11. Close door and check that door strike aligns with door catch (C). If it is needed, slide door catch left or right within slot to adjust alignment. 1. Place towel (A) on top of dryer to avoid damaging surface. 2. Open dryer door. Remove bottom screws from cabinet side of hinges (D). Loosen (do not remove) top screws from cabinet side of hinges. 3. Lift door until top screws in cabinet are in large part of hinge slot. Pull door forward off screws. Set door (handle side up) on top of dryer. Remove top screws from cabinet. 4. Remove screws attaching hinges to door. 5. Remove screws at top, bottom, and side of door (4 screws). Holding door over towel on dryer, grasp sides of outer door and gently lift to separate it from inner door. Do not pry apart with putty knife. Do not pull on door seal or plastic door catches. 6. Be certain to keep cardboard spacer centered between doors. Reattach outer door panel to inner door panel so handle is on the side where hinges were just removed. 7= Attach door hinges to dryer door so that the larger hole is at the bottom of the hinge. 8. Remove door strike (E) from cabinet. Use a small, flat-blade screwdriver to gently remove 4 hinge hole plugs (F) on left side of cabinet. Insert plugs into hinge holes on right side of cabinet. g. Insert screws into bottom holes on left side of cabinet. Tighten screws halfway. Position door so large end of door hinge slot is over screws. Slide door up so screws are in bottom of slots. Tighten screws. Insert and tighten top screws in hinges. 1. Check that all parts are now installed. If there is an extra part, go back through the steps to see what was skipped. 2. Check that you have all of your tools. 3. Check dryer's final location. Be sure vent is not crushed or kinked. 4. Check that dryer is level. See "Level Dryer." Electrical Shock Hazard Plug into a grounded 3 prong outlet. Do not remove ground prong, Do not use an adapter. Do not use an extension cord. Failure to follow these instructions can result in death, fire, or electrical shock. 5. Plug into a grounded 3 prong outlet. Turn on power. 6. Remove any film or tape remaining on the dryer. 7. Dispose of/recycle all packaging materials. 8. Read "Dryer Use" in the Dryer User Instructions. 9. Wipe dryer drum interior thoroughly with a damp cloth to remove any dust. 10. Select a Timed Dry heated cycle, and start the dryer. Do not select the Air Only Temperature setting. If the dryer will not start, check the following: • Dryer is plugged into a grounded 3 prong outlet. • Electrical supply is connected. • Household fuse is intact and tight, or circuit breaker has not tripped. • Dryer door is closed. 11. When the dryer has been running for 5 minutes, open the dryer door and feel for heat. If you feel heat, cancel cycle and close door. If you do not feel heat, turn off the dryer, and check that the gas supply line shutoff valve is open. • If the gas supply line shutoff valve is closed, open it, then repeat the 5-minute test as outlined above. • If the gas supply line shutoff valve is open, contact a qualified technician. 11
-
 1
1 -
2
-
3
-
4
-
5
-
 6
6 -
 7
7 -
 8
8 -
 9
9 -
 10
10 -
 11
11 -
 12
12 -
 13
13 -
 14
14 -
 15
15 -
 16
16 -
17
-
18
-
19
-
20
-
21
-
22
-
23
-
24
 |
 |
