Kenmore 9397 User Manual - Page 6
IHsIalIiH I, VOU Ief ige aIo
 |
View all Kenmore 9397 manuals
Add to My Manuals
Save this manual to your list of manuals |
Page 6 highlights
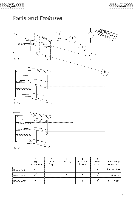
IHsIalIiH I VOU Ief ige aIo[ LJnpaeking Your Refrigerator 1 Remove all packaging material. This includes the foam b_se and all adhesive tape holding the refrigerator accessories inside and outside. 2. Inspect and remove any remains of packing, tape or printed materials before powering on the refrigerator. Proper Air Circulation To assure your refrigerator works at the maximum efficiency it was designed for, you should instal it in a location where there is proper air circulation, plumbing and electricai connections. The following are recommended clearances around the refrigerator: Bides Top Back 3/4" (19ram) 2" (50mm) 2" (50mm) l:lecttical Requitemertt Make sure there is a suitable power outlet (115 volts, 15 amps outlet) with proper grounding to power the refrigerator. Avoid the use of three plug adapters or cutting off the third grounding in order to accommodate a two plug outlet. This is a dangerous practice since it provides no effective grounding for the refrigerator and may resuit in shock hazard. Use of Extension Cords Avoid the use of an extension cord beck]use of potential s_fety h,_zards under certain conditions. If it is necessary to use an extension cord, use only a 3-wire extension cord that has a 3-btade grounding plug and a 3slot outlet that wiii accept the plug. The marked rating of the extension cord must be equal to or greater than the electrical rating of the appliance. install [imitations Do not install your refrigerator in any location not properly heated e.g. garage etc. '7our refrigerator was not designed temperature settings below 55 ° Fahrenheit. insulated or to operate in Belect a suitable location for the refrigerator on a hard even surface away from direct sunlight or heat source e.g. radiators, baseboard heaters, cooking appliances etc. Any floor unevenness shouId be corrected with the leveling legs located at the bottom.
-
 1
1 -
 2
2 -
 3
3 -
 4
4 -
 5
5 -
 6
6 -
 7
7 -
 8
8 -
 9
9 -
 10
10 -
 11
11 -
 12
12 -
13
-
14
-
15
-
16
-
17
-
18
-
19
-
20
-
21
-
22
-
23
-
24
-
25
-
26
-
27
-
28
-
29
-
30
-
31
-
32
-
33
-
34
-
35
-
36
 |
 |