Kenwood CA-LID98 Operation Manual - Page 3
Bag and Lid Prep, Disassembling The Factory Lid
 |
View all Kenwood CA-LID98 manuals
Add to My Manuals
Save this manual to your list of manuals |
Page 3 highlights
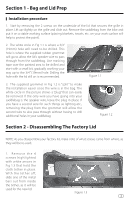
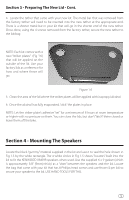
Section 1 - Bag and Lid Prep Installation procedure 1. Start by removing the 2 screws on the underside of the lid that secures the grille in place. Lift up slightly on the grille and slide out. Remove the saddlebag from the bike and put it on a stable working surface (placing blankets, towels, etc. on your work surface will help to protect the paint). 2. The white circle in Fig 1.1 is where a 3/4" (19mm) hole will need to be drilled. This hole is where the supplied rubber grommet will go to allow the lid's speaker wire to pass through from the saddlebag. Use masking tape over the painted area to be drilled and start with a small bit, gradually working your way up to the 3/4" (19mm) hole. Drilling the hole with the lid still on is recommended. Figure 1.1 3. The supplied grommet in Fig 1.2 is "split" to make the installation easier once the wire is in the bag. The white circle in the picture shows a "plug" that can easily be removed. If the only wire you have going into your saddlebag is the speaker wire, leave the plug in place. If you have a second wire for such things as lighting etc., removing the plug from the grommet will allow the second wire to also pass through without having to drill additional holes in your saddlebag. Figure 1.2 Section 2 - Disassembling The Factory Lid NOTE: As you disassemble your factory lid, make note of what screws came from where, as they will be re-used. 1. Remove the 4 screws highlighted with white arrows in Fig 1.3 that hold the cloth tether in place. With the tether off, slide one of the metal bars out from inside the tether, as it will be used for the new lid. Figure 1.3 3
-
 1
1 -
 2
2 -
 3
3 -
 4
4 -
 5
5 -
 6
6 -
 7
7 -
 8
8
 |
 |
