Kenwood CA-LID98 Operation Manual - Page 5
Mounting The Speakers
 |
View all Kenwood CA-LID98 manuals
Add to My Manuals
Save this manual to your list of manuals |
Page 5 highlights
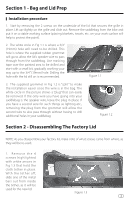
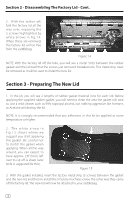
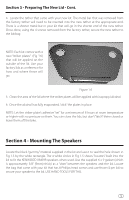
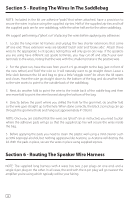
Section 3 - Preparing The New Lid - Cont. 4. Locate the tether that came with your new kit. The metal bar that was removed from the factory tether will need to be inserted into the new tether at the appropriate end. There is a shorter metal bar in your kit that will go in the shorter end of the new tether. Once done, using the 4 screws removed from the factory tether, secure the new tether to the lid/bag. NOTE: Each kit comes with 4 new "striker plates" (Fig 1.6) that will be applied on the outside of the lid. Use your factory lids as a reference for how and where these will go. Figure 1.6 5. Clean the area of the lid where the striker plates will be applied with isopropyl alcohol. 6. Once the alcohol has fully evaporated, "stick" the plates in place. NOTE: Let the striker plate's adhesive "set" for a minimum of 8 hours at room temperature or higher with no pressure on them. You can close the lids, but don't "latch" them closed or leave them off the bike. Section 4 - Mounting The Speakers Locate the black "gummy" material supplied in the kit and use it to seal the hole shown in Fig 1.5 by the white rectangle. The 4 white circles in Fig 1.5 shows "locators" built into the lid to fit the KENWOOD XM69R speakers when used. Use the supplied 6 x 9 gasket (which is approximately 3/8" (9mm) thick) as a "shim" between the speakers and the lid. Locate the bag that came with your kit that has 8 Phillips head screws and use those (4 per lid) to secure your speaker to the lid. USE HAND TOOLS FOR THIS. 5
-
 1
1 -
 2
2 -
 3
3 -
 4
4 -
 5
5 -
 6
6 -
 7
7 -
 8
8
 |
 |
