Kenwood DDX23BT North America - Page 71
Removing the unit
 |
View all Kenwood DDX23BT manuals
Add to My Manuals
Save this manual to your list of manuals |
Page 71 highlights
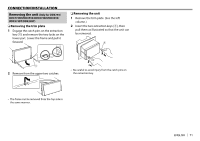
CONNECTION/INSTALLATION Removing the unit (Only for DDX793/ DDX773BH/DDX593/DDX573BH/DDX393/ DDX373BT/DDX23BT) ❏ Removing the trim plate 1 Engage the catch pins on the extraction key (4) and remove the two locks on the lower part. Lower the frame and pull it forward. ❏ Removing the unit 1 Remove the trim plate. (See the left column.) 2 Insert the two extraction keys (4), then pull them as illustrated so that the unit can be removed. 4 4 2 Remove from the upper two catches. • Be careful to avoid injury from the catch pins on the extraction key. • The frame can be removed from the top side in the same manner. ENGLISH 71
-
 1
1 -
2
-
3
-
4
-
5
-
6
-
7
-
8
-
9
-
10
-
11
-
12
-
13
-
14
-
15
-
16
-
17
-
18
-
19
-
20
-
21
-
22
-
23
-
24
-
25
-
26
-
27
-
28
-
29
-
30
-
31
-
32
-
33
-
34
-
35
-
36
-
37
-
38
-
39
-
40
-
41
-
42
-
43
-
44
-
45
-
46
-
47
-
48
-
49
-
50
-
51
-
52
-
53
-
54
-
55
-
56
-
57
-
58
-
59
-
60
-
61
-
62
-
63
-
64
-
65
-
 66
66 -
 67
67 -
 68
68 -
 69
69 -
 70
70 -
 71
71 -
 72
72 -
 73
73 -
 74
74 -
 75
75 -
 76
76 -
77
-
78
-
79
-
80
-
81
-
82
-
83
-
84
 |
 |

ENGLISH
71
CONNECTION/INSTALLATION
CONNECTION/INSTALLATION
Removing the unit
(Only for DDX793/
DDX773BH/DDX593/DDX573BH/DDX393/
DDX373BT/DDX23BT)
❏
Removing the trim plate
1
Engage the catch pins on the extraction
key (
4
) and remove the two locks on the
lower part. Lower the frame and pull it
forward.
4
2
Remove from the upper two catches.
•
The frame can be removed from the top side in
the same manner.
❏
Removing the unit
1
Remove the trim plate. (See the left
column.)
2
Insert the two extraction keys (
4
), then
pull them as illustrated so that the unit can
be removed.
4
•
Be careful to avoid injury from the catch pins on
the extraction key.