Kenwood KDC-X595 Instruction Manual - Page 28
Information display setting, Illumination color selection, Display, Overview, Operation type
 |
UPC - 019048193131
View all Kenwood KDC-X595 manuals
Add to My Manuals
Save this manual to your list of manuals |
Page 28 highlights
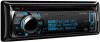
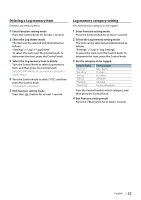
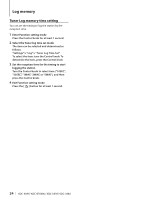
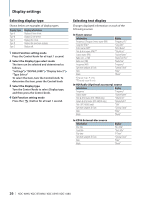
Display settings Information display setting Sets side and graphic parts of the display. 1 Enter Function setting mode Press the Control knob for at least 1 second. 2 Select the Display select mode The item can be selected and determined as follows. "Settings" > "DISP&ILLUMI" > "Display Select" To select the item, turn the Control knob. To determine the item, press the Control knob. 3 Select the desired Information display setting item Turn the Control knob to select Display setting item, and then press the Control knob. Display "Display Select" "Side Select" "Graphic Select" "Status" Overview Sets the side part display for Type A, B, and D. 1 / 2 / 3 Sets the Type C clock display and Type D spectrum analyzer display. 1 / 2 Sets the status display (ON/OFF indicator for each function) for Type A and B. "ON" / "OFF" ( : Factory setting) 4 Set the Display setting item Turn the Control knob to select desired value, and then press the Control knob. The previous item is displayed. 5 Exit Function setting mode Press the [ ] button for at least 1 second. Illumination color selection Selecting the Illumination Color of the panel. 1 Enter Function setting mode Press the Control knob for at least 1 second. 2 Select Color select mode The item can be selected and determined as follows. "Settings" > "DISP&ILLUMI" > "Color Select" To select the item, turn the Control knob. To determine the item, press the Control knob. 3 Select the part where you want to set the Illumination Color Display "Color Select" "ALL" "Display" "Key" "USB&AUX" Part All Display Button USB terminal and Auxiliary input Turn the Control knob to select part, and then press the Control knob. 4 Select the Illumination Color Turn the Control knob to select color, and then press the Control knob. Select the color from "Variable Scan"/ "Color1" - "Color24". Adjusting RGB values You can create your original color during the selection from "Color1" - "Color24." The color you created can be called when you select "User". 1. Press the Control knob for at least 1 second. Enter the detail color adjustment mode. 2. Set the color. Operation type Operation To select the color to adjust. Push the Control knob towards right (red, green, or blue) or left. To adjust color. Turn the Control knob. (Range: 0 - 9) 3. Press the Control knob. Exit the detail color adjustment mode. 5 Exit Function setting mode Press the [ ] button for at least 1 second. 28 | KDC-X895/ KDC-BT848U/ KDC-X595/ KDC-448U
-
 1
1 -
2
-
3
-
4
-
5
-
6
-
7
-
8
-
9
-
10
-
11
-
12
-
13
-
14
-
15
-
16
-
17
-
18
-
19
-
20
-
21
-
22
-
 23
23 -
 24
24 -
 25
25 -
 26
26 -
 27
27 -
 28
28 -
 29
29 -
 30
30 -
 31
31 -
 32
32 -
 33
33 -
34
-
35
-
36
-
37
-
38
-
39
-
40
-
41
-
42
-
43
-
44
-
45
-
46
-
47
-
48
-
49
-
50
-
51
-
52
-
53
-
54
-
55
-
56
-
57
-
58
-
59
-
60
-
61
-
62
-
63
-
64
-
65
-
66
-
67
-
68
-
69
-
70
-
71
 |
 |