Kenwood KDV-U4349M User Manual - Page 7
For first use
 |
View all Kenwood KDV-U4349M manuals
Add to My Manuals
Save this manual to your list of manuals |
Page 7 highlights
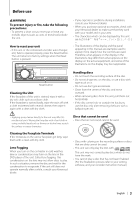
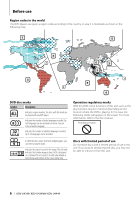
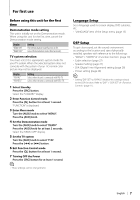
For first use Before using this unit for the first time Demonstration mode setting This unit is initially set on the Demonstration mode. When using this unit for the first time, cancel the Demonstration mode setting. Display "DEMO ON" "DEMO OFF" Setting The Demonstration mode function is ON. Cancel Demonstration mode (Normal mode). TV system selection You must select the appropriate system mode for your TV system. When the selected system does not coincide with the system of your TV, normal color picture may not be displayed. Display "P/N PAL" "P/N NTSC" Setting Select when the unit is connected with PAL-TV. Select when the unit is connected with NTSC-TV. 1 Select Standby Press the [SRC] button. Select the "STANDBY" display. 2 Enter Function Control mode Press the [ ] button for at least 1 second. "FUNCTION" is displayed. 3 Enter Menu mode Turn the [AUD] knob to select "MENU". Press the [AUD] knob. 4 Set the Demonstration mode Turn the [AUD] knob to select "DEMO". Press the [AUD] knob for at least 2 seconds. Select the "DEMO OFF" display. 5 Set the TV system Turn the [AUD] knob to select "P/N". Press the [4] or [¢] button. 6 Exit Function Control mode Press the [ ] button for at least 1 second. 7 Turning OFF the Power Press the [SRC] button for at least 1 second. ⁄ • These settings can be changed later. Language Setup Set a language used for screen display, DVD subtitles, etc. • "LANGUAGE" item of the Setup menu (page 13) DSP Setup To get clear sound, set the sound environment according to the location and size of physically installed speakers with reference to the followings: • "MENU" > "SWPRE" of (page 10) • Cabin selection (page 27) • Speaker Setting (page 27) • DTA (Digital Time Alignment) setting (page 28) • X'Over setting (page 28) ⁄ • Setting "DSP SET" to "BYPASS" disables the settings related to the DSP function. Refer to "DSP" > "DSP SET" of (page 11). English | 7
-
 1
1 -
 2
2 -
 3
3 -
 4
4 -
 5
5 -
 6
6 -
 7
7 -
 8
8 -
 9
9 -
 10
10 -
 11
11 -
 12
12 -
13
-
14
-
15
-
16
-
17
-
18
-
19
-
20
-
21
-
22
-
23
-
24
-
25
-
26
-
27
-
28
-
29
-
30
-
31
-
32
-
33
-
34
-
35
-
36
-
37
-
38
-
39
-
40
 |
 |
