Kenwood KSC-SW11 Instruction Manual - Page 8
Troubleshooting guide, Specifications
 |
View all Kenwood KSC-SW11 manuals
Add to My Manuals
Save this manual to your list of manuals |
Page 8 highlights
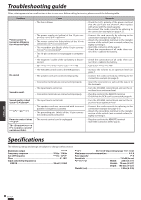
Troubleshooting guide Often, what appears to be a malfunction is due to user error. Before calling for service, please consult the following table. Problem Power cannot be turned on (illumination does not light). No sound Sound is small. Sound quality is bad (sound is distorted). Sound is unnatural. Remote control does not work. The illuminations on the remote control unit do not light. Cause • The fuse is blown. • The power supply pin (yellow) of the 10-pin connection cord is not connected. • The power control pin (blue/white) of the 10-pin connection cord is not connected. • The grounding pin (black) of the 10-pin connection cord is not connected. • The 10-pin connector is not plugged in completely. • The negative (-) cable of the car battery is disconnected. • The attenuator of the center unit is set to ON. • The VOLUME control is set to the MIN position. • The speaker cords are connected improperly. • Connection terminals are connected improperly. • The input level is set to low. • Connection terminals are connected improperly. • The input level is set to high. • The speaker cords are connected with incorrect positive (+)/negative (-) polarity. • The grounding pin (black) of the 10-pin connection cord is poorly contacted. • The remote control cord is unplugged. Remedy • Check the (+)/(-) polarity of the power cord and that the cords are not shorted, then replace with a fuse with the rated capacity. • Re-connect the cords correctly by referring to the connection example (on page 4, 5). • Connect the cord correctly by referring to the connection example (on page 4, 5). • Attach the grounding terminal to the metallic section of the vehicle (not a coated surface) by tightly screwing it. • Insert the connector all the way in. • Check the connections of all cords, then con- nect the (-) cable to the battery. • Check the connections of all cords, then connect the (-) cable to the battery. • Switch the attenuator OFF. • Increase the volume to an optimum level (on page 7). • Connect the cords correctly by referring to the connection example (on page 4). • Insert the connectors or jacks all the way in to the terminals. • Turn the VOLUME control knob and set the input level to an optimum level. • Plug the cord into the REMOTE terminal. • Check that the RCA cord is connected properly. • Turn the VOLUME control knob and set the input level to an optimum level. • Connect the cords correctly by referring to the connection example (on page 4, 5). • Attach the grounding terminal to the metallic section of the vehicle (not a coated surface) by tightly screwing it. • Plug the cord into the REMOTE terminal. • Insert the connector all the way in. Specifications The following ratings and design are subject to change without notice. Maximum output 150 W Frequency response 35 Hz - 150 Hz Cut-off frequency 50 Hz - 125 Hz Phase 0˚, 180˚ Input sensitivity/impedance LINE IN 50 mV / 22 kΩ Power DC 14.4 V (Operating range 11 V - 16 V) Maximum current consumption 8.5 A Fuse capacity 10 A Sensitivity 110 dB (In car) External size Width : 280 mm (11") Height : 70 mm (2-3/4") Depth : 190 mm (7-1/2") Weight (net 2.8kg (6.2 Ib) ENGLISH 8 English
-
 1
1 -
2
-
 3
3 -
 4
4 -
 5
5 -
 6
6 -
 7
7 -
 8
8 -
 9
9
 |
 |
