Kenwood KVT-514 Owners Manual - Page 74
Clock Setup, Monitor Setup
 |
UPC - 019048181466
View all Kenwood KVT-514 manuals
Add to My Manuals
Save this manual to your list of manuals |
Page 74 highlights
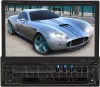
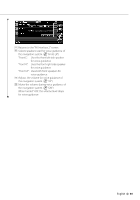
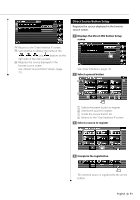
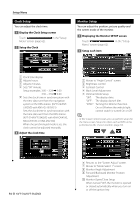
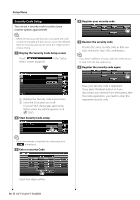
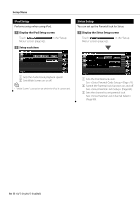
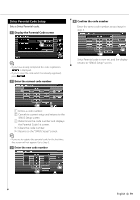
Setup Menu Clock Setup You can adjust the clock time. 1 Display the Clock Setup screen Touch Menu" screen (page 62). in the "Setup 2 Setup the Clock 2 3 1 2 3 4 5 1 Clock time display 2 Adjusts hours. 3 Adjusts minutes. 4 Sets "00" minute. Setup examples: 3:00 - 3:29 \ 3:00 3:30 - 3:59 \ 4:00 5 Sets the clock time in synchronization with the time data sent from the navigation system or the RDS station. (KVT-514/KVT534DVD with KNA-G510/G431) Sets the clock time in synchronization with the time data sent from the RDS station. (KVT-514/KVT-534DVD with KNA-DV4100, KNA-DV3100 or KNA-DV2100) When the synchronized mode is set, the clock cannot be adjusted manually. 3 Adjust the clock time 74 KVT-514/KVT-534DVD Monitor Setup You can adjust the position, picture quality and the screen mode of the monitor. 1 Displaying the Monitor SETUP screen Touch Menu" screen (page 62). in the "Setup 2 Setup each item 1 2 3 5 4 1 Moves to "Angle Control" screen. 2 Brightness control 3 Contrast Control 4 Black Level Adjustment 5 Dimmer Mode Setup "ON": The display dims. "OFF": The display doesn't dim. "SYNC": Turning the Dimmer function On or Off when the vehicle light control switch is turned On or Off. ⁄ • In this Screen Control screen, you can perform setups for the menu screen. Setups for videos such as DVD can be performed on the (page 49). 6 7 8 9 10 11 6 Returns to the "Screen Adjust" screen. 7 Moves to "Mode Select 1" screen. 8 Monitor Angle Adjustment 9 Forward/Backward Monitor Position Adjustment p Monitor Open/Close Setup When turned "ON", the monitor is opened or closed automatically when you turn on or off the ignition key.
-
 1
1 -
2
-
3
-
4
-
5
-
6
-
7
-
8
-
9
-
10
-
11
-
12
-
13
-
14
-
15
-
16
-
17
-
18
-
19
-
20
-
21
-
22
-
23
-
24
-
25
-
26
-
27
-
28
-
29
-
30
-
31
-
32
-
33
-
34
-
35
-
36
-
37
-
38
-
39
-
40
-
41
-
42
-
43
-
44
-
45
-
46
-
47
-
48
-
49
-
50
-
51
-
52
-
53
-
54
-
55
-
56
-
57
-
58
-
59
-
60
-
61
-
62
-
63
-
64
-
65
-
66
-
67
-
68
-
 69
69 -
 70
70 -
 71
71 -
 72
72 -
 73
73 -
 74
74 -
 75
75 -
 76
76 -
 77
77 -
 78
78 -
 79
79 -
80
-
81
-
82
-
83
-
84
-
85
-
86
-
87
-
88
-
89
-
90
-
91
-
92
-
93
-
94
-
95
-
96
-
97
-
98
-
99
-
100
-
101
-
102
-
103
-
104
 |
 |