Kenwood KVT-815DVD Installation Manual - Page 9
English 9
 |
View all Kenwood KVT-815DVD manuals
Add to My Manuals
Save this manual to your list of manuals |
Page 9 highlights
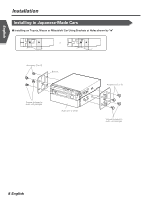
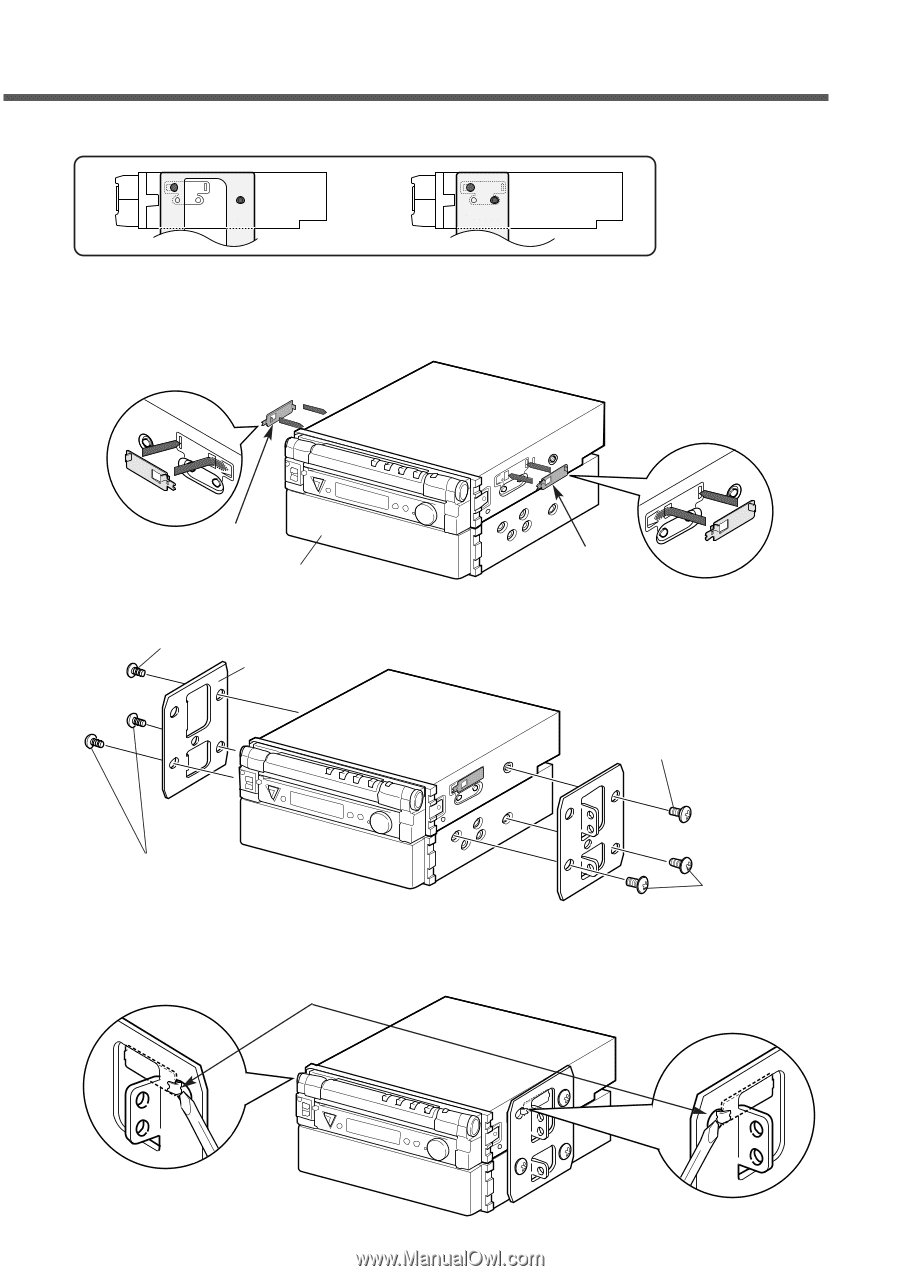
■ Installation on Toyota Car using Brackets at Holes shown by "¶" or When using the bracket shown above, you cannot use screws at two holes of the right and left unit sides. If so, tighten the bracket using accessories 0 as shown below. 1. Use accessories 0 at both sides as shown. Accessory 0 Audio unit or others 2. Mount the bracket at each side. Accessory - Bracket Screws (included in audio unit package) 3. Bend each end of accessory 0 to fix the bracket. Use a flat-blade screwdriver or pliers, and bend each accessory tab into the hole of installation bracket to fix the bracket. Accessory 0 Accessory Screws (included in audio unit package) English 9
-
 1
1 -
2
-
3
-
 4
4 -
 5
5 -
 6
6 -
 7
7 -
 8
8 -
 9
9 -
 10
10 -
 11
11 -
 12
12 -
 13
13 -
 14
14 -
15
-
16
-
17
-
18
-
19
-
20
-
21
-
22
-
23
-
24
-
25
-
26
-
27
-
28
-
29
-
30
-
31
-
32
-
33
-
34
-
35
-
36
-
37
-
38
-
39
-
40
 |
 |
English 9
When using the bracket shown above, you cannot use screws at two holes of the right and left unit sides.
If so, tighten
the bracket using accessories
0
as shown below.
■
Installation on Toyota Car using Brackets at Holes shown by "
"
1.
Use accessories
0
at both sides as shown.
Accessory
0
2.
Mount the bracket at each side.
Accessory
-
Accessory
-
Screws (included in
audio unit package)
Screws (included in
audio unit package)
Audio unit or others
Accessory
0
Bracket
or
3.
Bend each end of accessory
0
to fix the bracket.
Use a flat-blade screwdriver or pliers, and
bend each accessory tab into the hole of
installation bracket to fix the bracket.