KitchenAid KBFO42FTX Use & Care Guide - Page 10
Freezer Features, Door Features - model
 |
UPC - 883049033983
View all KitchenAid KBFO42FTX manuals
Add to My Manuals
Save this manual to your list of manuals |
Page 10 highlights
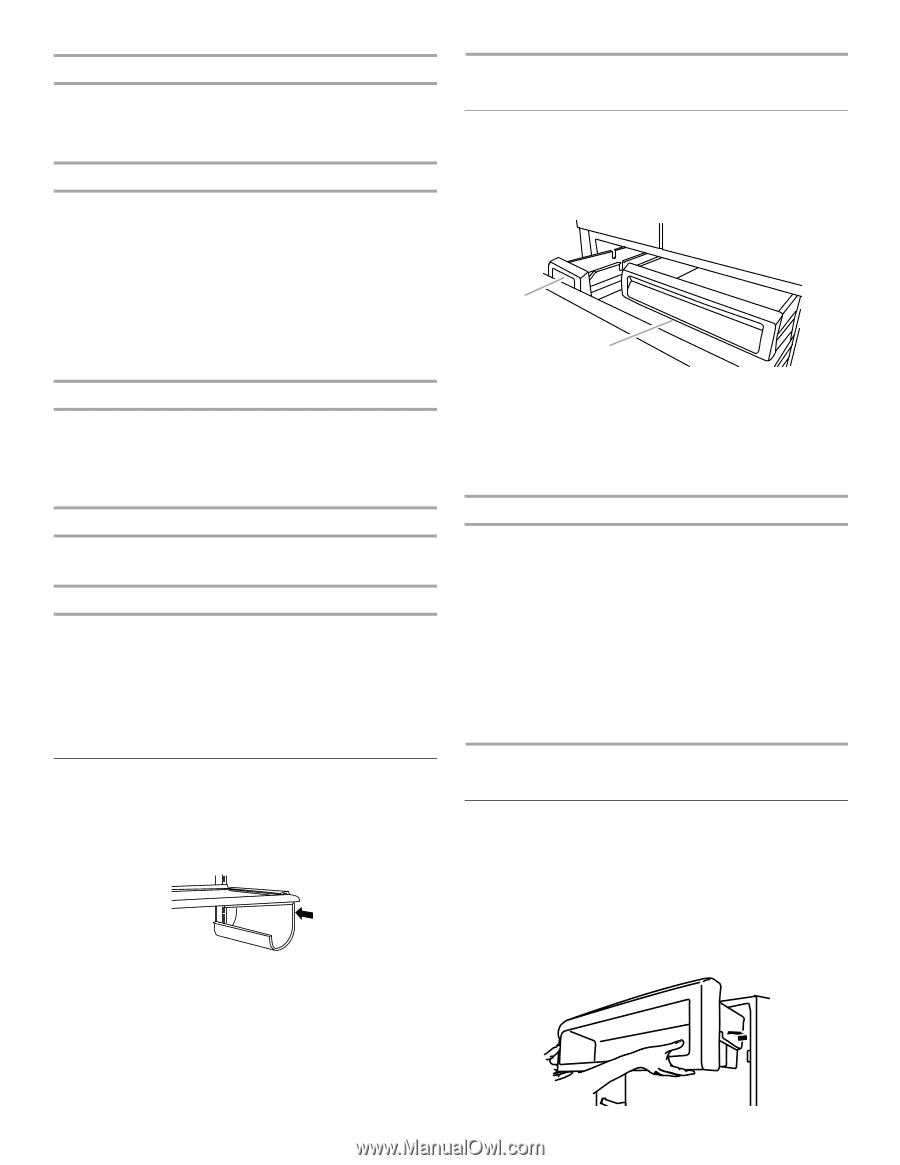
Deli Pan Settings (42" [106.7 cm] Models) The Ingredient Care Center control panel located above each deli pan has the following three temperature settings: Deli, Produce, Meats (Cold to Coldest) and the Quick Chill setting. Select the appropriate setting for the food being stored. Meat Storage Guide (42" [106.7 cm] Models) Store most meat in original wrapping as long as it is airtight and moisture-proof. Rewrap if necessary. See the following chart for storage times. When storing meat longer than the times given, freeze the meat. Fresh fish or shellfish use same day as purchased Chicken, ground beef, variety meat (liver, etc.)......... 1-2 days Cold cuts, steaks/roasts 3-5 days Cured meats 7-10 days Leftovers - Cover leftovers with plastic wrap, aluminum foil, or plastic containers with tight lids. Quick Chill Setting (42" [106.7 cm] Models) Each deli pan has a Quick Chill setting. Activating this selection lowers the temperature of the pan for a period of one hour. NOTE: This will lower the deli pan temperature below the freezing point for liquids. Care should be taken on what items are in the pan when this setting is selected. Crisper Pan Above each deli pan is a crisper pan (the larger of the pans) which is for your larger produce items. Remove and Replace the Deli/Crisper Pans 1. Slide the deli/crisper pan straight out to the stop. Lift the front of the pan with one hand while supporting the bottom with the other hand. Slide the pan out the rest of the way. 2. To replace the deli/crisper pan, pull out the pan slides until they are fully extended and set the pan on the slides. Push the pan in toward the back until it is in closed position. 3. Reopen the deli/crisper pan to make sure it has been replaced properly. Wine Rack To Remove and Replace the Wine Rack: 1. Remove the rack by pulling it straight out from the shelf. 2. Replace the rack by sliding it in between the shelf and the wall of the refrigerator. FREEZER FEATURES Freezer Pan and Pull-out Ice Bin The freezer pan can be used to store smaller items. The freezer pan is not removable. Remove and Replace the Ice Bin: 1. Slide the ice bin out of the freezer and lift up and out. A B A. Ice bin B. Freezer pan 2. To replace the ice bin, pull out the pan slides until they are fully extended and set ice bin on the slides. Push the ice bin in toward the back until it is in closed position. 3. Reopen the ice bin to make sure it has been replaced properly. Frozen Food Storage Guide Storage times will vary according to the quality and type of food, the type of packaging or wrap used (should be airtight and moisture-proof), and the storage temperature. Ice crystals inside a sealed package are normal. This simply means that moisture in the food and air inside the package have condensed, creating ice crystals. Put no more unfrozen food into the freezer than will freeze within 24 hours (no more than 2 to 3 lbs of food per cubic foot [907-1,350 g per 28 L] of freezer space). Leave enough space in the freezer for air to circulate around packages. Be careful to leave enough room for the door to close tightly. For more information on preparing food for freezing, check a freezer guide or reliable cookbook. DOOR FEATURES Utility Compartment (on some models) The utility compartment can be placed in any position on the refrigerator door. To Remove and Replace the Utility Bin: 1. Remove utility compartment by grasping both ends and lifting compartment up and out. 2. Replace the bin by sliding it in above the desired support and pushing it down until it stops. 10
-
 1
1 -
2
-
3
-
4
-
 5
5 -
 6
6 -
 7
7 -
 8
8 -
 9
9 -
 10
10 -
 11
11 -
 12
12 -
 13
13 -
 14
14 -
 15
15 -
16
-
17
-
18
-
19
-
20
-
21
-
22
-
23
-
24
-
25
-
26
-
27
-
28
-
29
-
30
-
31
-
32
-
33
-
34
-
35
-
36
-
37
-
38
-
39
-
40
-
41
-
42
-
43
-
44
-
45
-
46
-
47
-
48
-
49
-
50
-
51
-
52
 |
 |