KitchenAid KBLS19KCMS Use & Care Guide - Page 6
Unpack the Wine Cellar, Install Custom Overlay Frame
 |
View all KitchenAid KBLS19KCMS manuals
Add to My Manuals
Save this manual to your list of manuals |
Page 6 highlights
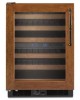
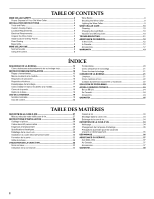
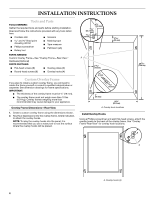
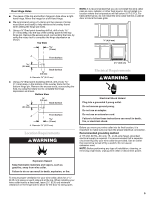
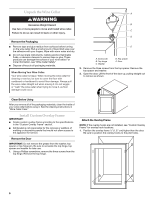
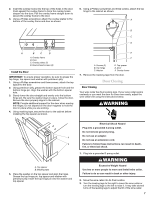
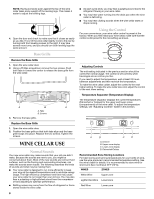
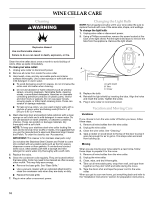
Unpack the Wine Cellar WARNING Excessive Weight Hazard Use two or more people to move and install wine cellar. Failure to do so can result in back or other injury. Remove the Packaging ■ Remove tape and glue residue from surfaces before turning on the wine cellar. Rub a small amount of liquid dish soap over the adhesive with your fingers. Wipe with warm water and dry. ■ Do not use sharp instruments, rubbing alcohol, flammable fluids, or abrasive cleaners to remove tape or glue. These products can damage the surface of your wine cellar. For more information, see "Wine Cellar Safety." ■ Dispose of/recycle all packaging materials. When Moving Your Wine Cellar: Your wine cellar is heavy. When moving the wine cellar for cleaning or service, be sure to cover the floor with cardboard or hardboard to avoid floor damage. Always pull the wine cellar straight out when moving it. Do not wiggle or "walk" the wine cellar when trying to move it, as floor damage could occur. A B C D E A. Screws (3) B. Top hinge C. Washer D. Top spacer E. Door 2. Remove the three screws from the top spacer. Remove the top spacer and washer. 3. Open the door. Lift the front of the door up, pulling straight out to remove as shown. Clean Before Using After you remove all of the packaging materials, clean the inside of your wine cellar before using it. See the cleaning instructions in "Wine Cellar Care." Install Custom Overlay Frame IMPORTANT: ■ Create custom overlay frame according to the specifications in the "Custom Overlay Frame" section. ■ KitchenAid is not responsible for the removal or addition of molding or decorative panels that would not allow access to the appliance for service. Remove the Door IMPORTANT: Do not remove the grease from the washer, top spacer or top hinge pin. Be sure to set aside the top hinge, top spacer and washer for later use. 1. Using a Phillips screwdriver, remove the three screws from the top hinge. Remove the top hinge. Attach the Overlay Frame NOTE: If the overlay hooks are not installed, see "Custom Overlay Frame" for overlay hook locations. 1. Position the overlay frame ¹⁄₂" (1.27 cm) higher than the door. Be sure to position the overlay hooks to the pilot holes. 6
-
 1
1 -
 2
2 -
 3
3 -
 4
4 -
 5
5 -
 6
6 -
 7
7 -
 8
8 -
 9
9 -
 10
10 -
 11
11 -
 12
12 -
13
-
14
-
15
-
16
-
17
-
18
-
19
-
20
-
21
-
22
-
23
-
24
-
25
-
26
-
27
-
28
-
29
-
30
-
31
-
32
-
33
-
34
-
35
-
36
-
37
-
38
-
39
-
40
 |
 |