KitchenAid KCM511OB Instruction Manual - Page 11
Warning - 10 coffee maker
 |
UPC - 050946967318
View all KitchenAid KCM511OB manuals
Add to My Manuals
Save this manual to your list of manuals |
Page 11 highlights
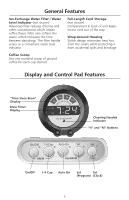
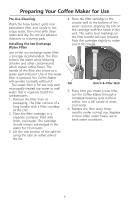
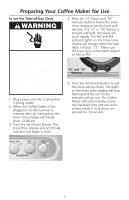
Preparing Your Coffee Maker for Use To Set the Time-of-Day Clock WARNING Electrical Shock Hazard Plug into a grounded 3 prong outlet. Do not remove ground prong. Do not use an adapter. Do not use an extension cord. Failure to follow these instructions can result in death, fire or electrical shock. 1. Plug power cord into a grounded 3 prong outlet. 2. When the Coffee Maker is first plugged in or when power is restored after an interruption, the brew timer display will initially show 12:00 am. 3. Press the Set (Clock) Button. The brew timer display and Set (Clock) indicator will begin to flash. 4. Press the "H" (hour) and "M" (minute) Buttons below the brew timer display to set the hour and minutes. If a "H" or "M" Button is pressed and held, the digits will scroll rapidly. The AM and PM indicator lights on the brew timer display will change when the hour digits roll past "12". Make sure the hour set is correct with respect to AM or PM. "H" and "M" Buttons 5. Press the Set (Clock) Button to exit the clock-setting mode. The digits on the brew timer display will stop flashing and the Set (Clock) indicator will go out. The Coffee Maker will automatically record the displayed time and exit clocksetting mode if no buttons are pressed for 10 seconds. 9
-
 1
1 -
2
-
3
-
4
-
5
-
 6
6 -
 7
7 -
 8
8 -
 9
9 -
 10
10 -
 11
11 -
 12
12 -
 13
13 -
 14
14 -
 15
15 -
 16
16 -
17
-
18
-
19
-
20
-
21
-
22
-
23
-
24
 |
 |
