KitchenAid KCO128BM Owners Manual
KitchenAid KCO128BM Manual
 |
View all KitchenAid KCO128BM manuals
Add to My Manuals
Save this manual to your list of manuals |
KitchenAid KCO128BM manual content summary:
- KitchenAid KCO128BM | Owners Manual - Page 1
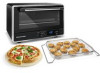
Countertop Oven Four grille-pain Horno para mostrador KCO128 W11670365B.indd 1 7/19/2023 5:22:18 PM - KitchenAid KCO128BM | Owners Manual - Page 2
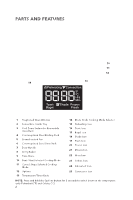
PARTS AND FEATURES 3 8 4 5 6 9 2 1 7 10 11 12 14 15 16 17 18 13 25 24 23 22 21 20 19 1 Toughened Glass Window 2 Removable Crumb Tray 3 Cool Down Surface for Removable Oven Rack 4 Chrome-plated Steel Broiling Rack 5 Enamel-coated Pan 6 Chrome-plated Steel Oven Rack 7 Door Handle 8 Air Fry - KitchenAid KCO128BM | Owners Manual - Page 3
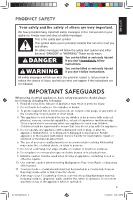
should always be followed, including the following: 1. Read all instructions. Misuse of appliance may result in personal injury. 2. Do not or damaged in any manner. Return appliance to the nearest Authorized Service Facility for examination, repair, or electrical or mechanical adjustment. 6. - KitchenAid KCO128BM | Owners Manual - Page 4
Allow to cool before putting on or taking off parts. SAVE THESE INSTRUCTIONS This product is designed for household use only. ELECTRICAL REQUIREMENTS Voltage: power supply cord is too short, have a qualified electrician or service technician to install an outlet near the appliance. The cord should - KitchenAid KCO128BM | Owners Manual - Page 5
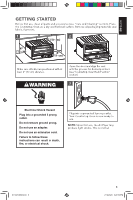
ENGLISH GETTING STARTED Before first use, clean all parts and accessories (see "Care and Cleaning" section). Place the Countertop Oven on a dry and flat level surface. Remove all packaging materials and labels, if present. 1 2 Make sure all sides are positioned with at least 4" (10 cm) distance. - KitchenAid KCO128BM | Owners Manual - Page 6
basket with oil before each batch of food. No more oil is needed. Results may vary with different food brands and sizes. Follow Toaster Oven instructions from the back of the food package and reduce time. TIP: When cooking fatty foods, such as non breaded poultry with skin, use the baking - KitchenAid KCO128BM | Owners Manual - Page 7
ENGLISH COOKING FUNCTIONS COOKING FUNCTION RECOMMEND RACK POSITION PRESET TEMP. °F (°C) TEMPERATURE RANGE °F (°C) PRESET TIME PREHEAT Dehydrate Upper/Lower 150°F (66°C) 80-180°F (27-82°C) 6 hours - Proof Lower 90°F (32°C) 80-100°F (27-38°C) 30 minutes - Air Fry Lower 400°F (205 - KitchenAid KCO128BM | Owners Manual - Page 8
COUNTERTOP OVEN RACK POSITION Bottom rack position for Air Fry, Bake, Dehydrate, Keep Warm, Pizza, Proof, Reheat Top rack position for Broil, Dehydrate USING THE DEHYDRATE FUNCTION Dehydrate option is to remove moisture content from veggies or fruits to dry and preserve them. 1 2 Set the Mode - KitchenAid KCO128BM | Owners Manual - Page 9
ENGLISH USING THE DEHYDRATE FUNCTION 3 IMPORTANT: Always use oven mitts when removing pans or racks. When the time has elapsed, the end signal will sound and the Air Fryer will shut off automatically. USING THE PROOF FUNCTION The Proof function maintains a warm environment useful for rising - KitchenAid KCO128BM | Owners Manual - Page 10
USING THE PIZZA (FROZEN/FRESH) FUNCTION The Pizza Function distributes power to the top and bottom heating elements to maintain the desired Oven temperature to cook homemade or Frozen Pizza. 1 2 Set the Mode knob to Pizza. The default mode is Frozen. To cook Fresh pizza, select the Options button - KitchenAid KCO128BM | Owners Manual - Page 11
ENGLISH USING THE TOAST OR BAGEL FUNCTION In Toast mode, your oven distributes power to the top and bottom heating elements to maintain the desired oven temperature. In Bagel mode, the oven distributes power between the top and bottom heating elements to nicely brown the top of cut bagels while - KitchenAid KCO128BM | Owners Manual - Page 12
USING THE AIR FRY FUNCTION 2 3 Open the door and place the food on the center of the rack. Close the door. Press Start to start the cycle. When the time has elapsed, the end signal will sound and the Countertop Oven will shut off automatically. USING THE BAKE FUNCTION In Bake mode, food will - KitchenAid KCO128BM | Owners Manual - Page 13
ENGLISH USING THE BROIL FUNCTION Only the top cooking elements heat when the Broil function is selected. Use the included 1 broil pan directly on the oven rack for even browning and easy cleanup. The broil pan may also be used for the Bake and Warm settings. The convection fan can be turned - KitchenAid KCO128BM | Owners Manual - Page 14
USING THE REHEAT FUNCTION 2 3 Open the door and place the food on the center of the rack. Close the door. Press Start to start the cycle. When the time has elapsed, the end signal will sound and the Countertop Oven will shut off automatically. USING THE KEEP WARM FUNCTION WARNING Food - KitchenAid KCO128BM | Owners Manual - Page 15
ENGLISH USING THE KEEP WARM FUNCTION 2 3 Open the door and place the food on the center of the rack. Close the door. Press Start to start the cycle. When the time has elapsed, the end signal will sound and the Countertop Oven will shut off automatically. CARE AND CLEANING NOTE: Allow the - KitchenAid KCO128BM | Owners Manual - Page 16
TROUBLESHOOTING GUIDE WARNING Electrical Shock Hazard Plug into a grounded 3 prong outlet. Do not remove ground prong. Do not use an adapter. Do not use an extension cord. Failure to follow these instructions can result in death, fire, or electrical shock. PROBLEM "Warranty and Service" sections. - KitchenAid KCO128BM | Owners Manual - Page 17
family use or use inconsistent with product instructions and manuals. B. Defects or damage resulting from accident, alteration, misuse, abuse, fire flood, or acts of God. C. Any shipping or handling costs to deliver your product to an Authorized Service Center. D. Replacement parts or repair labor - KitchenAid KCO128BM | Owners Manual - Page 18
local KitchenAid dealer or the store where you purchased the product for information on how to obtain service. For service information in Canada: Call toll-free 1-800-807-6777. For service information in Mexico: Call toll-free 01-800-0022-767. ®/™ ©2023 KitchenAid. All rights reserved. Used under - KitchenAid KCO128BM | Owners Manual - Page 19
PIÈCES ET CARACTÉRISTIQUES 3 8 FRANÇAIS 4 5 6 9 2 1 7 10 11 12 14 15 16 17 18 1 Hublot en verre trempé 2 Ramasse-miettes amovible 3 Surface de refroidissement pour grille amovible du four 4 Grille de cuisson au gril en acier chromé 5 Plateau émaillé 6 Grille en acier chromé du four 7 Poign - KitchenAid KCO128BM | Owners Manual - Page 20
être observées, incluant les suivantes : 1. Lire toutes les instructions. Une mauvaise utilisation de l'appareil peut causer des blessures. 2. Ne il est endommagé d'une quelconque façon. Retourner l'appareil au centre de service agréé le plus proche pour examen, réparation ou réglage électrique ou - KitchenAid KCO128BM | Owners Manual - Page 21
un adaptateur. Ne pas utiliser un câble de rallonge. Le non-respect de ces instructions peut causer un décès, un incendie ou un choc électrique. Tension : ~ 120 de l'appareil électroménager par un électricien ou un technicien de service qualifié. Le cordon doit être disposé de sorte qu'il ne - KitchenAid KCO128BM | Owners Manual - Page 22
pas enlever la broche de liaison à la terre. Ne pas utiliser un adaptateur. Ne pas utiliser un câble de rallonge. Le non-respect de ces instructions peut causer un décès, un incendie ou un choc électrique. Brancher l'appareil sur une prise à 3 alvéoles reliée à la terre. Ce four grille-pain est - KitchenAid KCO128BM | Owners Manual - Page 23
avant chaque cuisson d'aliments. Très peu d'huile est nécessaire. Le résultat peut varier selon les différentes marques et épaisseurs d'aliments. Suivre les instructions de cuisson au four grille-pain indiquées au dos de l'emballage des aliments et réduire la durée de cuisson. ASTUCE : Lors de la - KitchenAid KCO128BM | Owners Manual - Page 24
FONCTIONS DE CUISSON FONCTION DE CUISSON Dehydrate (déshydrata- tion) Proof (faire lever) POSITION DE GRILLE RECOMMAN- DÉE Upper/Lower (supérieur/ inférieur) Lower (inférieur) PRÉRÉGLER LA TEMPÉRA- TURE °F (°C) 150 °F (66 °C) 90 °F (32 °C) Air Fry (friture à air) Lower (inférieur) 400 °F (205 - KitchenAid KCO128BM | Owners Manual - Page 25
FRANÇAIS POSITION DE LA GRILLE DU FOUR GRILLE-PAIN Position de la grille inférieure pour la Air Fry (friture à air), Bake (la cuisson au four), la Dehydrate (déshydratation), Keep Warm (le maintien au chaud), Pizza (la pizza), Proof (l'étuvage), Reheat (le réchauffage) Position de la grille supé - KitchenAid KCO128BM | Owners Manual - Page 26
UTILISER LA FONCTION DEHYDRATE (DÉSHYDRATER) 3 IMPORTANT : Toujours utiliser des gants isolants lors du retrait des plateaux ou des grilles. Lorsque le temps s'est complètement écoulé, le signal de fin retentit et la Friteuse à Air s'éteint par elle-même. UTILISER LA FONCTION PROOF (LEVÉE) La - KitchenAid KCO128BM | Owners Manual - Page 27
peuvent varier en fonction de la pâte, des ingrédients et de la marque. Pour les pizzas Surgelées, il est recommandé de suivre les instructions de température et de temps de cuisson indiquées sur l'emballage de l'aliment. • Les pizzas à croûte mince, à croûte levante ou à croûte - KitchenAid KCO128BM | Owners Manual - Page 28
UTILISER LA FONCTION TOAST (GRILLAGE) DE BAGEL Au mode Toast (grille-pain), le four répartit la puissance de cuisson entre les éléments de chauffage supérieur et inférieur afin de maintenir la température de four souhaitée. Au mode Bagel, le four répartit la puissance de cuisson entre les éléments - KitchenAid KCO128BM | Owners Manual - Page 29
FRANÇAIS UTILISER LA FONCTION AIR FRY (FRITURE À AIR) 2 3 Ouvrir la porte et placer les aliments au centre de la grille. Fermer la porte. Appuyer sur "Start" (mise en marche) pour mettre en marche le programme. Lorsque le temps s'est complètement écoulé, le signal de fin retenti et le Four - KitchenAid KCO128BM | Owners Manual - Page 30
), le four répartit la puissance de cuisson entre les 1 éléments de chauffage supérieur et inférieur afin d'amener les aliments à la température de service. Le ventilateur de convection peut ÊTRE MIS EN MARCHE et ÉTEINT en appuyant sur le bouton Convection. Placer le bouton de Mode sur Reheat - KitchenAid KCO128BM | Owners Manual - Page 31
Risque d'empoisonnement alimentaire Ne pas laisser des aliments dans un four plus d'une heure avant ou après la cuisson. Le non-respect de cette instruction peut causer un empoisonnement alimentaire ou une maladie. Au mode Keep Warm (maintien au chaud), le four répartit la puissance de cuisson aux - KitchenAid KCO128BM | Owners Manual - Page 32
UTILISER LA FONCTION KEEP WARM (MAINTIEN AU CHAUD) 2 3 Ouvrir la porte et placer les aliments au centre de la grille. Fermer la porte. Appuyer sur "Start" (mise en marche) pour mettre en marche le programme. Lorsque le temps s'est complètement écoulé, le signal de fin retenti et le Four Grille- - KitchenAid KCO128BM | Owners Manual - Page 33
surfaces sont bien sèches avant l'utilisation. GUIDE DE DÉPANNAGE AVERTISSEMENT Risque de choc électrique de rallonge. Le non-respect de ces instructions peut causer un décès, un incendie ou un service ». Ne pas renvoyer le four grille-pain au détaillant - les détaillants n'offrent pas de service - KitchenAid KCO128BM | Owners Manual - Page 34
commercial, non résidentiel ou par plusieurs familles, ou nonrespect des instructions et manuels qui accompagnent le produit. B. Les défaillances ou ne sont pas d'origine ou d'un tiers; cependant, l'utilisation de fournisseurs de services non autorisés ou de pièces qui ne sont pas d'origine ou de - KitchenAid KCO128BM | Owners Manual - Page 35
FRANÇAIS GARANTIE LIMITÉE ET SERVICE GARANTIE DE REMPLACEMENT SANS DIFFICULTÉ POUR LES 50 ÉTATS ET DES PIÈCES DE RECHANGE Aux États-Unis et à Porto Rico : Pour des informations sur le service de dépannage ou pour commander des accessoires ou des pièces de rechange, composer le numéro sans frais - KitchenAid KCO128BM | Owners Manual - Page 36
PIEZAS Y CARACTERÍSTICAS 3 8 4 5 6 9 2 1 7 10 11 12 14 15 16 17 18 1 Ventana de vidrio reforzado 2 Bandeja para migas removible 3 Superficie de enfriamiento para la parrilla extraíble del horno 4 Parrilla asadora de acero cromado 5 Recipiente esmaltado 6 Parrilla del horno de acero cromado - KitchenAid KCO128BM | Owners Manual - Page 37
SEGURIDAD DEL PRODUCTO ESPAÑOL MEDIDAS DE PRECAUCIÓN IMPORTANTES Al utilizar electrodomésticos eléctricos, se deben seguir las precauciones básicas de seguridad, entre las que se incluyen las siguientes: 1. Lea todas las instrucciones. El uso indebido de un electrodoméstico puede dar como - KitchenAid KCO128BM | Owners Manual - Page 38
SEGURIDAD DEL PRODUCTO 11. No deben insertarse en un Horno para mostrador alimentos demasiado grandes ni utensilios de metal, ya que pueden constituir un riesgo de incendio o de choque eléctrico. 12. Puede ocurrir un incendio si se cubre el Horno para mostrador con un material inflamable o si éste - KitchenAid KCO128BM | Owners Manual - Page 39
ESPAÑOL INTRODUCCIÓN Antes del primer uso, limpie todas las piezas y accesorios (consulte la sección "Cuidado y limpieza"). Coloque el horno para mostrador en una superficie seca, plana y nivelada. Quite todos los materiales de empaque y las etiquetas, si los hay. 1 2 Asegúrese de que todos los - KitchenAid KCO128BM | Owners Manual - Page 40
INTRODUCCIÓN RECOMENDACIONES DE TIEMPO: FUNCIÓN FREÍDO SIN ACEITE ALIMENTOS Croquetas de pollo Frituras de pollo Alitas de pollo Filetes de pescado Palitos de pescado Papas fritas a la francesa Palitos de mozzarella Taquitos PORCIÓN 1 capa 1 capa 1 capa 1 capa 1 capa 1 capa 1 capa 1 capa - KitchenAid KCO128BM | Owners Manual - Page 41
ESPAÑOL FUNCIONES DE COCCIÓN FUNCIÓN DE COCCIÓN Dehydrate (deshidratar) Proof (leudar) Air Fry (freir sin aceite) Bake (hornear) Broil (asar a la parrilla) Reheat (Recalentar) Keep Warm (Mantener caliente) Frozen Pizza (Pizza congelada) Fresh Pizza (Pizza fresca) POSICIÓN RECOMENDADA DE LA - KitchenAid KCO128BM | Owners Manual - Page 42
POSICIÓN DE LA REJILLA DEL HORNO PARA MOSTRADOR Posición inferior de la rejilla para Freír sin aceite, Hornear, Deshidratar, Mantener caliente, Pizza, Leudar, Recalentar Posición superior de la rejilla para Asar a la parrilla, Deshidratar USO DE LA FUNCIÓN DEHYDRATE (DESHIDRATAR) La opción - KitchenAid KCO128BM | Owners Manual - Page 43
ESPAÑOL USO DE LA FUNCIÓN DEHYDRATE (DESHIDRATAR) 3 IMPORTANTE: Use siempre guantes de cocina al extraer las bandejas o parrillas. Cuando haya pasado el tiempo, sonará la señal de término y la Freidora sin aceite se apagará automáticamente. USO DE LA FUNCIÓN PROOF (LEUDAR) La función Proof ( - KitchenAid KCO128BM | Owners Manual - Page 44
USO DE LA FUNCIÓN PIZZA (CONGELADA/FRESCA (CONGELADA/FRESCA)) La función Pizza distribuye la potencia entre las resistencias superior e inferior para mantener la temperatura deseada del Horno para cocinar Pizza Casera o Congelada. 1 2 Ponga la Perilla de modos en Pizza. El modo predeterminado es - KitchenAid KCO128BM | Owners Manual - Page 45
USO DE LA FUNCIÓN TOAST OR BAGEL (TOSTAR O ROSCA) En el modo Toast (Tostar), el horno distribuye la potencia entre los calentadores superior e inferior para mantener la temperatura deseada. En el modo Bagel (Rosca), el horno distribuye la potencia entre los calentadores superior e inferior para - KitchenAid KCO128BM | Owners Manual - Page 46
USO DE LA FUNCIÓN AIR FRY (FREÍDO SIN ACEITE) 2 3 Abra la puerta y coloque los alimentos en el centro de la parrilla. Cierre la puerta. Presione "Start" (Inicio) para iniciar el ciclo. Cuando haya pasado el tiempo, sonará la señal de término y el Horno para Mostrador se apagará automáticamente. - KitchenAid KCO128BM | Owners Manual - Page 47
USO DE LA FUNCIÓN BROIL (ASAR) Cuando se seleccione la función Broil (Asar), solamente se calentarán los elementos 1 superiores. Use la bandeja de asar a la parrilla incluida directamente sobre la rejilla del horno para conseguir un dorado uniforme y una limpieza fácil. La bandeja de asar a - KitchenAid KCO128BM | Owners Manual - Page 48
USO DE LA FUNCIÓN REHEAT (RECALENTAR) 2 3 Abra la puerta y coloque los alimentos en el centro de la parrilla. Cierre la puerta. Presione "Start" (Inicio) para iniciar el ciclo. Cuando haya pasado el tiempo, sonará la señal de término y el Horno para Mostrador se apagará automáticamente. USO DE - KitchenAid KCO128BM | Owners Manual - Page 49
USO DE LA FUNCIÓN KEEP WARM (MANTENER CALIENTE) 2 3 ESPAÑOL Abra la puerta y coloque los alimentos en el centro de la parrilla. Cierre la puerta. Presione "Start" (Inicio) para iniciar el ciclo. Cuando haya pasado el tiempo, sonará la señal de término y el Horno para Mostrador se apagará autom - KitchenAid KCO128BM | Owners Manual - Page 50
GUÍA DE SOLUCIÓN DE PROBLEMAS ADVERTENCIA Peligro de Choque Eléctrico Conecte a un contacto de pared de conexión a tierra de 3 terminales. No quite la terminal de conexión a tierra. No use un adaptador. No use un cable eléctrico de extensión. No seguir estas instrucciones puede ocasionar la muerte, - KitchenAid KCO128BM | Owners Manual - Page 51
cubierto por esta garantía limitada): A. Uso comercial, no residencial o familiar múltiple o uso diferente del indicado en las instrucciones y manuales del producto. B. Defectos o daños causados por accidente, uso indebido, abuso, alteración incendio, inundación, actos fortuitos. C. Cualquier gasto - KitchenAid KCO128BM | Owners Manual - Page 52
GARANTÍA LIMITADA Y SERVICIO GARANTÍA DE REEMPLAZO SIN DIFICULTADES: EN LOS 50 ESTADOS DE LOS ESTADOS UNIDOS, EL DISTRITO DE COLUMBIA Y PUERTO RICO Confiamos tanto en que la calidad de nuestros productos cumple con las exigentes normas de KitchenAid que, si el producto presentara alguna falla - KitchenAid KCO128BM | Owners Manual - Page 53
W5W114106760636C5B.in.inddbd 6353 7/19/2023 5:22:55 PM - KitchenAid KCO128BM | Owners Manual - Page 54
5W11670365B.indd 54 7/19/2023 5:22:55 PM - KitchenAid KCO128BM | Owners Manual - Page 55
5W11670365B.indd 55 7/19/2023 5:22:55 PM - KitchenAid KCO128BM | Owners Manual - Page 56
DISCOVER MORE. DÉCOUVREZ PLUS. DESCUBRA MÁS. KITCHENAID.COM/QUICKSTART PRODUCT QUESTIONS OR RETURNS QUESTIONS SUR LE PRODUIT OU LES RETOURS PREGUNTAS SOBRE EL PRODUCTO O DEVOLUCIÓNES USA: 1.800.541.6390 | KitchenAid.com CANADA: 1.800.807.6777 | KitchenAid.ca MEXICO: KitchenAid.com.mx LATIN AMERICA:
-
 1
1 -
 2
2 -
 3
3 -
 4
4 -
 5
5 -
 6
6 -
 7
7 -
8
-
9
-
10
-
11
-
12
-
13
-
14
-
15
-
16
-
17
-
18
-
19
-
20
-
21
-
22
-
23
-
24
-
25
-
26
-
27
-
28
-
29
-
30
-
31
-
32
-
33
-
34
-
35
-
36
-
37
-
38
-
39
-
40
-
41
-
42
-
43
-
44
-
45
-
46
-
47
-
48
-
49
-
50
-
51
-
52
-
53
-
54
-
55
-
56
 |
 |
KCO128
Countertop Oven
Horno para mostrador
Four grille-pain
W11670365B.indd
1
W11670365B.indd
1
7/19/2023
5:22:18 PM
7/19/2023
5:22:18 PM