KitchenAid KDFE104HBL Owners Manual - Page 7
STEP 3, Add Rinse Aid, Filling the dispenser, Rinse Aid Setting, To adjust the setting, STEP 4,
 |
View all KitchenAid KDFE104HBL manuals
Add to My Manuals
Save this manual to your list of manuals |
Page 7 highlights
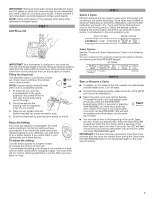
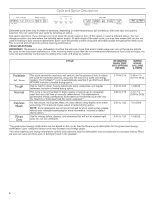
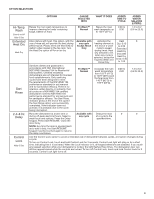
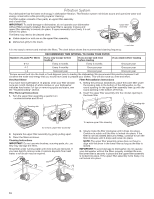
IMPORTANT: Extremely hard water mineral deposits (15 grains per U.S. gallon or more) can cause damage to your dishwasher and make it difficult to achieve good results. A water softener is recommended to avoid damage and achieve good results. NOTE: Follow instructions on the package when using other dishwasher detergent types. STEP 3 Add Rinse Aid STEP 4 Select a Cycle Efficient dishwashers run longer to save water and energy, just as driving a car slower saves gas. Cycle times may increase or decrease depending on selections. Estimated cycle times after calibration are listed in the "Cycle and Option Descriptions" chart in the following section. Select the desired cycle by pressing the Cycles button. Each time you press the Cycles button, it will advance to the next available cycle. SLIDE IMPORTANT: Your dishwasher is designed to use rinse aid. The use of rinse aid greatly improves drying by allowing water to drain from the dishes after the final rinse. Rinse aid also keeps water from forming droplets that can dry as spots or streaks. Filling the dispenser The dispenser holds 5 oz (150 mL) of rinse aid. Under most conditions, this will last Full one to three months. NOTE: Indicator reads correct fill level when door is completely opened. Add 1. To add rinse aid, open the rinse dispenser lid by gently pushing in the center of the lid with your thumb and pulling up on the edge. Pre Wash SLIDE OPEN 2. Pour rinse aid into the opening until the dispenser is full. Do not overfill. 3. Clean up any spilled rinse aid. Spilled rinse aid can create excessive suds. 4. Close the dispenser by pushing down gently on the lid. Rinse Aid Setting Your rinse aid dispenser is adjustable. For most water conditions, the factory setting will give good results. If you have hard water and notice calcium buildup on your dishware, you may want to try a higher setting. If you notice foam in your dishwasher, use a lower setting. To adjust the setting: Turn the arrow adjuster to a higher number to increase the amount of rinse aid. If you change the setting only change it one number at a time and run a few cycles before changing it again. Too much rinse aid can reduce cleaning performance and too little may leave spots or rings. Select Options See the "Cycle and Option Descriptions" chart in the following section. You can customize the cycles by selecting the options desired and pressing the Start/RESUME keypad. STEP 5 Start or Resume a Cycle ■■ If needed, run hot water at the sink nearest your dishwasher until the water is hot. Turn off water. ■■ For best dish washing results, water should be 120ºF (49ºC) as it enters the dishwasher. ■■ Select the wash cycle and options desired. To repeat the same cycle and options used previously, press the Start/RESUME keypad twice. Within 4 seconds of pressing Start/RESUME, you must firmly push the door closed. If the door is not closed within 4 seconds, the Start/RESUME LED will flash an audible tone will be heard, and the cycle will not start. ■■ You can add an item at the beginning of the cycle. Open the door slowly and add the item. Press the Start/RESUME keypad and close the door firmly within 4 seconds. If the door has been open more than 4 seconds, the LED will flash a tone will sound and the dishwasher will not resume unless you press Start/RESUME again. IMPORTANT: If the door has been opened for more than a few seconds after the cycle has started (even during the Delay time), the Start/RESUME button must be pressed again or the cycle will not resume. 7
-
 1
1 -
 2
2 -
 3
3 -
 4
4 -
 5
5 -
 6
6 -
 7
7 -
 8
8 -
 9
9 -
 10
10 -
 11
11 -
 12
12 -
13
-
14
-
15
-
16
-
17
-
18
-
19
-
20
-
21
-
22
-
23
-
24
-
25
-
26
-
27
-
28
-
29
-
30
-
31
-
32
-
33
-
34
-
35
-
36
-
37
-
38
-
39
-
40
-
41
-
42
-
43
-
44
-
45
-
46
-
47
-
48
-
49
-
50
-
51
-
52
-
53
-
54
-
55
-
56
-
57
-
58
-
59
 |
 |
