KitchenAid KDRS807SSS Installation Guide - Page 11
Install Anti-Tip Bracket, Remove Warming Drawer
 |
UPC - 883049027555
View all KitchenAid KDRS807SSS manuals
Add to My Manuals
Save this manual to your list of manuals |
Page 11 highlights
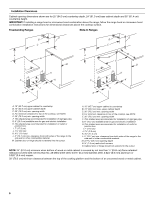
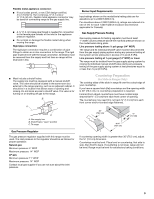
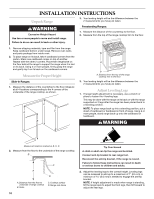
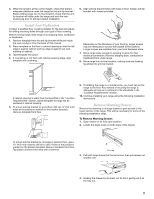
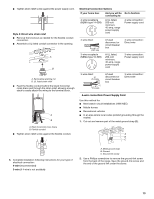
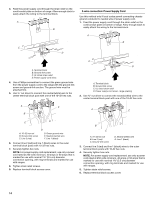
3. When the range is at the correct height, check that there is adequate clearance under the range for the anti-tip bracket. Before sliding range into its final location, check that the antitip bracket will slide under the range and onto the rear leveling leg prior to anti-tip bracket installation. 6. Align anti-tip bracket holes with holes in floor. Fasten anti-tip bracket with screws provided. Install Anti-Tip Bracket Contact a qualified floor covering installer for the best procedure for drilling mounting holes through your type of floor covering. Before moving range, slide range onto shipping base, cardboard or hardboard. 1. Remove template from the anti-tip bracket kit (found inside the oven cavity) or from the back of this manual. 2. Place template on the floor in cabinet opening so that the left edge is against cabinet and top edge is against rear wall, molding or cabinet. 3. Tape template into place. 4. If countertop is not flush with cabinet opening edge, align template with overhang. Depending on the thickness of your flooring, longer screws may be necessary to anchor the bracket to the subfloor. Longer screws are available from your local hardware store. 7. Move range close enough to opening to allow for final electrical connection. Remove shipping base, cardboard or hardboard from under range. 8. Move range into its final location, making sure rear leveling leg slides into anti-tip bracket. If cabinet opening is wider than that specified in the "Location Requirements" section, adjust template so range will be centered in cabinet opening. 5. To mount anti-tip bracket to wood floor, drill two ¹⁄₈" (3.2 mm) holes at the positions marked on the bracket template. Remove template from floor. 9. If installing the range in a mobile home, you must secure the range to the floor. Any method of securing the range is adequate as long as it conforms to the standards in the "Location Requirements" section. 10. Continue installing your range using the following installation instructions. Remove Warming Drawer Remove the warming or storage drawer to gain access to the lower section of the range. This will be necessary for some of the following installation steps. To Remove Warming Drawer: 1. Open drawer to its fully open position. 2. Locate the black loops on both sides of the drawer. To mount anti-tip bracket to concrete or ceramic floor, use a 4.8 mm) masonry drill bit to drill 2 holes at the positions marked on the bracket template. Remove template from floor. Tap plastic anchors into holes with a hammer. A A. Loop 3. Pull both loops forward at the same time, then pull drawer out another inch. 4. Holding the drawer by its sides, not its front, gently pull it all the way out. 11
-
 1
1 -
2
-
3
-
4
-
5
-
 6
6 -
 7
7 -
 8
8 -
 9
9 -
 10
10 -
 11
11 -
 12
12 -
 13
13 -
 14
14 -
 15
15 -
 16
16 -
17
-
18
-
19
-
20
-
21
-
22
-
23
-
24
-
25
-
26
-
27
-
28
-
29
-
30
-
31
-
32
-
33
-
34
-
35
-
36
-
37
-
38
-
39
-
40
 |
 |
