KitchenAid KEHU309SSS Microwave Use and Care - Page 7
Microwave Oven Control - manual
 |
UPC - 883049035307
View all KitchenAid KEHU309SSS manuals
Add to My Manuals
Save this manual to your list of manuals |
Page 7 highlights
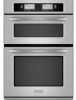
MICROWAVE OVEN CONTROL This manual covers different models. The oven you have purchased may have some or all of the items listed. The locations and appearances of the items shown here may not match those of your model. The microwave oven's controls are accessed through its control panel and interactive touch display. NOTE: Due to the sensitivity of the control panel, we have provided special instructions for cleaning the panel as well as the touch screen display. See "General Cleaning" section for cleaning instructions. Control Panel Add a Minute A. Control panel B. Lower oven controls (see separate Use and Care Guide) C. Number keys D. Start/control lock (hold 5 seconds) E. Off F. Timer Set/Off G. Interactive touch display H. Clear I. Clock Control Panel The control panel houses the control menu and function controls. The control pads are very sensitive, and require only a light touch to activate. For more information about the individual controls, see their respective sections in this manual. When the oven(s) are not in use (sleep mode), the display shows the time of day, if is set to be displayed. On the combination oven the time of day will appear in the right display. To turn the clock display on/off, see the "Clock" section. During programming, the display shows menus and the appropriate selections for the respective cooking function. To view the main menu screens, see the "Main Menu" section. Interactive Touch Display The display area functions as both a display and an interactive, menu-driven touch control. It is designed to be easily navigable, guiding you through the menus, offering multiple selections, accepting your input and executing your commands. It also provides instructions, tips, and graphics. Touch Screen The LCD touch screen is used to make menu selections, adjust settings and input commands. A Display When power is first supplied to the microwave oven or, when power has been interrupted for more than 10 seconds, the clock will be set to 12:00 P.M. To set the time, follow the instructions in the "Clock" section. To bypass setting the clock and begin using the oven, touch Start, Off or Clear. On combination oven models, the left display shows the lower oven and the right display shows the upper microwave oven. When the oven(s) are in use (active mode), the display shows the oven temperature, heat source(s) and timer, if set. The main menu display may display "Fan Cooling" after the end of a cooking cycle. The oven cavity fan is used to vent humidity and/or heat from the oven cavity and may continue to run for 5-10 minutes after a cooking cycle has ended. The microwave may be used as normal during this cooling period. Food can be removed or placed in the microwave during this time. After approximately 2 minutes of inactivity, the display will go into standby (sleep) mode. When the oven is in operation, the display will remain active. B C A. Title/description region B. Menu and selection/settings input region C. Command input region Menu selections and input adjustments are made in the center portion of the screen, and the command inputs (OK, Adjust Settings, Browning, Back, Exit, etc.) are made in the bottom portion of the screen. Screen titles and descriptions are displayed in the top portion of the screen, which accepts no input. A light- to medium-pressure touch of the fingertip will activate the menu selection. 7
-
 1
1 -
 2
2 -
 3
3 -
 4
4 -
 5
5 -
 6
6 -
 7
7 -
 8
8 -
 9
9 -
 10
10 -
 11
11 -
 12
12 -
13
-
14
-
15
-
16
-
17
-
18
-
19
-
20
-
21
-
22
-
23
-
24
-
25
-
26
-
27
-
28
-
29
-
30
-
31
-
32
-
33
-
34
-
35
-
36
-
37
-
38
-
39
-
40
-
41
-
42
-
43
-
44
-
45
-
46
-
47
-
48
-
49
-
50
-
51
-
52
-
53
-
54
-
55
-
56
 |
 |
