KitchenAid KERS807SWW User Guide - Page 11
Electronic Control Pads, Oven Displays, Start, Control Lock, Clock/Timer Display
 |
UPC - 883049027043
View all KitchenAid KERS807SWW manuals
Add to My Manuals
Save this manual to your list of manuals |
Page 11 highlights
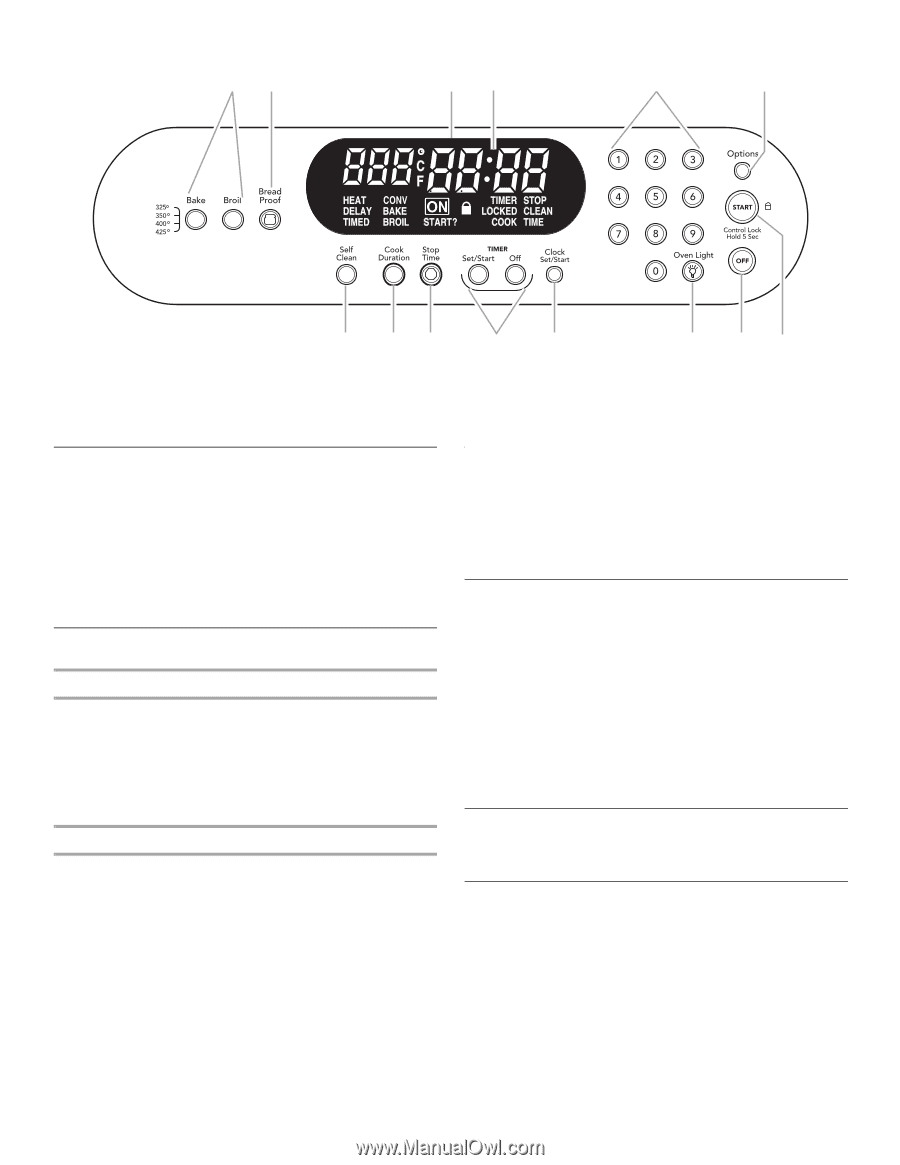
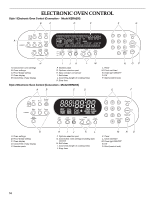
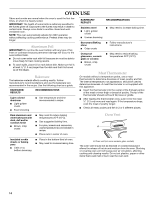
Style 3 Electronic Oven Control (Non-Convection - Model KERI201) AB CD E F A. Oven settings B. Proof bread setting C. Oven display D. Clock/time of day display E. Number pads G HI J K F. Options selection pad G. Self-clean H. Cook time (length of cooking time) I. Stop time L MN J. Timer K. Clock set/start L. Oven light ON/OFF M. Off N. Start (control lock) Electronic Control Pads When pressing any control pad function on the Electronic Oven Control, use the pad of your finger to press the desired function. Hold down the pad a few seconds, or until the desired function appears in the display. When entering multiple functions within one setting, pause briefly between each control pad command. If a command pad is pressed several times repeatedly, the pad may briefly stop working. Wait a few seconds, and the pad should function again as normal. Oven Displays Style 1 Electronic Oven Control When the oven is in use, this display shows the oven temperature, heat source(s) and start time. During Timed Cooking, this display also shows a timed countdown and the stop time (if entered). If 3 beeps sound, an invalid pad was pressed. Press OFF and retry your entry. When the oven is not in use, only the time of day is shown on the display. Styles 2 and 3 Electronic Oven Controls When the oven is in use, this display shows the oven temperature. During Timed Cooking, this display also shows a timed countdown. If 3 beeps sound, an invalid pad was pressed. Press OFF and retry your entry. When the oven is not in use, only the time of day is shown on the display. Start The START pad begins any oven function except the Timer and Sabbath Mode. If not pressed within 5 seconds after pressing a pad, "START?" will appear on the oven display as a reminder. If not pressed within 5 minutes after pressing a pad, the oven display will return to inactive mode (time of day) and the programmed function will be canceled. Control Lock The Control Lock shuts down the control panel pads to avert unintended use of the oven. The Control Lock is preset unlocked, but can be locked. When the control is locked, only the TIMER SET/START, TIMER OFF, CLOCK SET/START and OVEN LIGHT pads will function. On models with electronic oven control Style 1, the time of day and the timer can be set. To Lock/Unlock Control: Before locking, make sure the oven, the Timer and Timed Cooking are off. Press and hold the START pad for 5 seconds until "LOC" or "CONTROL LOCKED" appears on the display. Repeat to unlock and remove "LOC" or "CONTROL LOCKED" from the display. Off The OFF pad stops any oven function except for the Clock, Timer and Control Lock. Clock/Timer Display This is a 12-hour clock. 1. Press CLOCK SET/START or START. 2. Press number pads to set time of day. 3. Press CLOCK SET/START or START. 11
-
 1
1 -
2
-
3
-
4
-
5
-
 6
6 -
 7
7 -
 8
8 -
 9
9 -
 10
10 -
 11
11 -
 12
12 -
 13
13 -
 14
14 -
 15
15 -
 16
16 -
17
-
18
-
19
-
20
-
21
-
22
-
23
-
24
-
25
-
26
-
27
-
28
 |
 |