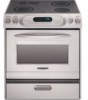
KitchenAid KESA907PSS Use and Care Guide
KitchenAid KESA907PSS - ARCHITECT Series: 30'' Slide-In Electric Range Manual
 |
View all KitchenAid KESA907PSS manuals
Add to My Manuals
Save this manual to your list of manuals |
KitchenAid KESA907PSS manual content summary:
- KitchenAid KESA907PSS | Use and Care Guide - Page 1
o ELECTRIC RANGE PRO LINE™ SERIES AND ARCHITECT® SERIES Use & Care Guide For questions about features, operation/performance, parts, accessories or service, call: 1-800-422-1230 In Canada, call for assistance 1-800-461-5681, for installation and service, call: 1-800-807-6777 or visit our website at - KitchenAid KESA907PSS | Use and Care Guide - Page 2
Broil 23 Convect Full Meal 23 Sabbath Mode 24 Proofing Bread 24 Timed Cooking 25 Warming Drawer 25 RANGE CARE 26 Self-Cleaning Cycle 26 General Cleaning 27 Oven Light(s 28 Storage Drawer 29 Oven Door 29 Warming Drawer 29 TROUBLESHOOTING 30 ASSISTANCE OR SERVICE 31 WARRANTY 32 2 - KitchenAid KESA907PSS | Use and Care Guide - Page 3
to follow these instructions can result in death or serious burns to children and adults. Anti-Tip Bracket Range Foot Making sure the anti-tip bracket is installed: • Slide range forward. • Look for the anti-tip bracket securely attached to floor. • Slide range back so rear range foot is under - KitchenAid KESA907PSS | Use and Care Guide - Page 4
burner during cooking may subject wiring or manual. Improper installation of these liners may result in a risk of electric shock, or fire. s Glazed Cooking Utensils - Only certain types of glass, glass/ceramic, ceramic, earthenware, or other glazed utensils are suitable for range-top service - KitchenAid KESA907PSS | Use and Care Guide - Page 5
IMPORTANT SAFETY INSTRUCTIONS s Keep Oven Vent Ducts Unobstructed. For self-cleaning ranges - s Placement of Oven Racks - should be used in or around any part of the oven. elements may be hot even though they are dark in s Clean Only Parts Listed in Manual. color. Interior surfaces of an oven - KitchenAid KESA907PSS | Use and Care Guide - Page 6
PARTS AND FEATURES This manual covers several different models. The range you have purchased may have some or all of the items listed. The locations and appearances of the features shown here may not match those of your model. Control Panel for Electronic Touch Activated System (Models KESV908 and - KitchenAid KESA907PSS | Use and Care Guide - Page 7
of drawer) F. Warming Drawer G. Dual-Size Element H. Ceramic Surface Cooking Area I. Electronic Cooktop Touch Controls J. Oven Control Panel K. Automatic Oven Light L. Door Gasket M. Broil Element (not shown) N. CleanBake™ Element (not shown) Parts and Features not shown (on some models) Ceramic - KitchenAid KESA907PSS | Use and Care Guide - Page 8
Cooking Area H. Selectable Simmer Feature (available on left rear on some models) I. Hot Surface Indicator Lights J. Control Panel K. Automatic Oven Light L. Door Gasket M. Broil Element (not shown) N. CleanBake™ Element (not shown) Parts marks. s Do not slide cookware or bakeware across the - KitchenAid KESA907PSS | Use and Care Guide - Page 9
instructions. s Use on low heat settings. Porcelain enamel- s See stainless steel or cast iron. on-steel or cast iron Stainless steel stainless steel provides even heating. Home Canning When canning for long periods, alternate the use of surface cooking areas, elements or surface burners - KitchenAid KESA907PSS | Use and Care Guide - Page 10
surface cooking area(s) off individually, or touch ALL OFF to turn all elements off at the same time. Use the following chart as a guide when s Stew or steam food. LO-3 [SIMMER] s Simmer (range of simmer temperatures) KEEP WARM s Keep cooked foods warm. MELT & HOLD s Melt chocolate or butter. - KitchenAid KESA907PSS | Use and Care Guide - Page 11
cooking, touch ON/OFF to turn surface cooking area off. Use the following chart as a guide operation without affecting cooking performance. To Use: 1. The cooktop control can be set s Cook soups, sauces and gravies. MED-LO s Stew or steam food. LO [SIMMER] s Simmer (range of simmer temperatures - KitchenAid KESA907PSS | Use and Care Guide - Page 12
is available on all cooking elements. It has an adjustable heat setting for more precise simmer control. Three levels of simmer guide when setting heat levels. SETTING RECOMMENDED USE LO s Water-based foods such as chicken noodle soup. s Bringing water to boil. s Cooking with a lid. s Cooking - KitchenAid KESA907PSS | Use and Care Guide - Page 13
area is too hot to touch, even after the surface cooking area(s) is turned off. SETTING SIMMER Switch (on some models) WARM ZONE Element Switch RECOMMENDED USE s Precise simmer control. s Keep cooked foods warm. HOT SURFACE REMEMBER: When range is in use or (on some models) during the Self - KitchenAid KESA907PSS | Use and Care Guide - Page 14
or elements. When the Simmer feature is not on, the right front surface cooking areas or elements will function as usual. When this feature is on, the wattage to the burner is significantly reduced. It provides a wide range of temperatures for simmering. Choose from the higher levels for stocks and - KitchenAid KESA907PSS | Use and Care Guide - Page 15
H Maxi Econo Bread 325˚ Bake Broil Broil Proof 350˚ 400˚ B 425˚ Full Bake Broil Roast Meal CONVECT A MED LOW HI ON F C CONTROL LOCKED CLEAN TIME PROBE TEMP HR MIN COOK TIME NIGHT LIGHT DELAY MIN HR AM PM SEC MIN START TIME STOP TIME Low Med High WARMING DRAWER On Off - KitchenAid KESA907PSS | Use and Care Guide - Page 16
the control panel pads to prevent unintended use of the oven. The Control Lock is preset unlocked, but can be locked. When the control is locked, only the TIMER SET/START and TIMER OFF pads will function. To Lock/Unlock Control: Before locking, make sure the oven, the Timer and Timed Cooking are - KitchenAid KESA907PSS | Use and Care Guide - Page 17
TIMER SET/START. Press again to switch from MIN/SEC and HR/MIN. able to move freely for best cooking results. s To catch spills, place a guide. Stainless steel s Light, golden crusts s Uneven browning s May need to increase baking time. Stoneware s Crisp crusts s Follow manufacturer's instructions - KitchenAid KESA907PSS | Use and Care Guide - Page 18
probe. Do not touch broil element. Failure to follow these instructions can result in burns. The temperature probe accurately measures the internal plug back in. Close the oven door and repeat previous steps. After cooking, unplug the probe and remove food from oven. The probe symbol will remain - KitchenAid KESA907PSS | Use and Care Guide - Page 19
edge, then lift out. Use the following illustration and charts as a guide. 5 4 3 2 1 BAKEWARE To cook food evenly, hot air must be able to circulate. Allow 1" (2.5 to keep it shiny and easy to slide. See the "General Cleaning" section in the Use and Care Guide for more information. To Use Oven Oven - KitchenAid KESA907PSS | Use and Care Guide - Page 20
3. Press OFF when finished cooking. Broil (Maxi/Econo on some models) s Use only the broiler pan and grid provided with the range. It is designed to control when cooking. The lower the temperature, the slower the cooking. Thicker cuts and unevenly shaped pieces of meat, fish and poultry may cook - KitchenAid KESA907PSS | Use and Care Guide - Page 21
cooked. To ensure optimal cooking results, the oven will prompt a food check at the end of a non-delayed cook time. Use the following chart as a guide number pads to enter a temperature other than 325°F (163°C). The convection bake range can be set between 170°F and 500°F (77°C and 260°C). 2. Press - KitchenAid KESA907PSS | Use and Care Guide - Page 22
the door is closed. s Reduce recipe temperature 25°F (14°C). The cook time may need to be reduced also. To Convection Roast: Before Press the number pads to enter a temperature other than 300°F (149°C). The convection roast range can be set between 170°F and 500°F (77°C and 260°C). 2. Press START. - KitchenAid KESA907PSS | Use and Care Guide - Page 23
a cook time or probe temperature. One pad is changeable to allow you to set your own cycle and save it for future use. Use the following chart as a guide. of the meat or main dish. Temperatures ranging from plus or minus 25°F to 50°F (14°C to 28°C) and cook times ranging from plus or minus 10 to 15 - KitchenAid KESA907PSS | Use and Care Guide - Page 24
the oven on for only part of the Sabbath. When the bake range can be set between 170°F and 500°F (77°C and 260°C). 2. Press COOK turn off. The oven control will remain Sabbath Mode compliant Untimed" section for instructions on placing the the recipe directions as a guide. To Proof: Before first - KitchenAid KESA907PSS | Use and Care Guide - Page 25
cooking spray. Follow the same placement, broiler pan and water and control steps above. Before baking, remove the plastic wrap. Timed Cooking pressing WARMING DRAWER additional times. Use the following chart as a guide when selecting a different temperature other than "Low." SETTINGS TEMPERATURES - KitchenAid KESA907PSS | Use and Care Guide - Page 26
as a guide. FOOD Chicken MED HI Soft Rolls LOW RANGE CARE Self-Cleaning Cycle (on some cycle. Failure to follow these instructions can result in burns. IMPORTANT: oven racks to keep them shiny and easy to slide. See "General Cleaning" section for more information. cooking performance. 26 - KitchenAid KESA907PSS | Use and Care Guide - Page 27
to heavy soil. Use the following chart as a guide to determine the desired cleaning level. CLEANING LEVEL TOTAL controls are off and the oven and cooktop are cool. Always follow label instructions damaging. s Stainless Steel Cleaner & Polish (sample included): See "Assistance or Service" section to - KitchenAid KESA907PSS | Use and Care Guide - Page 28
Service" to order panel. CONTROL PANEL Do not use abrasive cleaners, steel slide. If this happens, a light coating of vegetable oil applied to the rack guides will help them slide. s Steel steel-wool pad. s Oven cleaner: Follow product label instructions . 1. Unplug range or disconnect power. - KitchenAid KESA907PSS | Use and Care Guide - Page 29
drawer and pull out. To Replace: 1. Fit the ends of the drawer rails into the guides in the cavity. 2. Slide the drawer closed. To Replace: 1. Insert both hanger arms into the door. Oven Door For normal range use, it is not suggested to remove the oven door. However, if removal is necessary, make - KitchenAid KESA907PSS | Use and Care Guide - Page 30
the appliance. See the Installation Instructions. Oven will not operate s Is the electronic oven control set correctly? See "Electronic Oven Control" section. s Has a delay start been set? See "Timed Cooking" section. s On some models, is the Control Lock set? See "Control Lock" section. s On some - KitchenAid KESA907PSS | Use and Care Guide - Page 31
(stainless steel models) Order Part #4396095 Gourmet Griddle Order Part #4396096 Warming Drawer Pan (1/2 Size) (ceramic glass models) Order Part #8171421 Warming Drawer Pan (1/3 Size) (ceramic glass models) Order Part #8171422 In Canada For product related questions, please call the KitchenAid - KitchenAid KESA907PSS | Use and Care Guide - Page 32
materials or workmanship. Service must be provided by a KitchenAid designated service company. SECOND THROUGH FIFTH YEAR LIMITED WARRANTY ON ELECTRIC ELEMENTS, CERAMIC GLASS COOKTOP, GAS BURNERS, SOLID STATE TOUCH CONTROL SYSTEM, AND MAGNETRON TUBE On electric ranges and electric cooktops, in the
-
 1
1 -
 2
2 -
 3
3 -
 4
4 -
 5
5 -
 6
6 -
 7
7 -
8
-
9
-
10
-
11
-
12
-
13
-
14
-
15
-
16
-
17
-
18
-
19
-
20
-
21
-
22
-
23
-
24
-
25
-
26
-
27
-
28
-
29
-
30
-
31
-
32
 |
 |

o
Models KERA807 KESI901 KESA907 KESV908 YKESA907 YKERA807 YKESV908
9757451
ELECTRIC RANGE
PRO LINE™ SERIES AND ARCHITECT
®
SERIES
Use & Care Guide
For questions about features, operation/performance, parts, accessories or service, call:
1-800-422-1230
In Canada, call for assistance
1-800-461-5681
, for installation and service, call:
1-800-807-6777
or visit our website at...
www.kitchenaid.com
or
www.KitchenAid.ca
Table of Contents
............................................................................................................
2