KitchenAid KRFF507HPS Dispensing Guide - Page 2
WARNING, Dispenser Drip Tray, Inside Door Bins, Pizza Pocket and Drawer Divider - ice maker
 |
View all KitchenAid KRFF507HPS manuals
Add to My Manuals
Save this manual to your list of manuals |
Page 2 highlights
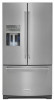
NOTE: The dispenser will automatically turn off Measured Fill after 1 minute of inactivity. When Measured Fill is turned off, any changes you have made will be lost and all defaults will be restored. WARNING 2. You can dispense water by the ounce, cup, or liter. The default unit is ounces. To switch to cups or liters, press the Light button. Default, minimum, and maximum volumes are listed below. Units Default Minimum Maximum Ounces 8 1 128 Cups 1 1/4 16 Cut Hazard Liters 0.25 0.05 4.00 3. Press the Lock and Options buttons to adjust the volume as desired. The Lock button increases the volume, and the Options button lowers the volume. When increasing or decreasing the dispense volumes, if an adjustment button (-/+) is held for approximately 10 seconds or longer the control may stop responding. Release the button for approximately 2 seconds and then continue making the adjustment. NOTE: Most coffee cups (commonly 4 to 6 oz [118 to 177 mL] per cup) are not the same size as a measuring cup (8 oz [237 mL]). You may need to adjust the volume to avoid unintentionally overfilling coffee cups. 4. To dispense water, press a sturdy glass against the water dispenser lever or place the glass below the water dispenser and press the Measured Fill button. Use a sturdy glass when dispensing ice. Failure to do so can result in cuts. 2. Press a sturdy glass against the ice dispenser paddle. Hold the glass close to the dispenser opening so ice does not fall outside of the glass. NOTE: When changing from crushed to cubed, a few ounces of crushed ice will be dispensed along with the first cubes. 3. Remove the glass to stop dispensing. Dispenser Drip Tray There is an insert in the dispenser drip tray. The insert can be removed from the drip tray to carry to the sink to empty or clean. Push down on the rear edge of the insert to tilt up the front edge for easy removal. NOTE: While dispensing water, the digital display will count down how much water remains to be dispensed, according to the volume you selected. The flow of water will automatically stop once the desired volume has been dispensed. 5. To stop dispensing before the selected volume has been dispensed, remove the glass from the dispenser lever or press the Measured Fill button a second time. NOTE: If you stop dispensing before the desired volume has been dispensed, the digital display will continue to show how Inside Door Bins much water remains to be dispensed. The display will turn off To remove and replace the bins: after 1 minute of inactivity. 1. Remove the bin by lifting it up and pulling it 6. To select a new volume or start dispensing the same volume straight out. again, you must first finish dispensing the selected volume, or turn off the Measured Fill feature (either by waiting 1 minute so it will automatically turn off or by pressing Ice Mode to manually turn it off) and then turn it back on. 2. Replace the bin by sliding it in above the desired support and pushing it down until it stops. TO DISPENSE ICE Ice dispenses from the ice maker storage bin. To turn off the ice maker, see "Ice Maker and Storage Bin" in the Owner's Manual. The dispenser may continue to make noise and ice may continue to dispense for several seconds after releasing the dispenser button or paddle. Pizza Pocket and Drawer Divider The drawer divider is not removable. For storage flexibility, the divider can be moved a few inches to either side allowing you to store larger items in one section of the freezer drawer. IMPORTANT: You do not need to apply a lot of pressure to the paddle to activate the ice dispenser. Pressing hard will not make the ice dispense faster or in greater quantities. 1. Press Ice Mode to select cubed ice (default) or crushed ice. The display screen indicates which type of ice is selected. IMPORTANT: If the ice cubes are hollow or have an irregular shape, it could be because of low water pressure. See "Water Supply Requirements" in the Owner's Manual. A. Drawer divider B. Pizza pocket 2
-
 1
1 -
 2
2 -
 3
3 -
 4
4 -
 5
5 -
 6
6 -
 7
7 -
 8
8 -
9
-
10
-
11
-
12
-
13
 |
 |
